Adding Audio Switch to a 2011 Expedition XL

Disclaimer: Links on this page pointing to Amazon, eBay and other sites may include affiliate code. If you click them and make a purchase, we may earn a small commission.

JimS

Member
Joined
Mar 22, 2017
Posts
10
Reaction score
8
Location
Milwaukee, WI
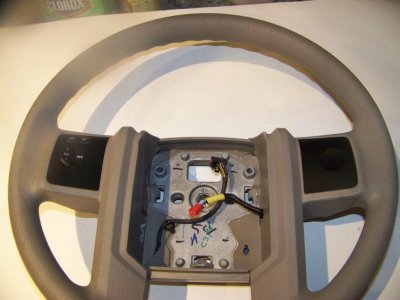
I have a 2011 Expedition XL with a blank plate where the stereo/audio controls on the steering wheel would go. I have an after market double din radio installed that can work with steering wheel controls with an interface adapter and would like to make use of this feature.

Has anyone done this themselves already?

I know I need part number 8L2Z9C888AB (the switch), but what else will be needed? Is a new clockspring needed? And what about the wiring? I've heard the wiring doesn't come with the switch or clockspring.

And, of course, how brutal is the installation process?
 
OP
OP
J

JimS

Member
Joined
Mar 22, 2017
Posts
10
Reaction score
8
Location
Milwaukee, WI
Finally figured it out. Here are the steps I followed:


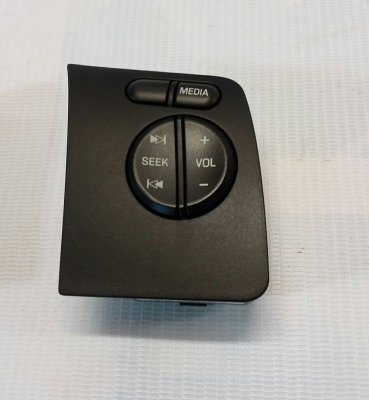
1) Got the RH redundant audio control switch for $40 on eBay. There are a few different RH switches out there, some with just audio buttons, others with phone and temperature buttons. Anything beyond just the Media, Volume, and Seek buttons has complications, however.


2) Got wire harness WPT-1219 for $25. It works with the RH control switch but you must break off one of the pieces of plastic on the bottom of the connector to make it fit.


3) On the WPT-1219 harness you will need to use pins 1 (for ground), 6 (for power), and 5 and 7 (for the audio controls). You can take the red part off of the connector and remove the other four pins to use in empty spots in your clockspring. Put your WPT-1219 connector back together.
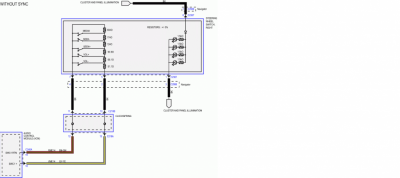
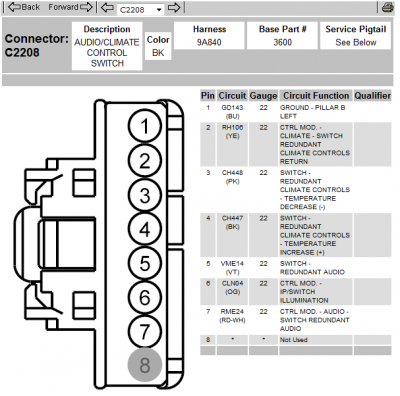
2011 Expedition Steering Wheel Wiring Diagram (No Phone).png Steering Wheel Audio Pin Wiring.png
4) Remove the air bag from the steering wheel. It's actually less of a job than it sounds and even though I was very nervous about it, it was actually a piece of cake. You can find instructions online.


5) Take out the clockspring connector under the air bag, remove the red part, and add two of the removed wires from the WPT-1219 to the empty pins 10 and 11. Put the connector back together.
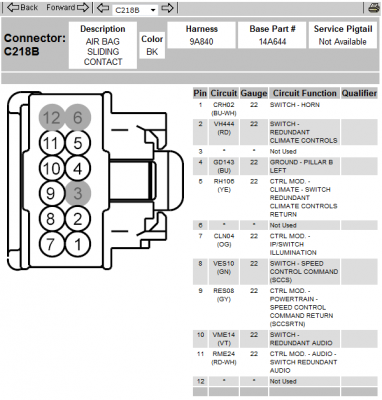
Clockspring Wiring.png

6) Connect WPT-1219 wire 5 with clockspring wire 10.


7) Connect WPT-1219 wire 7 with clockspring wire 11.


8) Splice WPT-1219 wire 1 into clockspring wire 4. This is for the ground.


9) Splice WPT-1219 wire 6 into clockspring wire 7. This is for power.


10) Tape everything up neatly and re-install the air bag. Find the instruction online.


11) Coming out of the left side of the steering column is the other connector for the clockspring. You will have to add two pins to this connector as well. Add them to pins 12 and 13.
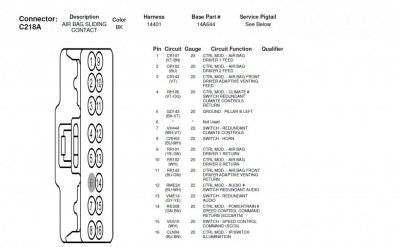
Clockspring Out Wiring.jpg

12) You could connect clockspring wire 13 to your Audio Control Module (ACM) pin 18 and clockspring wire 12 to ACM pin 19 (see below), but on my Chinese Android radio I was able to connect clockspring wire 13 to the stereo wire “Key1” and 12 to chassis ground bypassing the ACM.
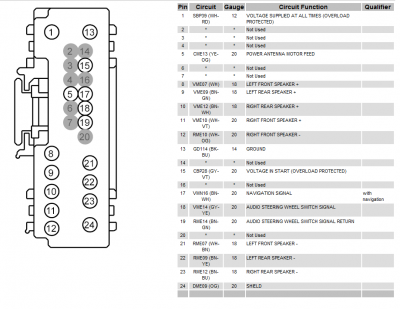
Stereo Wiring Diagram.png

13) I then used the programming app on my stereo to set the function of each button.

By the way, no interface adapter was needed and no new clockspring was needed, either.
 
Last edited:
OP
OP
J

JimS

Member
Joined
Mar 22, 2017
Posts
10
Reaction score
8
Location
Milwaukee, WI
This is the switch I would recommend and steering wheel similar to mine for the before picture: RH Audio Control Switch.jpg
Generic Steering Wheel 3.jpg
 
Last edited:
OP
OP
J

JimS

Member
Joined
Mar 22, 2017
Posts
10
Reaction score
8
Location
Milwaukee, WI
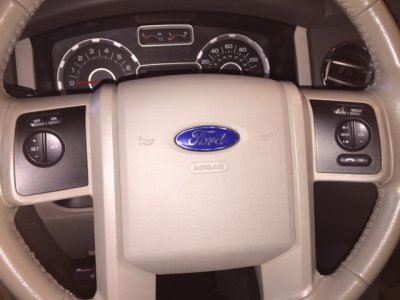
Here is the "after" picture.

Notice I used a switch with additional buttons from the one I posted above. Of the 8 different function buttons I was only able to use the 5 functions that were connected to the WPT-1219 switch connector's #5 and #7 pins/wires (Media, 2 Volume, and 2 Seek buttons) despite my attempt to use all 8 by splicing in the #2 (with #7) and #3 (with #5) pins/wires (#2 and #3 are listed in the diagram above as climate controls). This is because the 3 additional functions all had electrical impulses, ohms, that three of the other five functions had. This made my radio not be able to distinguish between these buttons.

Fortunately, I figured out a way around this. Everything was going into my radio through the Key1 wire and Key2 was unused. This made me wonder if Key2 inverted the electrical impulses thus making them different from the other five and making them usable. That's exactly what it did!

So I then wired WPT-1219 wires 2 and 3 to the clockspring connector 5 and 2, respectively. These corresponded to the clockspring output connector pins 4 and 7, which I then connected to Key2 and chassis ground to make them usable. Presto! Now I get to use all 8 functions!

Steering Wheel AFTER.JPG
 
Last edited:

Trainmaster

Old School Member
Joined
Jun 17, 2017
Posts
3,402
Reaction score
1,925
Location
Rockaway Beach, NY
Excellent! Thank you. Just ordered what I need for my 08 Expedition to which I added factory navigation. I ordered switch 7C3Z9C888AA, which is the one shown without the climate or phone button. Rock Auto has it. The harness between the clockspring and the radio on the XLT does not have the two redundant audio wires in it. So I'll use some spare pins and add them to the jacks as shown in the above posts.
 
Last edited:

Trainmaster

Old School Member
Joined
Jun 17, 2017
Posts
3,402
Reaction score
1,925
Location
Rockaway Beach, NY
The 7C3Z9C888AA is the audio control pictured above without heat/fan controls for use on the XLT with manual heat. It is also numbered 7C3T-9E740-ABW on the switch. RockAuto carries it (Motorcraft SW-6461) lower priced than Tasca.

If you wish to remove sockets from these connectors to rearrange them, you snap off the red plastic caps. Then the metal jacks are angled up toward the void left from the red cap with a pin and pushed out the front using the connected wire. Look at the end of it with the red cap off through a magnifying glass and you'll figure it out.
 
Last edited:

VCFP153

Member
Joined
May 19, 2023
Posts
16
Reaction score
6
Location
Hastings, FL
Greetings to everyone! This is the only thread I found close to my situation. I have a 2015 XL without audio controls on the steering wheel. I purchased and installed a full Android Auto head unit which works great, so I would like to add audio controls. Rather than trying to incorporate just the switch, I actually purchased an XLT steering wheel with the switch installed already. My question is, will it work with the current harness and/or clock spring or will I need to do more mods? I assume I will need to activate steering wheel controls in Forscan.

Thanks in advance.
 
Top