
I got my halo rings mounted. The HD something something switchbacks from Diode Dynamics. Has amber turns & 2 different brightness of white (bright for DRL & dimmer for headlights).

Now for the extra support...

First put several coats of epoxy mold release on the projector bodies. Then mixed up some JB QuikSteel. This is a firm putty so holds it's shape pretty well. Started with a couple blobs around the opening...

The projectors have a tabbed washer with a notch. One per projector, but for this I used both for this step. One on the projector body first, then inserted it into the bucket, then the 2nd on the back followed by the nut. This gives a metal washer on each side of the ABS flange for this step. Just made sure it went in at the correct rotation, tightened it up pretty snut & let the epoxy set up.
After 15 - 20 minutes, loosened the nut, screwed on the capped nut (that goes over the bulb) and rapped it a few times with a hammer while pulling a little on the projector to get it to pop out & it looks like this:

A couple more blobs...

For the 2nd I manged to do it all in one step. Just have to work quick as this stuff starts to set up in 3 - 5 minutes.

So this makes a... uh... "saddle" I guess? Fits the projector body perfectly. With the inner washer removed the projector is pulled back into this saddle as the nut it tightened. It's on the inside of the bucket so it'll help pull the adapter and bucket together rather than relying on just the JBWeld to hold the adapter on the back. It also supports the projector a lot further forward than the nut so there's less leverage working on it. About halfway up the projector body. Make sense??

Test fit the cover. Hard to see, but there is a nice gap there. I'm guessing about 3/8" to 1/2". It'll be a little less when the cover's sucked in tight.

Looking down from the top...

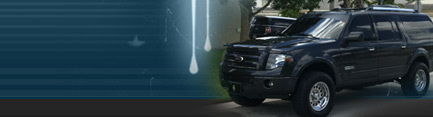
I did get my missing wire adapters so I was able to test fit & try these out. Did a rough aim adjustment to try and make them match the old headlights. Still need to finish the wiring, but these are about ready to put back together I think.
--Dan
Now for the extra support...
First put several coats of epoxy mold release on the projector bodies. Then mixed up some JB QuikSteel. This is a firm putty so holds it's shape pretty well. Started with a couple blobs around the opening...
The projectors have a tabbed washer with a notch. One per projector, but for this I used both for this step. One on the projector body first, then inserted it into the bucket, then the 2nd on the back followed by the nut. This gives a metal washer on each side of the ABS flange for this step. Just made sure it went in at the correct rotation, tightened it up pretty snut & let the epoxy set up.
After 15 - 20 minutes, loosened the nut, screwed on the capped nut (that goes over the bulb) and rapped it a few times with a hammer while pulling a little on the projector to get it to pop out & it looks like this:
A couple more blobs...
For the 2nd I manged to do it all in one step. Just have to work quick as this stuff starts to set up in 3 - 5 minutes.
So this makes a... uh... "saddle" I guess? Fits the projector body perfectly. With the inner washer removed the projector is pulled back into this saddle as the nut it tightened. It's on the inside of the bucket so it'll help pull the adapter and bucket together rather than relying on just the JBWeld to hold the adapter on the back. It also supports the projector a lot further forward than the nut so there's less leverage working on it. About halfway up the projector body. Make sense??
Test fit the cover. Hard to see, but there is a nice gap there. I'm guessing about 3/8" to 1/2". It'll be a little less when the cover's sucked in tight.
Looking down from the top...
I did get my missing wire adapters so I was able to test fit & try these out. Did a rough aim adjustment to try and make them match the old headlights. Still need to finish the wiring, but these are about ready to put back together I think.
--Dan

