You are using an out of date browser. It may not display this or other websites correctly.
You should upgrade or use an alternative browser.
You should upgrade or use an alternative browser.
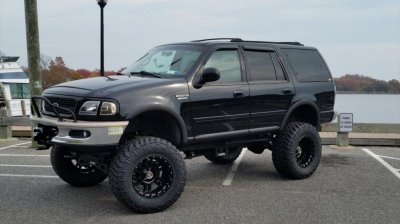
Lifted Expeditions of EF.com (picture post)
- Thread starter SOLISIMO
- Start date
Disclaimer: Links on this page pointing to Amazon, eBay and other sites may include affiliate code. If you click them and make a purchase, we may earn a small commission.
Will H
Active Member
The wrong ones for these tires. LoL
Will H
Active Member
I don't recommend powder coating the chrome bumpers.
I did it and it started flaking off after about 2 years....or the 1st really good rock chip.
I did it and it started flaking off after about 2 years....or the 1st really good rock chip.
dkappel6189
Active Member
I was just gonna plastidip them. If j spend the money on powder coat then I'm gonna just buy the steel and weld a bumper
Texpedition45
Full Access Members
The wrong ones for these tires. LoL
Lol. I have 3.55's and debating if 37s would be liveable for a while until I upgrade.
dkappel6189
Active Member
I had the stock 3.73 gears for my 38s for a little and it was brutal
Will H
Active Member
I have 3.73 as well.
Will H
Active Member
On my bumpers, I chose the bedliner route. And I'm glad I did. Rock chips, scrapes, etc are easy to touch up.
SnuffThePunkz
Full Access Members
3" Body Lift
3" Torsion Keys
Coil Over Up Front
Moog Springs In Back (no spacers)
37" Toyo Open Country RT's
20" Fuel Throttle Wheels
Rough Country Winch Behind Bumper
View attachment 21295 View attachment 21296 View attachment 21297 View attachment 21298
Love it man, basically what I'm aiming for ATM.
How'd you manage the hitch? All the body lifts I've seen have it sitting low looking like shit, yours looks fine.
Also how does she manage the 37's work 3.73's?
Edit: I see you answered that question already, damned phone showed only some of the new parts but not the important ones lol
Last edited:
Will H
Active Member
Love it man, basically what I'm aiming for ATM.
How'd you manage the hitch? All the body lifts I've seen have it sitting low looking like shit, yours looks fine.
Also how does she manage the 37's work 3.73's?
Edit: I see you answered that question already, damned phone showed only some of the new parts but not the important ones lol
The hitch :
On each side of the hitch where it bolts to the frame rail, there are 2 "flanges", 1 on each side, with 2 holes drilled in each. These are simply parts of the hitch that they cut and "folded" the metal over, so as the hitch gets raised up under the truck, the "flanges" hit the bottom of the frame rail and the holes align with threaded holes on the bottom of the frame rail for the bolts that attach it.
I had these "flanges" cut off flush, and re-welded 3" lower. This allowed me to raise the hitch 3 more inches up under the truck, which closed the gap between the bumper and hitch created from the body lift.
Similar threads
- Replies
- 4
- Views
- 910
- Replies
- 2
- Views
- 2K


