A/C is warm

Disclaimer: Links on this page pointing to Amazon, eBay and other sites may include affiliate code. If you click them and make a purchase, we may earn a small commission.

stamp11127

Full Access Members
Joined
Mar 10, 2012
Posts
6,218
Reaction score
1,250
Location
Temple, Georgia
Static indicates charge is just a tad low which is fine. That is what we want. At 69 degrees it should be 3-4 psi above ambient temp.

Don't do anything yet because this is a good one to think about since you don't have a recovery machine. If you did it would be real easy. We'd just suck it back out, note how much oil came with it and put back to specs.

The PAG oil used should have been PAG46.

I'll look at my 99 today and see if it is possible to install the orifice tube backwards.
 
Last edited:
OP
OP
J

juan214

Full Access Members
Joined
Sep 11, 2013
Posts
506
Reaction score
60
Location
Stoughton, MA.
Static indicates charge is just a tad low which is fine. That is what we want. At 69 degrees it should be 3-4 psi above ambient temp.

Don't do anything yet because this is a good one to think about since you don't have a recovery machine. If you did it would be real easy. We'd just suck it back out, note how much oil came with it and put back to specs.

The PAG oil used should have been PAG46.

I'll look at my 99 today and see if it is possible to install the orifice tube backwards.

Don't do anything yet because this is a good one to think about since you don't have a recovery machine. If you did it would be real easy.
Not touching it this morning have to drive into Boston today a few hours back and forth.

We'd just suck it back out, note how much oil came with it and put back to specs.
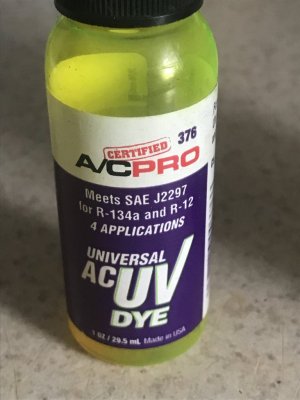
A minimum of 2.2 oz. of oil and dye came back out.

Looks like I use just over a 1/2 oz of dye through diagnosis and recharge combined.
IMG_3848.JPG

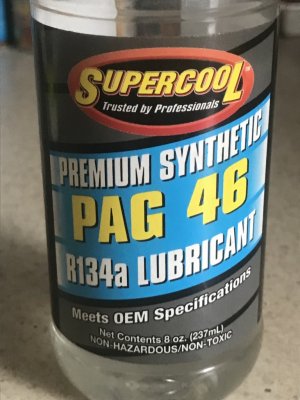
The PAG oil used should have been PAG46.
The oil came supplied with the parts kit for the truck.
IMG_3849.JPG
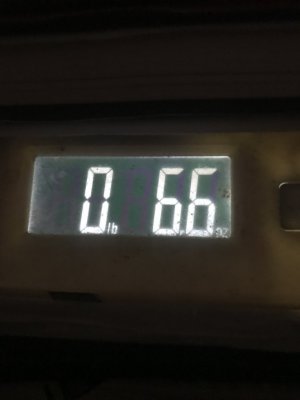
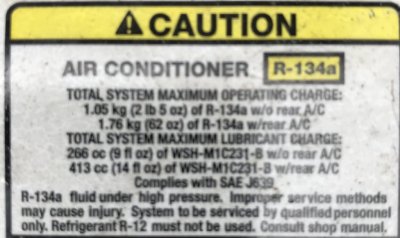
Bottle currently weighs 6.6 oz (including bottle probably .05 ox. for the bottle) and contained 8 .oz. So So I originaly charge less than 2.5 oz. I thought iI put in 3 oz.
IMG_3850.JPG

IMG_E3851.JPG
 
Last edited:

stamp11127

Full Access Members
Joined
Mar 10, 2012
Posts
6,218
Reaction score
1,250
Location
Temple, Georgia
It's been raining on and off here today. As I'm getting closer to retirement my comfort zone is getting narrower, if I'm going to get wet there had better be a temp adj knob within reach.

This is from your reply #22:
Got it down to 40 - 42 / 197 - 200 give or take..... Vent still at 76 - 78 degrees

The problem lies in this area somewhere. Evap air temp is "40- 42" degrees. Even if the refrigerant charge was low you would still get cooling at the accumulator.

Leave the system as it is. Let it run for 5-10 minutes to stabilize then take a temp reading with the ir gun right on the accumulator outlet pipe that connects to the compressor. Take another reading at the input connection to the evap. We will also need to know the low side pressure at that time.

Repeat the same test but raise the engine rpm to 2500. Will need temp and pressure readings. That is used to determine if the evap is getting enough refrigerant, too little or too much.

This will allow me to check the superheat amount at idle and higher rpms.

Between last year and now was the system ever opened to the air for any length of time, or was it sealed? When you replaced the components, did you use any shop air to blow them out including the lines?

When you charged the system, did you use low side gas or low side liquid? The difference is how the can is positioned. Normal will be gas, upside down is liquid.
 

stamp11127

Full Access Members
Joined
Mar 10, 2012
Posts
6,218
Reaction score
1,250
Location
Temple, Georgia
It is basically the same concept except that auto doesn't get into superheat, subcooling, different refrigerants and no reversing valves. Component sizes are larger in refrigeration.

This is a good one - he has evap temps in the low 40's but no cooling. Lines and accumulator aren't cold.
 
OP
OP
J

juan214

Full Access Members
Joined
Sep 11, 2013
Posts
506
Reaction score
60
Location
Stoughton, MA.
What occurred a year ago that necessitated changing all those components?
I had to look up the conversation this was two years ago.

May 26, 2017 started conversation with Big Brian on here.

99 Expy EB w/ rear a/c & heat

Charged a/c with sealer last summer (2016) held for a while. Every year prior it would drop a little. It was low again this year (2017) guess there is a leak(s). I found a wet spot between the inner fender and firewall coming down the a/c lines. So I took the right inner fender out to inspected the lines. The wet spot must have been an accumulation of oil dripping from my funnel I store above that spot (thank god) kept the lines clean. While it was off I unbolted the lines there and all the way to the back to visually inspect the lines. Found no issues with rubbing, rot, cracks on them. Bolted all the lines back on and inspected the other lines behind the inner fender found no visual damage. Put in 12 oz of R-134a with dye, not enough compresor didn't kick on. Put another straight twelve in compressor kicked on it cooled. Not cold enough put another 12 in waste of money. A total of 36 ounces the most I have ever put in a vehicle in my life. Took a drive with the Family an it was nice. Checked for leaks that night with a uv pen light. Found sporadic spots up top i'm thinking it's from when I took the can off. So I scrubbed most of those off so I could check them on day two. Day two no a/c. Its a clean truck washed regularly with no rot and minimal rust here and there.

Findings.
  • Where I cleaned looked the same (clean).
  • Found dye at at charge port assuming it just from the fill.
  • Found dye at Pressure sensor on the line.
  • Found dye at Condenser on the line where the line(s) connect(s)
  • Found dye at Compressor between the pulley and compressor and around the outside of it. I assume either its either failed everywhere, leaching through, or it sprayed back.
Plan:
  • Get a Vacuum Pump
  • Get a Gauge set
  • Replace compressor either new
  • Replace oil
  • Replace all o-rings
  • Replace Expansion Valve
  • Relace Orifice Tube
  • Replace Receiver Drier / Accumulator
  • Replace O-rings at condenser
  • Replace HP Sensor

Dumb question(s)
  1. Can I vacuum test for leaks with the oil in the compressor?
  2. Should I move this to the site?
Never done A/C work before never had an issue til now. Any tips or ideas are great appreciated. I remember when A/C was a luxury.....

Mainly for the passengers, me Ill roll the window down even with A/C on.

Thanks in advance
________________________________________________________________________

Started on July 4th. 2017 an all parts installed and vaced July 6th. 2017
________________________________________________________________________

New questions Rich:
During replacing all the parts o-ring, o-tube, dryer can something get screwed up?
Should I change out the dryer maybe it got screwed up during parts replacement or failed?
Exposure?
Vacumm issue?
 
Last edited:

stamp11127

Full Access Members
Joined
Mar 10, 2012
Posts
6,218
Reaction score
1,250
Location
Temple, Georgia
Juan hate to tell you this, but you screwed it:

"Charged a/c with sealer last summer (2016)"

Flush time - everything - lines, compressor, condenser, txv, both evaps. Swap out the oil in the compressor also. New accumulator. Basically start from scratch. I'd even pull the orifice tube to clean and make sure it is installed correctly.

We use something similar to this:
https://www.tooltopia.com/mastercool-91046-a.aspx

Might start with about 1/2 gallon of the flush also.

Once everything is cleaned out, the new accumulator is the last to be installed. As soon as you open it to the air it starts absorbing moisture. Speed is of the essence here, there is a time limit before the desiccant becomes saturated. I tell the students 10 min max.

PAG46 oil: We use 50-75% of rated capacity, result is components last longer. Since you have rear air I would put 75% of the amount in. One ounce of oil in each component with the remainder in the compressor. Turn the compressor by hand as you add the oil.
 
Last edited:
OP
OP
J

juan214

Full Access Members
Joined
Sep 11, 2013
Posts
506
Reaction score
60
Location
Stoughton, MA.
It's been raining on and off here today. As I'm getting closer to retirement my comfort zone is getting narrower, if I'm going to get wet there had better be a temp adj knob within reach.

This is from your reply #22:
Got it down to 40 - 42 / 197 - 200 give or take..... Vent still at 76 - 78 degrees

The problem lies in this area somewhere. Evap air temp is "40- 42" degrees. Even if the refrigerant charge was low you would still get cooling at the accumulator.

Leave the system as it is. Let it run for 5-10 minutes to stabilize then take a temp reading with the ir gun right on the accumulator outlet pipe that connects to the compressor. Take another reading at the input connection to the evap. We will also need to know the low side pressure at that time.

Repeat the same test but raise the engine rpm to 2500. Will need temp and pressure readings. That is used to determine if the evap is getting enough refrigerant, too little or too much.

This will allow me to check the superheat amount at idle and higher rpms.

Between last year and now was the system ever opened to the air for any length of time, or was it sealed? When you replaced the components, did you use any shop air to blow them out including the lines?

When you charged the system, did you use low side gas or low side liquid? The difference is how the can is positioned. Normal will be gas, upside down is liquid.

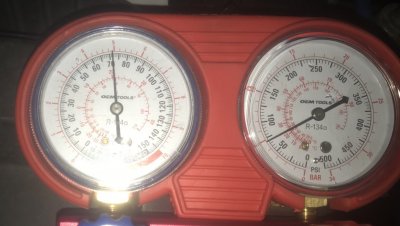
Static Pressure @ 1016 p.m. (sitting for over thee hours):
IMG_3857.PNG IMG_E3858.JPG
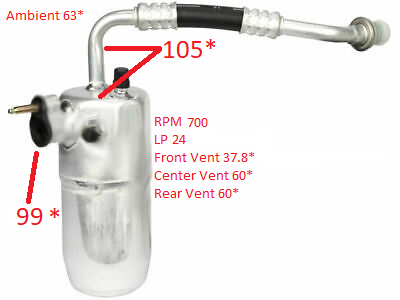
Leave the system as it is. Let it run for 5-10 minutes to stabilize then take a temp reading with the ir gun right on the accumulator outlet pipe that connects to the compressor. Take another reading at the input connection to the evap. We will also need to know the low side pressure at that time.

Hope I did this right (driven for ten minutes):
READINGS #700.png
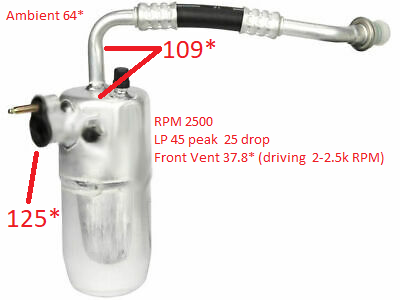
Repeat the same test but raise the engine rpm to 2500. Will need temp and pressure readings. That is used to determine if the evap is getting enough refrigerant, too little or too much.
READINGS #2500.png

Between last year and now was the system ever opened to the air for any length of time, or was it sealed? When you replaced the components, did you use any shop air to blow them out including the lines?
  • No, sealed as it still held pressure all this time. Only when the replacement parts were being installed could air get in.
  • No shop air, compressor hass been shot for years. I'm a backyader here in the woods wrenching regularly.
Question: How long would have been open to be an issue?

When you charged the system, did you use low side gas or low side liquid? The difference is how the can is positioned. Normal will be gas, upside down is liquid.
  • Gas, I beieve the can sat on radiator support or in my hands, may have shaken not sure.
  • I do not I beleive I recharged last year, if I did the that can would have been liquid due port location and length of charge hose.
  • I also still had my sixth can with refrigerant hose still in it from 2017. So originally I only put in 60 oz. into the system. As the sixth can was still connected to my charge hose this year.
 
OP
OP
J

juan214

Full Access Members
Joined
Sep 11, 2013
Posts
506
Reaction score
60
Location
Stoughton, MA.
Juan hate to tell you this, but you screwed it:

"Charged a/c with sealer last summer (2016)"

Flush time - everything - lines, compressor, condenser, txv, both evaps. Swap out the oil in the compressor also. New accumulator. Basically start from scratch. I'd even pull the orifice tube to clean and make sure it is installed correctly.

We use something similar to this:
https://www.tooltopia.com/mastercool-91046-a.aspx

Might start with about 1/2 gallon of the flush also.

Once everything is cleaned out, the new accumulator is the last to be installed. As soon as you open it to the air it starts absorbing moisture. Speed is of the essence here, there is a time limit before the desiccant becomes saturated. I tell the students 10 min max.

PAG46 oil: We use 50-75% of rated capacity, result is components last longer. Since you have rear air I would put 75% of the amount in. One ounce of oil in each component with the remainder in the compressor. Turn the compressor by hand as you add the oil.
Surprised Big Brian didn't say anything before i put all the new parts. Plus bleeding out the air out of the yellow line.

Oh well figured I would be doing it again anyway now to figure how.

A/C System Flush Kit I can get as a loaner.

I think one of my neighbors has a pancake air compressor.

Flush I can get one quart locally and need to drive to get another
AC Pro Certified A/C Pro Flush & Clean Solvent Based (1 Quart) 19.99 each $42.47
Amazon
Four Seasons 69994 Super Flush Solvent, 32 Oz/ 946 ml $11.41 3 quarts for $34.23
Supercool FFG Automotive Accessories, 128. Fluid_Ounces $36.46


Do I need to remove any parts to do any of this work?
Shoud the condesor be changed or flush it?


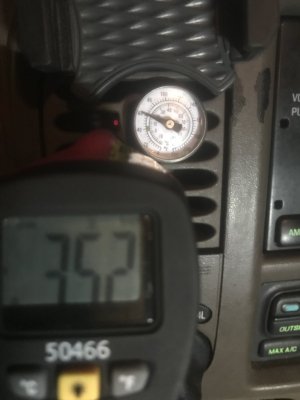
Found this kind of odd as well tonight.
IMG_3861.JPG
 
Last edited:
Top