Airbag cover (above glovebox) removal?

Disclaimer: Links on this page pointing to Amazon, eBay and other sites may include affiliate code. If you click them and make a purchase, we may earn a small commission.

Adieu

Full Access Members
Joined
Dec 22, 2016
Posts
3,700
Reaction score
786
Location
SoCal
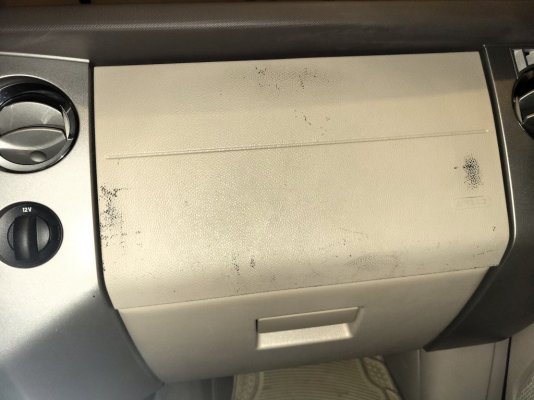
How do I remove that trim piece intact? Normally I'd just pry along the sides with a vinyl prybar, but wanna make sure I don't mess up or deploy that pesky airbag underneath

Got paint arriving tomorrow, plan to redo it... it's gotten quite nasty looking (and has been the wrong color ever since I swapped interiors)

Thx for any input
 

TXFRDOwner

Full Access Members
Joined
Jan 21, 2010
Posts
407
Reaction score
206
Location
Texas
214387994.jpg

214387995.gif

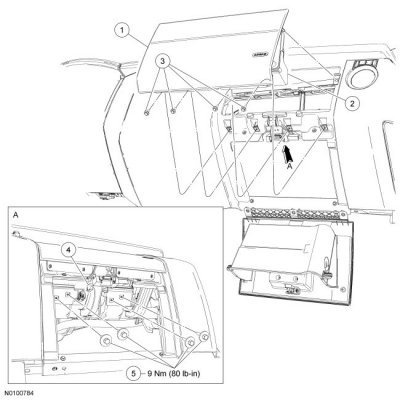
Removal and Installation


WARNING: Always carry a live airbag with the deployment door/trim cover/tear seam pointed away from the body. Do not place a live airbag down with the deployment door/trim cover/tear seam facing down. Failure to follow these instructions may result in serious personal injury in the event of an accidental deployment.

WARNING: Never probe the electrical connectors on airbag, Safety Canopy or side air curtain assemblies. Failure to follow this instruction may result in the accidental deployment of these assemblies, which increases the risk of serious personal injury or death.

NOTICE: Do not install a new passenger air bag module assembly due to a damaged or discolored passenger air bag cover. The passenger air bag cover can be serviced separately from the passenger air bag module assembly. For additional information, refer to Airbag Trim Cover - Passenger See: Airbag Trim Cover - Passenger.

NOTE: The air bag warning indicator illuminates when the correct Restraints Control Module (RCM) fuse is removed and the ignition is ON.

NOTE: The Supplemental Restraint System (SRS) must be fully operational and free of faults before releasing the vehicle to the customer.

All vehicles


  1. Depower the SRS (Supplemental Restraint System). For additional information, refer to Supplemental Restraint System (SRS) Depowering and Repowering See: Air Bag(s) Arming and Disarming\Service and Repair\Supplemental Restraint System (SRS) Depowering and Repowering in the General Procedures.
  2. Lower the glove compartment door.
  3. Disconnect the passenger air bag module electrical connector.
Expedition vehicles


  1. Remove the 4 passenger air bag trim cover screws.
All vehicles


  1. Remove the 4 passenger air bag module bolts.
  • To install, tighten to 9 Nm (80 lb-in).
  1. Push out on the bottom of the passenger air bag cover to release the bottom trim cover clips from the instrument panel and remove the passenger air bag module.
  2. NOTE: For correct installation, make sure all trim cover clips are fully seated into the instrument panel.
To install, reverse the removal procedure.


  1. Repower the SRS (Supplemental Restraint System). For additional information, refer to Supplemental Restraint System (SRS) Depowering and Repowering See: Air Bag(s) Arming and Disarming\Service and Repair\Supplemental Restraint System (SRS) Depowering and Repowering in the General Procedures.
 

TXFRDOwner

Full Access Members
Joined
Jan 21, 2010
Posts
407
Reaction score
206
Location
Texas
Depowering Procedure

WARNING: Always wear eye protection when servicing a vehicle. Failure to follow this instruction may result in serious personal injury.

WARNING: Never probe the electrical connectors on airbag, Safety Canopy or side air curtain assemblies. Failure to follow this instruction may result in the accidental deployment of these assemblies, which increases the risk of serious personal injury or death.

WARNING: Do not handle, move or change the original horizontal mounting position of the restraints control module (RCM) while the RCM is connected and the ignition switch is ON. Failure to follow this instruction may result in the accidental deployment of the Safety Canopy and cause serious personal injury or death.

WARNING: To reduce the risk of accidental deployment, do not use any memory saver devices. Failure to follow this instruction may result in serious personal injury or death.

NOTE: The air bag warning indicator illuminates when the correct Restraints Control Module (RCM) fuse is removed and the ignition is ON.

NOTE: The Supplemental Restraint System (SRS) must be fully operational and free of faults before releasing the vehicle to the customer.


  1. Turn all vehicle accessories OFF.
  2. Turn the ignition switch OFF.
  3. At the Smart Junction Box (SJB), located in the RH lower kick panel, remove the cover and the RCM (Restraints Control Module) fuse 32 (10A) from the SJB (Smart Junction Box). For additional information, refer to the Wiring Diagram. See: Diagrams\Electrical
  4. Turn the ignition switch ON and visually monitor the air bag warning indicator for at least 30 seconds. The air bag warning indicator will remain lit continuously (no flashing) if the correct RCM (Restraints Control Module) fuse has been removed. If the air bag warning indicator does not remain lit continuously, remove the correct RCM (Restraints Control Module) fuse before proceeding.
  5. Turn the ignition switch OFF.
  6. WARNING: Always deplete the backup power supply before repairing or installing any new front or side air bag supplemental restraint system (SRS) component and before servicing, removing, installing, adjusting or striking components near the front or side impact sensors or the restraints control module (RCM). Nearby components include doors, instrument panel, console, door latches, strikers, seats and hood latches. Refer to the Description and Operation portion of Restraints and Safety Systems &/or Air Bag Systems for location of the RCM and impact sensor(s). To deplete the backup power supply energy, disconnect the battery ground cable and wait at least 1 minute. Be sure to disconnect auxiliary batteries and power supplies (if equipped). Failure to follow these instructions may result in serious personal injury or death in the event of an accidental deployment.
Disconnect the battery ground cable and wait at least one minute. For additional information, refer to Section 414-01 See: Starting and Charging\Battery\Testing and Inspection\Component Tests and General Diagnostics.

Repowering Procedure


  1. Make sure that all SRS (Supplemental Restraint System) components are connected.
  2. Turn the ignition switch from OFF to ON.
  3. Install RCM (Restraints Control Module) fuse 32 (10A) to the SJB (Smart Junction Box) and close the cover.
  4. WARNING: Make sure no one is in the vehicle and there is nothing blocking or placed in front of any airbag when the battery is connected. Failure to follow these instructions may result in serious personal injury in the event of an accidental deployment.
Connect the battery ground cable.


  1. Prove out the SRS (Supplemental Restraint System) as follows: Turn the ignition from ON to OFF. Wait 10 seconds, then turn the back to ON and visually monitor the air bag warning indicator with the air bag modules installed. The air bag warning indicator will illuminate continuously for approximately 6 seconds and then turn off. If an SRS (Supplemental Restraint System) fault is present, the air bag warning indicator will:
- fail to light.
- remain lit continuously.
- flash.
The flashing might not occur until approximately 30 seconds after the ignition has been turned from the OFF to the ON position. This is the time required for the RCM (Restraints Control Module) to complete the testing of the SRS (Supplemental Restraint System). If the air bag warning indicator is inoperative and a SRS (Supplemental Restraint System) fault exists, a chime will sound in a pattern of 5 sets of 5 beeps. If this occurs, the air bag warning indicator and any SRS (Supplemental Restraint System) fault discovered must be diagnosed and repaired.
Clear all continuous DTCs from the RCM (Restraints Control Module) using a scan tool.
 
OP
OP
A

Adieu

Full Access Members
Joined
Dec 22, 2016
Posts
3,700
Reaction score
786
Location
SoCal
Does unplugging the battery do anything? Or just provide a failsafe in case you pulled the wrong fuse?
 

Carl Keef Jr

Member
Joined
Jul 29, 2020
Posts
22
Reaction score
2
Location
Cedar Park, TX
Can I find out how this went for you? That cover was badly scratched on my Expedition before I purchased it. The rest of the vehicle is pristine. I tried scrubbing the scratches, but it just made them worse. I want to remove and paint the cover but am definitely nervous about messing up the airbag.20210719_161625.jpg
 
OP
OP
A

Adieu

Full Access Members
Joined
Dec 22, 2016
Posts
3,700
Reaction score
786
Location
SoCal
Worked fine

However, be aware that the duplicolor paint matches pretty good, but is fairly flimsy and might get new scratches (probably not as bad as this). What you have on yours amounts to sandthrough to bare plastic.

The color that you need is Ford Camel.
 

JExpedition07

That One Member
Supporting Member
Joined
Mar 30, 2017
Posts
6,510
Reaction score
3,123
Location
New York
That looks like it might be stone not camel. Tan or grey? If your interior is grey it’s going to be the stone color
 

Kortoga

Member
Joined
Dec 8, 2021
Posts
5
Reaction score
2
Location
LA
Don't let the very comprehensive and confusing "by the book" directions TXFRDOwner posted scare you. IT IS EASY. Follow the directions below.

1. Purchase the correct passenger dash air bag cover from an online dealer. I paid about $100 plus shipping, and was able to specify camel color for my interior. It doesn't match perfectly since the original interior has faded a little over time. However, only I notice it.
2. Move your passenger seat all the way to the rear position.
3. Disconnect the battery and wait 30 minutes. Some say just the negative, some say just the positive. Just disconnect both, and tie them back so they don't bend back and touch the battery posts when you aren't looking.
4. Lower the glove box and push in on the 2 side walls to allow the door to hinge all the way to the floor.
5. Search and watch a few of the videos on U-tube that show how to remove the passenger air bag from the dash of your Ford Expedition. The videos do not really show you how to remove the air bag cover, but they will show you which screws to remove. There are 8, they are easy. Took me a few minutes, longer to round up the tools than to remove the screws.
6. Use a pry bar to pry the top left/right and lower left/right sides of the air bag cover away from the vehicle. Use a plastic pry bar if you don't want to scratch your interior. use a screw driver if you don't give a shit.
7. Pop the entire assembly out, let it kinda rest half out of the hole, reach in and disconnect the connector for the air bag. Pull the assembly out of the vehicle.
8. Remembering the top/bottom of the cover on the air bag, Place the air bag cover (with air bag attached) onto the garage floor and work the 8 clips out of the holes on the cover. This is easy, just pry one side, the other side falls right out.
9. Put the new cover onto the air bag. Do this by putting the air bag clips into the holes on the new cover.
10. Slide the new cover and air bag into the vehicle. Pushing (or hitting with your palm) the top left/right and bottom left/right to pop in the holding clips on the new cover.
11. when you have the new cover sitting flush like the old cover did, screw in the 8 screws.
12. bring the glove box up, push in the side to allow the glove box to close. Open the glove box to make sure it works.
13. Gather your tools, get all your install junk off the passenger seat.
14. Connect the battery back. If the air bag doesn't deploy, you did a good job.
15. Move your passenger seat back to normal position. OR let your passenger worry about that.

Took me about 30 minutes. I literally spent days researching this because everyone makes it sound like you are dealing with a live grenade someone just threw to you. You are, but once you disconnect the battery and then the connector, there is no voltage to trigger the air bag. If there was, there is no garage that would deal with these things.
 
Top