Third row window water leak

Disclaimer: Links on this page pointing to Amazon, eBay and other sites may include affiliate code. If you click them and make a purchase, we may earn a small commission.

OP
OP
M

Mako825

Full Access Members
Joined
Dec 29, 2018
Posts
108
Reaction score
60
Location
Charlotte
Well, I finally decided to tackle the pesky water leak. I pulled the Expedition into the garage and tested the seals around the 3rd row seat windows and didn't find a leak. So, figured it had to be coming from the roof rack bolt holes or the cracks in the roof channel (see pics of cracks in first post in this thread). So I purchased some Permatex flowable clear silicone windshield & glass sealer. I setup my lightweight foldable work platform. I worked one side and then the other to pull off the roof rack by removing the 7 mounting screws on left and right side rails (T25 bit). Vacuumed all the dirt and grime from under the roof rack rails and the recessed screw holes. Took the roof rack outside and cleaned it up with some soapy water and a scrub brush. Then rinsed it off and left it out to dry.

I went back to the Expedition and cleaned the recessed roof channel on the drivers and passenger side to remove dirt and dust. I opened the Permatex flowable silicon package, cut the tip of the dispensing nozzle to be pretty small and screwed it onto the tube. With nitrile gloves on, I slowly squeezed the silicone into the cracks all down the sides of the roof channel. I was careful not to apply too much. It did as advertised "Wicking action silicone “seeks the leak”. Flows into hidden and hard-to-reach areas. Forms a tough, waterproof, durable, clear seal that is resistant to weather, extreme temperatures, vibration, shock and most shop chemicals. Fills surface voids and irregularities." Then ran a gloved finger down the length of the roof channel to further press the excess into the cracks. Used a shop towel with light pressure to clean up any visible excess silicone. The consistency of this silicon product is much thinner than any silicone product I've ever used and really does flow well into the gaps.

Then took the 14 roof rack screws and wound Teflon thread seal tape around each. Went back to the roof and squeezed a dab of the silicone into each of the 14 screw holes in the roof. Set the roof rack back in place on the roof. Reinserted each of the screws and gave them a few turns. Came back and tightened each until they were seated and tight.

I pulled the Expedition out of the garage today so I could inspect it in the sun. I was pleased how well the clear silicone filled the gaps and moreover how clean and undetectable it was. Products specs say that it takes 24-hours to fully cure. I'll probably give it an extra day or so and then run it through the drive-though car wash for a test. I'll report back on what I find.


UPDATE: I thought I did a thorough job removing and resealing the screws for the roof rack and sealing the cracked roof channels. But the rain this week proved me wrong. More water dripping down from the headliner closest to the 3rd row passenger window filling the storage tray.

I really don't want to remove the headliner and trim - but I guess I need to. I'm committed to this now. I'll double-check the rear gate, glass seals, hinges and high 3rd light. More to come...
 

Aspen03

Full Access Members
Joined
Apr 24, 2019
Posts
727
Reaction score
357
Location
Indianapolis
I found my rear glass hinges loose and that caused the glass not to seat properly against it's gasket. They also rattled annoyingly. Tightened 'em up with a Torx driver and that solved all of it for me. It's always something .... got new Michelins today at Costco, so I got that going for me ..... LOL ....

Good deal on those Michelins, I was waiting to have receipt checked the other day and tire guy recognized me from buying a battery for a friend a couple weeks ago and tried to talk me into pulling the trigger (we discussed tires for me at the time). He was going to get me out the door under 800 but I had to get back to work, no time to deal w it. Tempting. I said I'd be back Friday to pick up some things for the weekend and consider it.

Did you do the LTX or the Costco "branded" one...I forget the exact model but they stated it was identical but manufactured for them and a few dollars less. They private label everything else so it wouldn't surprise me there just to not have to deal w local comps.


OP. That's unfortunate its still leaking. Pulling thst trim is definitely no fun if it comes to it, you'll want somewhere warm and dry as the disassembly is a bit involved and takes some time. Removing a factory sub is a project...I imagine this is similar.
 

Hamfisted

Full Access Members
Joined
Nov 20, 2012
Posts
2,598
Reaction score
1,477
Location
Ft Lauderdale
The ones I got were their Michelin XLT A/S tires. Michelin just builds them for Costco and Sam's because they move enough tires to have their own line built. It's the same as the over the counter Defender A/S LTX . They were just under $800 out the door. I had them install high pressure valve stems, and I kept my black valve stem caps. My old LTX's had right at 60k miles on them and they were down to the wear bars. Mostly turnpike driving.
 

Aspen03

Full Access Members
Joined
Apr 24, 2019
Posts
727
Reaction score
357
Location
Indianapolis
Xlt a/s, those were what were discussed i just couldn't remember the exact name. I need to order new tpms sensors if I'm going to grab them, 2 out of the 4 are dead. I drive enough mileage they're nice to have, my tires seldom need adjusting outaode of major seasonal ones but it's good peace of mind since most of my drive is hwy speeds, if I have a moderate leak I'd like to know before it starts to compromise handling.
 
OP
OP
M

Mako825

Full Access Members
Joined
Dec 29, 2018
Posts
108
Reaction score
60
Location
Charlotte
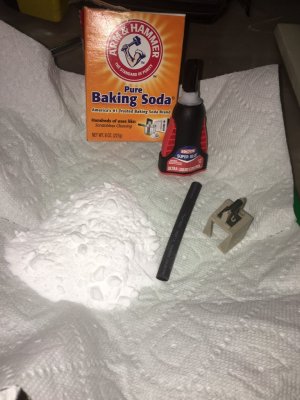
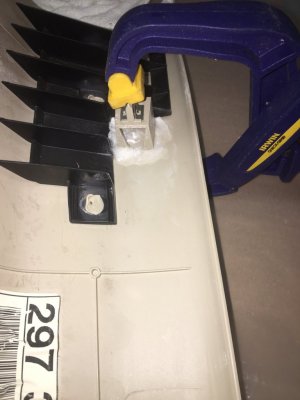
A quick update on my progress so far.... I started the process to drop the headliner by removing the 3rd row seat seat belts. Then started removing the D-pillar plastic trim. Classic fail - most of the plastic mounting tabs on each trim piece broke. I guess I'm not surprised. My Ford is 18+ years old and has always been parked outside, so the plastics are brittle. I researched best ways to bond or weld the plastic and found that there are products you can buy, but also found a trick using liquid Super Glue and baking soda. There are lot's of videos out there you can find.

I cleaned the mounting surface and the mating pieces that broke off. Used the Super Glue to re-attach the pieces together. I clamped the pieces together. Then sprinkled baking soda on the wet Super Glue. I went back several times and added more glue and baking soda and let it cure over night.

It feels like it bonded pretty well. I'm not through with my other work yet, so I haven't snapped these trim pieces back into the pillars. But am hopeful that this will work.

IMG_6421.JPG

IMG_6426.JPG
 
OP
OP
M

Mako825

Full Access Members
Joined
Dec 29, 2018
Posts
108
Reaction score
60
Location
Charlotte
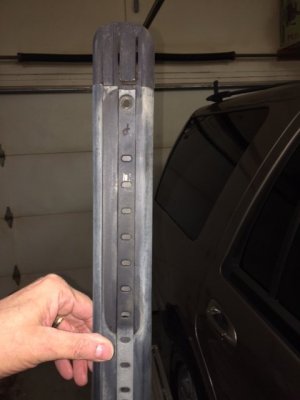
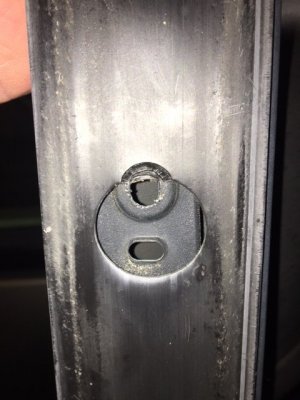
Still on the job..... pulled the roof rail off and found something I didn't see last time. The silicon / rubber seal on the bottom of the roof rail has pre-cut factory holes so that the screws coming through the rail can pass through this hole and into the roof's nuts. The pre-cut holes in the silicone / rubber seal lines up with all the screws - except in one place. That one place is the closest to where I observe water dripping in.

The picture shows how the screws aren't making full contact on the roof because the seal is in the way. I'm going to enlarge the the holes in the silicone / rubber seal to accommodate the screw coming through so everything can seat properly.

IMG_6435.JPG

IMG_6434.JPG
 
OP
OP
M

Mako825

Full Access Members
Joined
Dec 29, 2018
Posts
108
Reaction score
60
Location
Charlotte
My work is complete and the Ford is back together. Don’t know if it solved the problem but will know next time it rains.

I did trim the bottom seal of the roof rack so each mounting screw is unimpeded. I also cleaned the mounting screws and put Teflon tape on the threads. I also cleaned and vacuumed the mounting holes.

I squeezed a generous amount of RTV into each mounting hole and then put it all back together.

The real win was that my baking soda and super glue welds held up great on on the D pillar trim tabs.

Oddly, the two plastic trim buttons that push in to keep the ceiling headliner up disintegrated. Will need to find a couple of replacements with the wide head and 1” or so stem in light beige.
 
OP
OP
M

Mako825

Full Access Members
Joined
Dec 29, 2018
Posts
108
Reaction score
60
Location
Charlotte
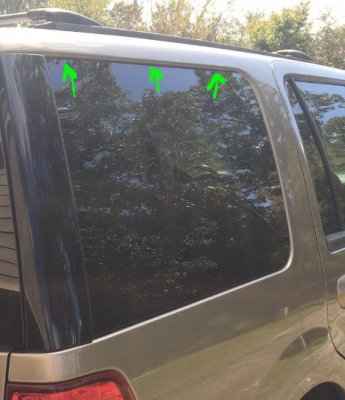
Well, it rained last night and water dripped in. So, today I water tested everything again to find out where it's coming in. The good news is that no water came in from the repaired / resealed roof rack mounts where I used RTV. Also, no water came in from the cracked rain channel on the roof that I filled with Permatex flowable silicone. But I did however, find that water comes in from the 3rd row seat side window. In previous water tests of the side window, I never saw any water dripping in. Today was different.

This is a fixed window, it does not open. I've read posts on the forum about folks taking off the inside trim and tightening the mounting bolts for this window, but with bad results. So I'm leaning towards buying some more Permatex flowable silicone and taking my time to seal the window from the outside. There's a descent gap there between the body and the window to squeeze this thin silicone in there.


Side Window.JPG
 
OP
OP
M

Mako825

Full Access Members
Joined
Dec 29, 2018
Posts
108
Reaction score
60
Location
Charlotte
Hope you get it dry soon. :happy107:

Thanks Rick!
I called the best auto window replacement shop in town this week. I explained to them that I was planning to seal a water leak in my 3rd row seat window on the passenger side with Permatex Flowable Silicone. I called to ask if they had a better product, or a better process as I'm not opposed to paying professionals to do it the right way. They shared that getting these fixed (non-opening) windows out to re-seal them is a destructive process. And, because of that, they only replacement them. i.e. the success rate of them getting the window out without breaking is so low, that they only quote the job including the cost of a new window.

So, I decided to go the Permatex Flowable Silicone route. I did that last night in the garage. It's been curing for the obligatory 24-hours. Tomorrow I'll pull it out of the garage and park it in the driveway. It's supposed to rain for the next 6 days. I'll know soon enough if it works.

Mako
 
Top