What Have You Done to Your 4th Gen This Week?

Disclaimer: Links on this page pointing to Amazon, eBay and other sites may include affiliate code. If you click them and make a purchase, we may earn a small commission.

OP
OP
MATT0404

MATT0404

Well-Known Member
Joined
Aug 7, 2018
Posts
82
Reaction score
112
Location
NW PA
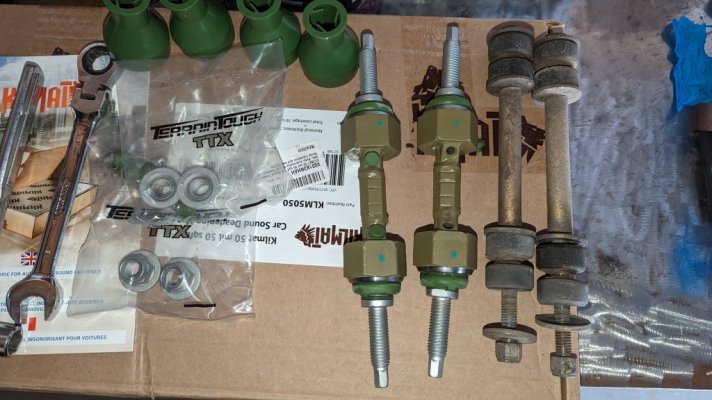
After 30k miles, my BFG KO2's (OEM Raptor take-offs) were nearing the end of their usable life. Not to mention getting noisy. Wanting to switch it up a bit, I went in a different direction looking for more comfort.

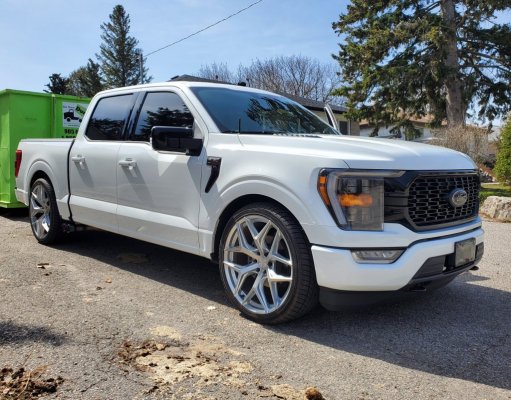
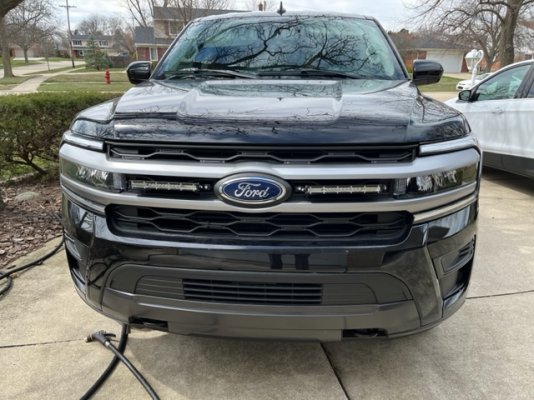
I picked up a set of OEM F-150 Sport wheels that were new take-offs for a great price ($1k shipped). I removed the Bilstein 5100's, adjusted them to the lowest setting, and reinstalled. Mounted up the wheels and tires and this is how she sits now.

IMG_4701.jpg

IMG_4705.jpg

I'm happy with the switch. The tires are much more comfortable and quiet. Performance is improved having shed 32 lbs per wheel/tire and MPGs are up. While I was a little hesitant to change it up, it turned out better than I expected. And I still have my old LX-450 (Land Cruiser) for trail duty in the warmer months.

Now to switch out the lug nuts for gray/black and black out the chrome trim. :)

Edit to add: I was fully expecting the rear axles to interfere with the wheel center caps, but they cleared just fine. :shrug:
 

JAMADOR

Full Access Members
Joined
Sep 7, 2022
Posts
129
Reaction score
32
Location
Spring, TX
^ Those look great, may have to keep an eye out for some.
Similar to the OE 20s that our Max has, but like the darker shade.
 

5280tunage

Full Access Members
Joined
Sep 17, 2019
Posts
1,499
Reaction score
868
Location
colorado
Regular maintenance stuff, and swapped out my energy suspension generic style swaybar end-links for these guys. They were more of an OE style but heavier duty and I liked that they had grease-able zurks. The only thing was this was third product in a row I've purchased that had zurks that weren't installed by the manufacturer and didn't thread properly. So frustrating, half of the zurks cross threaded, but I managed to get it to work. These felt well made, i know this seems dumb, but they way these were designed, I liked the grease bag - it had these little tiny openings that as you're pumping it full of grease, once it fills up it starts squirting a little bit out.

Link to product on Amazon - https://www.amazon.com/dp/B093QCZP3J?psc=1&ref=ppx_yo2ov_dt_b_product_details

Also added fully sound deadened my lift gate with some 80mil material. I think it helped a bit actually with noise back there and made the lift gate feel little more stout.

AND EDIT - had to pull these dumb TTX end links out, had a terrible popping noise after install, turns out one of the ball joints failed in less than a day. back to the energy suspension universal kit, and no noise. I did replace the bolts though with some new grade8 bolts from Ace. what a mess.
 

Attachments

  • PXL_20230310_190311290.jpg
    PXL_20230310_190311290.jpg
    142.7 KB · Views: 17
Last edited:

ak49

Well-Known Member
Joined
Jul 23, 2022
Posts
65
Reaction score
65
Location
Alaska
I'm pretty sure the console fridge would fit. We opted for the console safe because we like having a secure place to put my wife's purse, passports, or other vital travel items when on a road trip. We have a Dometic CFX3 25 that we use between the captains chairs in the second row. It offers more flexibility since it's not permanently attached to the vehicle and has more useable space. I don't have it in the vehicle now since it's winter and -10°F. I could throw it in and take a pic if you're interested in seeing what it looks like.
One of the other forum members inquired about the Dometic CFX3 25, so I thought I'd share some picture of how it fits between the seats in the second row.

In the forward position, I can easily reach the bottom of the cooler with my seat slid all the way back (I'm 6'2"). It's a little tippy (forward/backward) in this position due to the floor contour, so you have to shim the front a little.

Our preferred location is towards the back. I can't reach the bottom of the cooler from the driver's seat, but I can easily pull bottles of water out. The armrests have to be up, but it makes a decent armrest replacement for rear passengers especially if you through a blanket or pillow on top to make up for the shorter height. The cooler is much more stable on this section of floor. Having it back further allows for a strap to be ran from the cooler's handle to the child seat anchor on the folded center third row seatback. This stops it from sliding forward during hard braking. We use the other handle to hang a molle dump pouch lined with a doggie bag for trash.
 

Attachments

  • IMG_7327.jpg
    IMG_7327.jpg
    167 KB · Views: 85
  • IMG_7325.jpg
    IMG_7325.jpg
    152.3 KB · Views: 83
  • IMG_7328.jpg
    IMG_7328.jpg
    156.8 KB · Views: 82
  • IMG_7329.jpg
    IMG_7329.jpg
    145.5 KB · Views: 79
  • IMG_7331.jpg
    IMG_7331.jpg
    203.3 KB · Views: 85

MattG

Full Access Members
Joined
Feb 15, 2021
Posts
255
Reaction score
120
Location
Toronto
Picked up J&S oil separator for both the SPP and the 5.0. Installing both a breeze; brackets not 100% lined up but a drill made quick work of it.
Cleaned them both up while I was at it.
 

Attachments

  • 20230416_082445.jpg
    20230416_082445.jpg
    186.7 KB · Views: 49
  • 20230411_120859.jpg
    20230411_120859.jpg
    246.8 KB · Views: 49
  • 20230408_141808.jpg
    20230408_141808.jpg
    313.6 KB · Views: 51

MTB2022

Active Member
Joined
May 8, 2022
Posts
30
Reaction score
25
Location
livonia Michigan
added front auxiliary LED lamps to the front grille with the ford Aeroskin. I hope to add a larger LED down low when I can find a solid way to mount it. Last summer I added the rear work lamps to the rear.
 

Attachments

  • exp lights 1.jpg
    exp lights 1.jpg
    172.2 KB · Views: 62
  • expd lights 2.jpg
    expd lights 2.jpg
    181.7 KB · Views: 64
  • lm 1.jpg
    lm 1.jpg
    113.1 KB · Views: 62
  • lm 2.jpg
    lm 2.jpg
    108 KB · Views: 65
  • aeroskin 1.jpg
    aeroskin 1.jpg
    179.3 KB · Views: 64

ak49

Well-Known Member
Joined
Jul 23, 2022
Posts
65
Reaction score
65
Location
Alaska
I added a ProClip phone dash mount.


Attachments

  • IMG_4264.jpg
    IMG_4264.jpg
    137.1 KB · Views: 60
  • IMG_4265.jpg
    IMG_4265.jpg
    133.9 KB · Views: 59
  • IMG_4263.jpg
    IMG_4263.jpg
    119.2 KB · Views: 59

5280tunage

Full Access Members
Joined
Sep 17, 2019
Posts
1,499
Reaction score
868
Location
colorado
Pulled this old puppy out and matched my Mishimoto IC with a TurboSmart Veesport vent to atmosphere blowoff valve. Was a little worried about the sound but I can say I love it. Really helps you recognize the power (not in an HP or torque way) of the turbos and just how much air they move. I'm not expecting any real gains, but I wanted to help the turbo surge, and so far I think it's has.

A couple notes. I chose this one because it's plug and play, and also because they actually have a true plug for the standard in system release pipe. Some of the blow off valves out there don't have anything to plug that, they sort of leave it up to you. And I will say, the construction of this unit was awesome. The plug was even bill billet aluminum, which to me is just a sign of good quality. They could have easily handed you some sort of plastic cap to do the same job. Very impressed so far.

Built for anyone else that tries this, I ended up having to use half of the bracket that the blow off valve comes with, and the original bracket from the factory blow off unit. My guess this is some sort of difference between the f-150s and this platform. I would have blamed my intercooler, except the fact that the factory blow off unit directly bolted to that
 

Attachments

  • PXL_20230504_194243176.jpg
    PXL_20230504_194243176.jpg
    143 KB · Views: 22

GixxerJasen

Full Access Members
Joined
Aug 8, 2022
Posts
302
Reaction score
257
Location
DFW TX
Dang, why isn't this one stickied?

Forgot to take pictures but took off the entire front end in order to replace one small part. I've had the leaking front washer issue and it's frustrating because I fill up washer fluid and then promptly lose half of it. There's a TSB for it, but trying to set aside time when I don't need the truck and can get someone to drive me over to drop it off has been a pain. I've been saying I'd take care of it for six months now, so what the heck, the part is only $20.

I got about halfway through and got frustrated trying to find bolts that are on too small of black and white diagrams that I almost threw in the towel. Glad I didn't because overall it wasn't too bad. I could do it much faster next time.

I tell you though, it's quite stress full yanking the bumper cover off trusting that those pop pins are going to come loose. That's norally nerve wracking but I have a little PTST from removing fender flares on my old 80 series Land Cruiser when I followed directions and found a previous owner had replaced one of the push pins with a nut and bolt, and I yanked hard on it. Ugh. No such drama today. Only managed to lose one of the top push pin things so I need to get a bag of those for the future.

All done and no leaking so far, so looks good.
 
Top