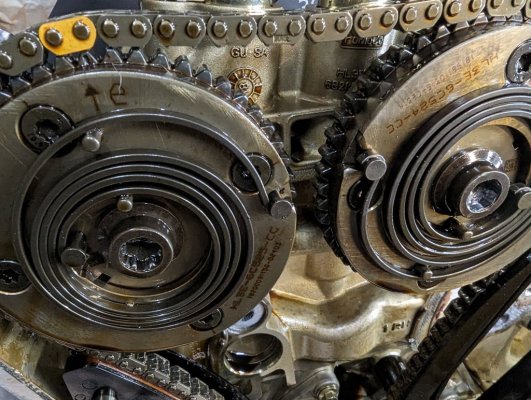
Cam phaser DIY Experience

Disclaimer: Links on this page pointing to Amazon, eBay and other sites may include affiliate code. If you click them and make a purchase, we may earn a small commission.

Anaclya

New Member
Joined
Mar 2, 2023
Posts
1
Reaction score
0
Location
Houston
@Jon2099 thank you for the info, this is a huge help. My rattle just started on my 2019 Plat at 80k miles. The dealership has screwed me around so much with a transmission problem, I'm not going to let them touch this issue.

Did you use a repair manual for this or a guide of some sort? Not sure I'm savvy enough to figure it out myself.

Thank you for your help!
 
OP
OP
J

Jon2099

Member
Joined
Nov 7, 2022
Posts
14
Reaction score
47
Location
Indiana
Hi Anaclya,
I used a few resources and spent some time preparing. I watched a series of youtube videos on a Gen1 ecoboost, which isn't exactly the same, especially the timing setup, but it does cover a lot of general things that were helpful about cleaning gasket surfaces, torquing bolts, etc. Search for FordTekMakuloko 3.5 ecoboost. I also watched a two video series on the gen2 ecoboost also on Youtube. Search for Ford Ecoboost 3.5 VCT Phaser Cold start rattle replacement Gen2. I also obtained a shop manual online, pretty cheap, around $25. Seemed a little sketchy, but it was exactly what I needed. I searched for 2018 Expedition Service Manual. It was a PDF download for the 2018 Expedition and was the complete shop manual covering all systems and had the electrical diagrams. Just make sure what you are getting is for the 2018. A lot of those sites may indicate it is, but then when you dig into it further they're actually showing a gen1 ecoboost.

Once I had the manual, I printed out the sections I needed and put them in order in a binder. It was useful for torques and the order for installing bolts on some assemblies, especially.

The biggest thing you could do wrong I think is have the timing chain wrong, or jump. The second video I mention above goes into quite a bit of detail about setting up the timing and ensuring the slack is on the tensioner side.

I'm happy to answer any other questions you might have, and good luck. When I was done mine started right up. It's not a job for a first time under the hood person, but it's also not what I would call a super technical job either, just a lot of stuff to come off and go back on that takes time.

Jon
 
OP
OP
J

Jon2099

Member
Joined
Nov 7, 2022
Posts
14
Reaction score
47
Location
Indiana
Thank you. Today marks 10 months since I did this and as should be expected, no leaks, no noise, etc. Everything is still working well and there have been no repairs on anything since then.
 
Joined
Dec 31, 2016
Posts
5
Reaction score
4
Location
Edmond, OK
Sorry to resurrect an old thread, but I saw the recent reply and am having some issues on my job on this motor.
Mine's not on an Expedition (though a couple years ago my son and I replaced the phasers on our 2010 Expedition 5.4L - that job was much easier), but a 2018 F-150 - same 3.5L Ecoboost.
I've done the research beforehand, bought all the parts from a local dealership at fortparts.com prices. I went ahead and got all the optional seals, etc as well as all the timing components and a new thermostat / seal as well (I saw a couple videos saying that customers had come back shortly after this job was done with overheating issues and the thermostat was the reason).
I'll do a write up afterwards regarding my job, but right now I'm stuck on a particularly frustrating problem.
I can't get the old phasers off. The bolts are so torqued on there that I've already stripped out two of the bolts. The first stripped bolt, I tried a large electric impact gun followed by a large breaker bar. I figured on that one, maybe the impact gun weakened the splines in the torx bolt, so I tried just using the breaker bar. Nope, that one stripped out as well. On those two, I'll end up having to cover everything except the phasers with plastic, then grinding them off. I have a feeling the other two will end up the same. Has anyone else had this issue? In all the videos I watched, the bolts either came straight out with just a bit of resistance or the video skipped past the part of breaking the bolts free.
I'll probably just move on with the grinding, but I'm curious what others' input will be. I thought about heating them, but I'm worried about doing damage to other components in the area so I won't do that.
Thoughts?
PXL_20230910_052405983s.jpg
 
Last edited:
Joined
Dec 31, 2016
Posts
5
Reaction score
4
Location
Edmond, OK
Oh, and whoever designed the coolant system on this motor needs to be let go. You can drain only about a gallon from it, then removing the multitude of hoses, etc from the front area, the thermostat housing, the water pump, etc leaves another 2 gallons on the floor. The whole work area is either a sticky mess or you spend half your time cleaning up after nearly every component removal. I'm sure I'm preaching to the choir, but needed to vent a bit about that.
 

Soliyou

Full Access Members
Joined
Jun 15, 2019
Posts
443
Reaction score
257
Location
OK
Sorry to resurrect an old thread, but I saw the recent reply and am having some issues on my job on this motor.
Mine's not on an Expedition (though a couple years ago my son and I replaced the phasers on our 2010 Expedition 5.4L - that job was much easier), but a 2018 F-150 - same 3.5L Ecoboost.
I've done the research beforehand, bought all the parts from a local dealership at fortparts.com prices. I went ahead and got all the optional seals, etc as well as all the timing components and a new thermostat / seal as well (I saw a couple videos saying that customers had come back shortly after this job was done with overheating issues and the thermostat was the reason).
I'll do a write up afterwards regarding my job, but right now I'm stuck on a particularly frustrating problem.
I can't get the old phasers off. The bolts are so torqued on there that I've already stripped out two of the bolts. The first stripped bolt, I tried a large electric impact gun followed by a large breaker bar. I figured on that one, maybe the impact gun weakened the splines in the torx bolt, so I tried just using the breaker bar. Nope, that one stripped out as well. On those two, I'll end up having to cover everything except the phasers with plastic, then grinding them off. I have a feeling the other two will end up the same. Has anyone else had this issue? In all the videos I watched, the bolts either came straight out with just a bit of resistance or the video skipped past the part of breaking the bolts free.
I'll probably just move on with the grinding, but I'm curious what others' input will be. I thought about heating them, but I'm worried about doing damage to other components in the area so I won't do that.
Thoughts?
View attachment 78758
No impact gun to be used on torque to yield bolts (similar to head bolts). You can zip it out with the impact gun after breaking the torque.

Are you sure you are using the correct torx bit?? These can be tricky since a smaller one will still fit but will lead to this damage.

Also for extracting them, not sure really what to do! Perhaps using a Dremel and many cutting disks.
 

gtr09

Supporting Member
Supporting Member
Joined
Oct 3, 2021
Posts
80
Reaction score
51
Location
Midwest
I've had luck pounding a smaller socket onto a stripped bolt, maybe you could tap the next size up in there?
 
OP
OP
J

Jon2099

Member
Joined
Nov 7, 2022
Posts
14
Reaction score
47
Location
Indiana
I'm not an expert at extracting stuck bolts, but there are plenty of people who are. Suggestions I've seen in the past include ones you've already heard here, welding a nut on the end if you are a welder and have tools, some specialty extraction devices like easy outs, or grinding the head of the bolt off so you can reduce the torque and get a hold of the bolt after removing the sprocket. The biggest enemy you have is that these are torqued really tight and some of the things that might work for low-torque applications won't work here. Grinding would make a lot of small particles in all kinds of areas where you don't want them, so a very thorough cleaning would be needed if you did that. Using some heat might help whatever route you take. I figure a machine shop can get them out in short order, and a flatbed tow there and back might also be a cost-effective choice that's a lot less frustrating. Sorry I'm not a lot of help, just throwing out some things that will hopefully help trigger a great idea. Others with more experience than I have may scoff at some of these--I'm okay with that. If you have someone else do it they may not preserve your current timing setup. Just be sure to get that back to where it needs to be upon reassembly.
 

Soliyou

Full Access Members
Joined
Jun 15, 2019
Posts
443
Reaction score
257
Location
OK
I don’t think welding will work due to the high torque. Before trying welding or grinding, I would recommend trying a rocket socket rounded nut extractor. These will bite into the bolt head and can take some torque.

Oh, and I just realized the correct bit is not a regular TORX. I think it is a TORX plus.
 
Last edited:
Top