CSVT#49
Active Member
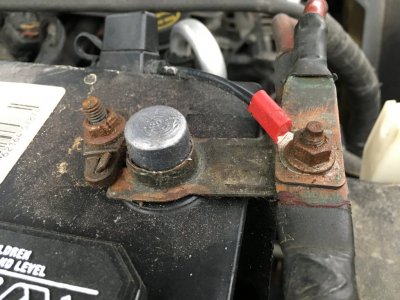
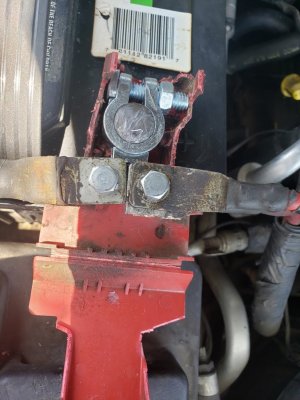
So my truck was plagued with the positive battery terminal issue as many of you may have experienced where the terminal will no longer tighten enough to prevent the terminal from spinning. It would consistently loosen and caused intermittent starting problems. I decided to do something about it. Now some people have done some similar to this solution I'm about to present, but I like mine as it allows for a factory look and install.
Options considered
1. Factory harness replacement, MotorCraft p/n: WC-95853 - Cost varies $48-85
2. STANDARD MOTOR PRODUCTS replacement positive battery cable, p/n: A544APP - Cost $15-20
3. Universal terminal w/stud, various models at different auto stores. - Cost $5-8
I opted for option because of cost and simplicity. Option 1 required complete removal of the facotry harness. Option 2 was lower cost, but required removal of the harness as well as disassembling the harness to remove and replace the positive battery cable. Alright that said on with the specifics...
This is merely a guide for a process that worked for me. I am not responsible, if while following these steps, something is broken or damaged.
Vehicle:
2005 Expedition, 5.4L, Eddie Bauer
Parts:
Super Start Battery Terminal p/n: 01346 (O'Reilly Auto Parts, $5.99)
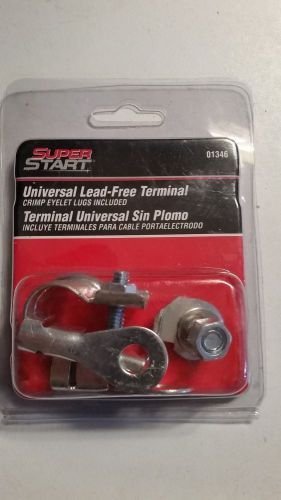
Tools Required:
Drill
5/16" drill bit for metal
ratchet
13mm socket
10mm socket
8mm socket
Vise grips or lineman pliers
dremel with metal cut off wheel (or similiar tool)
large rag (to catch debris)
rough grit sandpaper
box cutter (or similar cutting device)
Time required: 10-30min (depending on skill level)
R&R Steps
1. Using the 8mm socket and ratchet disconnect the negative battery terminal
2. If your positive battery terminal is still tight use the 8mm socket and ratchet to remove it, otherwise just twist and pull up. Pull the red plastic cover off the terminal and place to the side to be used later.
3. You can see by comparing the new terminal to the existing terminal that the terminal to stud distance is very close if not the same.
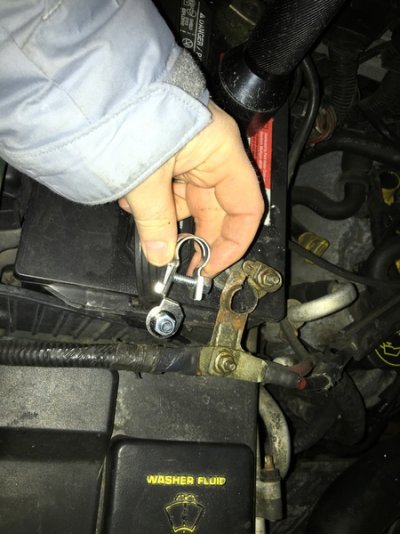
4. Using the 8mm socket and ratchet remove the nut holding the alternator cable and power distribution box cable from the positive battery terminal stud.
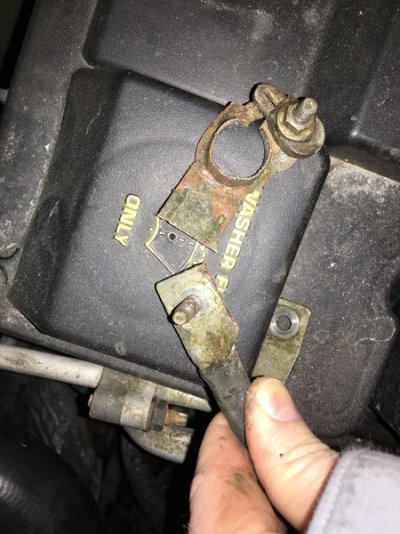
5. Place the rag under the cables and the working area. Using the dremel and cut off wheel cut off the positive terminal from the stud leaving enough material such that is equal to the material on the opposite side of the stud as shown.
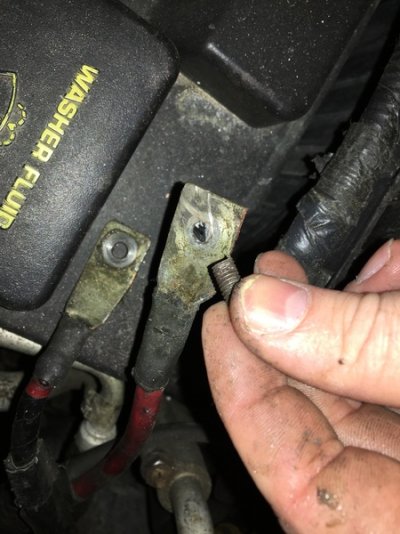
6. Using the dremel and cut off wheel cut off the stud from the cable.
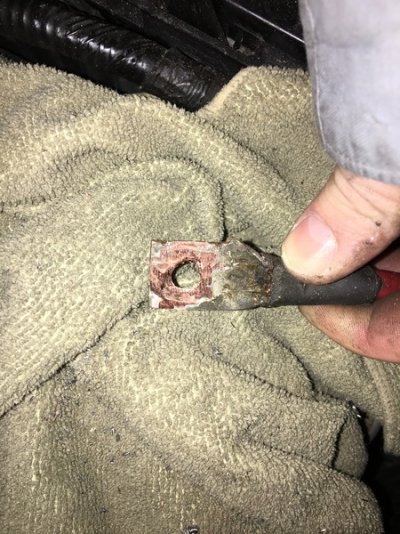
7. Use the drill with the 5/16" drill bit for metal and drill out the remaining portion of the stud from the cable.
8. Again using the drill with the 5/16" drill bit drill out the other cable for the alternator and power distribution box enlarging the existing holes.
https://imagizer.imageshack.com/v2/800x600q90/922/gsWtZe.jpg/img]
[ATTACH=full]60164[/ATTACH]
9. Clean all the cable ends using the sandpaper. (I just ground the surface with my dremel and cut off wheel and did not use sandpaper)
10. Remove the nut and washer from the stud on your new battery terminal. Place the cleaned cable ends on the stud followed by the washer and then tighten down the nut. I placed my cable ends on in the same order as the factory harness, which is newly drilled out positive battery cable, power distribution box cable, and alternator cable.
[ATTACH=full]60165[/ATTACH]
11. Grab the red plastic cover you set aside from step 2. You'll need to take your box cutter and cut out a tab to allow you to tighten your new battery terminal. See photo below. You'll need to make two vertical cuts to allow the plastic to fold down.
[ATTACH=full]60166[/ATTACH]
12. Place the red plastic cover underneath your new terminal assembly and place the terminal onto the positive battery stud.
13. Tighten your new battery terminal to the battery stud ensuring you do not over torque the new terminal.
14. Lock down the red plastic protective cover and enjoy your truck again. You now have a clean factory looking solution that should never give you problems again.
[ATTACH=full]60167[/ATTACH]
15. Throw away the pesky factory terminal piece you cut off with pride knowing you just saved yourself a good deal of money.
[ATTACH=full]60168[/ATTACH]
Options considered
1. Factory harness replacement, MotorCraft p/n: WC-95853 - Cost varies $48-85
2. STANDARD MOTOR PRODUCTS replacement positive battery cable, p/n: A544APP - Cost $15-20
3. Universal terminal w/stud, various models at different auto stores. - Cost $5-8
I opted for option because of cost and simplicity. Option 1 required complete removal of the facotry harness. Option 2 was lower cost, but required removal of the harness as well as disassembling the harness to remove and replace the positive battery cable. Alright that said on with the specifics...
This is merely a guide for a process that worked for me. I am not responsible, if while following these steps, something is broken or damaged.
Vehicle:
2005 Expedition, 5.4L, Eddie Bauer
Parts:
Super Start Battery Terminal p/n: 01346 (O'Reilly Auto Parts, $5.99)

Tools Required:
Drill
5/16" drill bit for metal
ratchet
13mm socket
10mm socket
8mm socket
Vise grips or lineman pliers
dremel with metal cut off wheel (or similiar tool)
large rag (to catch debris)
rough grit sandpaper
box cutter (or similar cutting device)
Time required: 10-30min (depending on skill level)
R&R Steps
1. Using the 8mm socket and ratchet disconnect the negative battery terminal
2. If your positive battery terminal is still tight use the 8mm socket and ratchet to remove it, otherwise just twist and pull up. Pull the red plastic cover off the terminal and place to the side to be used later.
3. You can see by comparing the new terminal to the existing terminal that the terminal to stud distance is very close if not the same.

4. Using the 8mm socket and ratchet remove the nut holding the alternator cable and power distribution box cable from the positive battery terminal stud.
5. Place the rag under the cables and the working area. Using the dremel and cut off wheel cut off the positive terminal from the stud leaving enough material such that is equal to the material on the opposite side of the stud as shown.

6. Using the dremel and cut off wheel cut off the stud from the cable.

7. Use the drill with the 5/16" drill bit for metal and drill out the remaining portion of the stud from the cable.

8. Again using the drill with the 5/16" drill bit drill out the other cable for the alternator and power distribution box enlarging the existing holes.
https://imagizer.imageshack.com/v2/800x600q90/922/gsWtZe.jpg/img]
[ATTACH=full]60164[/ATTACH]
9. Clean all the cable ends using the sandpaper. (I just ground the surface with my dremel and cut off wheel and did not use sandpaper)
10. Remove the nut and washer from the stud on your new battery terminal. Place the cleaned cable ends on the stud followed by the washer and then tighten down the nut. I placed my cable ends on in the same order as the factory harness, which is newly drilled out positive battery cable, power distribution box cable, and alternator cable.
[ATTACH=full]60165[/ATTACH]
11. Grab the red plastic cover you set aside from step 2. You'll need to take your box cutter and cut out a tab to allow you to tighten your new battery terminal. See photo below. You'll need to make two vertical cuts to allow the plastic to fold down.
[ATTACH=full]60166[/ATTACH]
12. Place the red plastic cover underneath your new terminal assembly and place the terminal onto the positive battery stud.
13. Tighten your new battery terminal to the battery stud ensuring you do not over torque the new terminal.
14. Lock down the red plastic protective cover and enjoy your truck again. You now have a clean factory looking solution that should never give you problems again.
[ATTACH=full]60167[/ATTACH]
15. Throw away the pesky factory terminal piece you cut off with pride knowing you just saved yourself a good deal of money.
[ATTACH=full]60168[/ATTACH]


