
As the owner of a 2017 Expy XLT I agree that the Coin Holder is useless. Taking an idea tip from PsychoBob90 I explored the idea of replacing it with a USB charger. First, a word about safety…
A number of you have considered a phone charger for that area, but as a retired police officer who has worked way too many crashes related to the use of the cell phone while driving, I urge you to reconsider. If the phone is down in that area you’ll be required to look down and away from your traffic path for a period of time. ANY length of time is too long and not safe.
A hands-free system of any sort is better than none at all, and if you need to be able to see the phone screen we have always recommended that you have it at (or very close) to eye level. That way when you look at the phone screen you'll still see your traffic path. [I use something called Majik Mount, but there are lots of options out there.]
It was my goal in this project to make something that looked factory without having to go broke. I also wanted to use what I had in my shop – no tool buys, unless I just HAD to have it.
The specs (we’ll discuss production steps later):
The coin holder’s diameter is 2-5/16” in a recessed opening, located below the trailer brake control, shown below.

The useable outside limit of the bezel is 3 inches, also below. The concealed area behind the panel is raised in that 3” diameter, forming a perfect bracing surface for the washer that comes up later.

I found black acrylic Plexiglass discs on eBay that fit the purpose. As part of this process I’d be using a 3” washer to go behind the dash, so I looked for 3” discs.
For the front, I wanted to be able to cut a 2-5/16” diameter circle out of one of the discs, then an appropriately sized hole for the USB charger unit. The charger unit would have its own plastic nut to secure it from behind.
I found the discs on eBay. Copy the bold text on the next line and paste it into the search box on eBay.
10 pack 3" black circle round disc 1/8" (3mm) thick acrylic plexiglass azm
You’ll see several choices of either 3, 5, or 10 discs. I ordered the 10 pack in case I destroyed a few during the project. I got lucky and only needed two. Here is a photo of the disc as it comes in the mail. In the photo it is resting on top of a small flashlight.
The disc comes with protective kraft type adhesive paper on both sides. This is a help because the paper takes a pencil mark very well, allowing you to easily determine the center of the disc.
The most appropriate USB charging unit seemed to be one with a provided drill bit to cut the correct hole. Copy the bold text below and paste it into the URL bar on your browser. It will bring up what I found.
Amazon.com: 12V USB Outlet, AlfredDireck Dual Quick Charge 3.0 USB Car Charger with 1.1inch Puncher, Waterproof 36W USB Power Outlet Fast Charge with Switch for 12V/24V Marine Boat Motorcycle Truck Golf Cart
The unit also comes with a rubber cap, shown below.

I preferred to use it without the cap. For me, the cap was in the way. The on/off pressure switch operates just with a finger touch. Here it is without the cap.

A number of you have considered a phone charger for that area, but as a retired police officer who has worked way too many crashes related to the use of the cell phone while driving, I urge you to reconsider. If the phone is down in that area you’ll be required to look down and away from your traffic path for a period of time. ANY length of time is too long and not safe.
A hands-free system of any sort is better than none at all, and if you need to be able to see the phone screen we have always recommended that you have it at (or very close) to eye level. That way when you look at the phone screen you'll still see your traffic path. [I use something called Majik Mount, but there are lots of options out there.]
It was my goal in this project to make something that looked factory without having to go broke. I also wanted to use what I had in my shop – no tool buys, unless I just HAD to have it.
The specs (we’ll discuss production steps later):
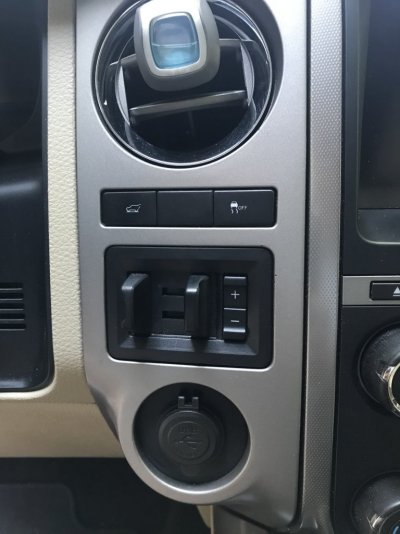
The coin holder’s diameter is 2-5/16” in a recessed opening, located below the trailer brake control, shown below.
The useable outside limit of the bezel is 3 inches, also below. The concealed area behind the panel is raised in that 3” diameter, forming a perfect bracing surface for the washer that comes up later.
I found black acrylic Plexiglass discs on eBay that fit the purpose. As part of this process I’d be using a 3” washer to go behind the dash, so I looked for 3” discs.
For the front, I wanted to be able to cut a 2-5/16” diameter circle out of one of the discs, then an appropriately sized hole for the USB charger unit. The charger unit would have its own plastic nut to secure it from behind.
I found the discs on eBay. Copy the bold text on the next line and paste it into the search box on eBay.
10 pack 3" black circle round disc 1/8" (3mm) thick acrylic plexiglass azm
You’ll see several choices of either 3, 5, or 10 discs. I ordered the 10 pack in case I destroyed a few during the project. I got lucky and only needed two. Here is a photo of the disc as it comes in the mail. In the photo it is resting on top of a small flashlight.
The disc comes with protective kraft type adhesive paper on both sides. This is a help because the paper takes a pencil mark very well, allowing you to easily determine the center of the disc.
The most appropriate USB charging unit seemed to be one with a provided drill bit to cut the correct hole. Copy the bold text below and paste it into the URL bar on your browser. It will bring up what I found.
Amazon.com: 12V USB Outlet, AlfredDireck Dual Quick Charge 3.0 USB Car Charger with 1.1inch Puncher, Waterproof 36W USB Power Outlet Fast Charge with Switch for 12V/24V Marine Boat Motorcycle Truck Golf Cart
The unit also comes with a rubber cap, shown below.
I preferred to use it without the cap. For me, the cap was in the way. The on/off pressure switch operates just with a finger touch. Here it is without the cap.