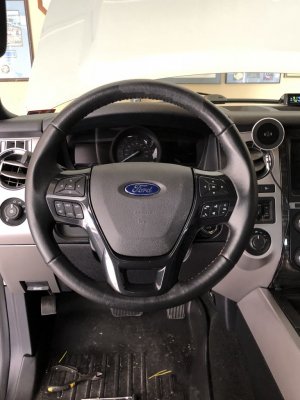
Heated Steering Wheel - Installation on my 2017

Disclaimer: Links on this page pointing to Amazon, eBay and other sites may include affiliate code. If you click them and make a purchase, we may earn a small commission.

OP
OP
17LimitedExpy

17LimitedExpy

Full Access Members
Joined
Jan 4, 2018
Posts
418
Reaction score
192
Location
TN
This is Connector C2280F (see red arrow) on the BCM:
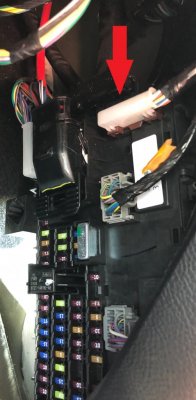
Power Connection Location.jpg

As you are looking at the Module, the connector is located at the top right.

Disconnect the connector and remove the white plastic cover (it's held on by 4 plastic clips).

Peel back/cut the insulation wrap around the wire bundle to give you easier access to the wire that goes to pin 11...the wire is White & Blue in color.

Looking at the back of the connector you should see the pin numbers and then count over to pin 11...follow that wire back to an easy location to place your splice.

Splice your wire harness power wire to the wire that goes to pin 11. Use some electrical tape to rewrap the wire harness/splice area, reinstall the white plastic cover on the connector and reconnect C2280F to the BCM.

Reinstall the kick panel.
 
OP
OP
17LimitedExpy

17LimitedExpy

Full Access Members
Joined
Jan 4, 2018
Posts
418
Reaction score
192
Location
TN
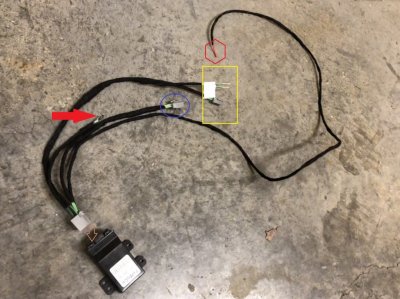
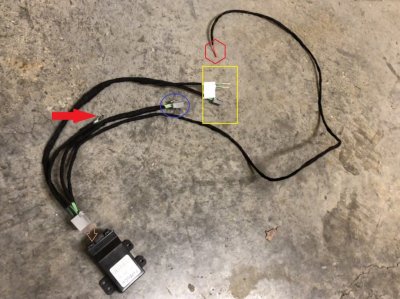
You should now have the MS CAN Network connected and power connected to your wire harness. Next step is to connect the ground wire (red arrow) of your harness to a ground location under the dash.

Wiring Harness Description.jpg

There are several areas you can connect the ground under the dash, so pick the area that works best for you...sorry, but I didn't take a pic of this step...it should be easy to identify a ground point under the dash and near the OBD connector.
 
OP
OP
17LimitedExpy

17LimitedExpy

Full Access Members
Joined
Jan 4, 2018
Posts
418
Reaction score
192
Location
TN
Now thread/run the last wires (yellow box) up the steering column to the clockspring area:

Wiring Harness Description.jpg
 
OP
OP
17LimitedExpy

17LimitedExpy

Full Access Members
Joined
Jan 4, 2018
Posts
418
Reaction score
192
Location
TN
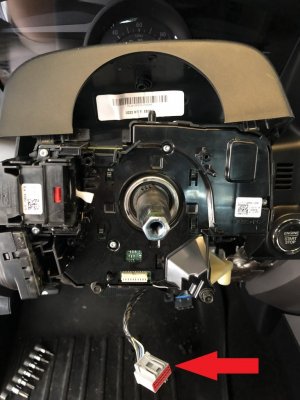
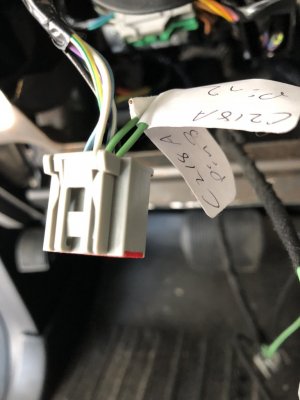
The two pins are labeled for Connector C218A...which is the connector that plugs into the clockspring (see pic below):

HSW Connector with Pins 2 and 3.jpg
 
OP
OP
17LimitedExpy

17LimitedExpy

Full Access Members
Joined
Jan 4, 2018
Posts
418
Reaction score
192
Location
TN
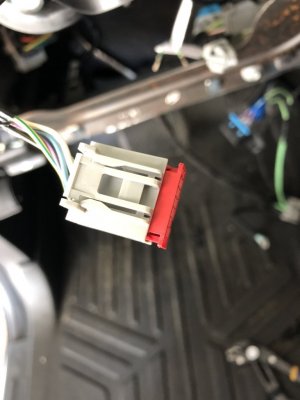
Use a small screwdriver/pick to pry up the red locking cover on the connector:

Clockspring Connector Red Cover.jpg
 
OP
OP
17LimitedExpy

17LimitedExpy

Full Access Members
Joined
Jan 4, 2018
Posts
418
Reaction score
192
Location
TN
On the front of the connector you will see the pin locations labeled at #1...count over to pin locations 2 and 3, then insert the pins into the back of the connector until you feel a 'click'.

Then push the red locking cover back into place so that you should see this:

IMG_0490.jpg
 
OP
OP
17LimitedExpy

17LimitedExpy

Full Access Members
Joined
Jan 4, 2018
Posts
418
Reaction score
192
Location
TN
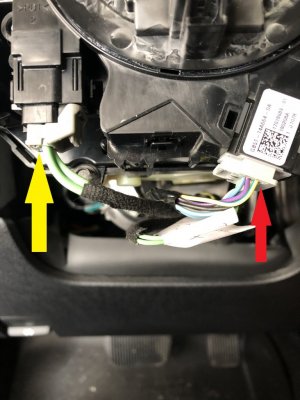
Install the new clockspring with the 4 Torx screws and connect the two connectors as shown:

New Clockspring Installed.jpg

Original connector (red arrow) with the 2 new pins inserted into the back is connected to the right plug.

New wire harness has the heated steering wheel element connector (yellow arrow) which plugs into the connector on the left.

Zip tie the new wire harness as necessary to the other wire harness running up the underside of the steering column.
 
Last edited:
OP
OP
17LimitedExpy

17LimitedExpy

Full Access Members
Joined
Jan 4, 2018
Posts
418
Reaction score
192
Location
TN
Now you should have the harness installed and connected.

Reinstall the bottom cover on the steering column with the 3 screws you removed...then install the top cover on the steering column.
 
OP
OP
17LimitedExpy

17LimitedExpy

Full Access Members
Joined
Jan 4, 2018
Posts
418
Reaction score
192
Location
TN
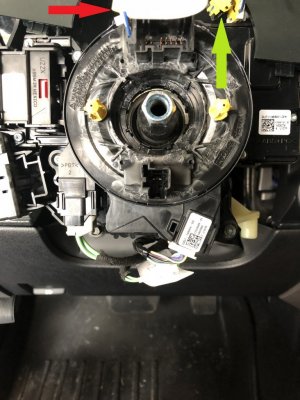
Pull the white stationary anchor (red arrow) on the new clockspring and thread the airbag connectors (yellow arrow) through the steering wheel connector as you install the steering wheel.

New Clockspring Pic with Arrows.jpg

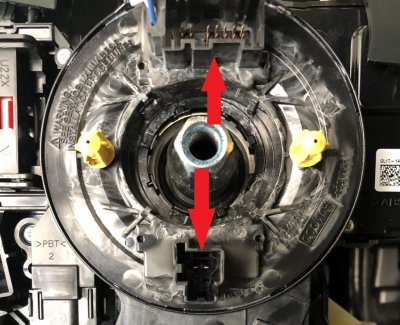
The new steering wheel will have two connectors that attach to the clockspring in the locations with the red arrows:

New Clockspring Pic with Steering Wheel arrows.jpg
 
OP
OP
17LimitedExpy

17LimitedExpy

Full Access Members
Joined
Jan 4, 2018
Posts
418
Reaction score
192
Location
TN
Make the two connections from the steering wheel to the clockspring and then set the steering wheel in place...reattach steering wheel using the Torx bolt you removed.

Connect the airbag to the two airbag connectors on the clockspring and install the airbag onto the steering wheel.

You should now be looking at something like this:

IMG_0496.jpg
 
Top