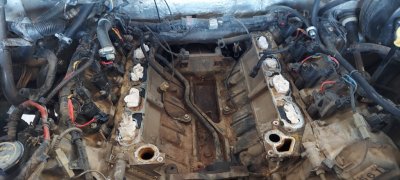
Hello Everyone I'm not new here but I finally a member

Disclaimer: Links on this page pointing to Amazon, eBay and other sites may include affiliate code. If you click them and make a purchase, we may earn a small commission.

Trainmaster

Old School Member
Joined
Jun 17, 2017
Posts
3,401
Reaction score
1,923
Location
Rockaway Beach, NY
Usually silicone has to be scraped off. I just use a single edged razor but there are scrapers made for this stuff with long handles. Just plug any holes with rags so the crap doesn't get into the engine. Vacuum or blow out any of the crap that you get free.

As far as the carbon and oil that's in the manifold, you could use that spray carburetor cleaner or just buy a new one if you feel it's worth the money. Really doesn't have to be clean enough to eat off of.

The injectors should be fine if the motor was running okay. They usually will last for many hundreds of thousands of miles without service. Most folks put Seafoam or some other additive in the gas and consider that a help. You can remove them and send them out to a service that will inspect, clean and make sure they are operating somewhat equally, but I wouldn't mess with them if they aren't bothering you.

Sweet eyes, by the way.
 
Last edited:

riphip

Full Access Members
Joined
Nov 6, 2018
Posts
641
Reaction score
189
Location
Memphis, TN.
Rigid wet/dry vac is a plus for me. I like the stainless steel over the plastic. Easier to clean. Clean up vac hoses, etc with Simple Green (let it sit) and water hose.
For gas additive, I use Hot Shot Gasoline Extreme ( I have diesel trucks also). Check it out.
 
OP
OP
Rachel N Adkins
Joined
Jul 21, 2020
Posts
22
Reaction score
3
Location
Twentynine palms CA
I was checking on the web to see what others have tried and one shows a guy using WD-40 and to my surprise it worked pretty good. I'm just waiting for a couple parts to come in tomorrow so I can start to put it back together and hopefully with the new IMCR actuator my code with be gone. I need it to pass smog asap. But while the intake manifold has been off I noticed there was a hose that I don't know what it goes to. The previous owner bent it over and put a zip tie on it. So now I'm trying to find out what the hell it is and where its supposed to go.

Thank you guys for the advice and help

20201103_145934.jpg
 

riphip

Full Access Members
Joined
Nov 6, 2018
Posts
641
Reaction score
189
Location
Memphis, TN.
Freshen those grounds that you, hopefully, may never see again while intake is off.
Do you have a close up of the zip-tied hose? I have a Ford DVD manual loaded
 
OP
OP
Rachel N Adkins
Joined
Jul 21, 2020
Posts
22
Reaction score
3
Location
Twentynine palms CA
Found out what the hose went to. It was my front differential. Im kinda confused on how the rods on the runner control actuator go and how the butterflies are supposed to be when its hooked on. Are the supposed to be open closed . Does anyone happen to have a picture of the intake manifold and how the butterflies are
 

riphip

Full Access Members
Joined
Nov 6, 2018
Posts
641
Reaction score
189
Location
Memphis, TN.
Intake Manifold Assembly


Disassembly

  1. Remove the 4 bolts, the vibration damper and the throttle body (TB).
  1. Remove the 4 bolts and the fuel rail.
  1. Remove the fuel injector-to-fuel rail locking clips and separate the fuel injectors from the fuel rail.
    • Discard the 2 O-ring seals from each fuel injector.
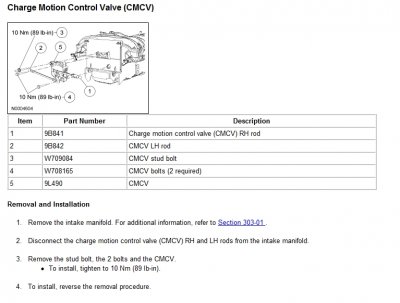
  1. Remove the charge motion control valve (CMCV) rod locking clips.
  1. Remove the stud bolt, the 2 bolts and the CMCV.
  1. Remove the 2 bolts and the positive crankcase ventilation (PCV) heater element.
    • Discard the O-ring seal.
  1. Remove the engine noise shield insulator from the intake manifold.
Assembly

  1. Install the engine noise shield insulator onto the intake manifold.
  1. NOTE: Lubricate the new O-ring seal with clean engine oil prior to installation.

    Using a new O-ring seal, install the PCV heater element and the 2 bolts.
    • Tighten to 6 Nm (53 lb-in).
  1. Position the CMCV and install the stud bolt and the 2 bolts.
    • Tighten to 10 Nm (89 lb-in).
  1. Install the CMCV rod locking clips.
  1. NOTE: Lubricate the new O-ring seal with clean engine oil prior to installation.

    Install new O-ring seals on each of the fuel injectors.
  1. Assemble the fuel injectors onto the fuel rail and install the locking clips.
  1. Install the fuel rail and fuel injector assembly onto the intake manifold.
  1. Install the 4 fuel rail bolts.
    • Tighten to 10 Nm (89 lb-in).
  1. NOTE: Lubricate the TB-to-intake manifold gasket with clean engine coolant prior to installation.

    Install the TB, the vibration damper and tighten the bolts in 2 stages.
    • Stage 1: Tighten to 9 Nm (80 lb-in).
    • Stage 2: Tighten an additional 90 degrees.
 

Trainmaster

Old School Member
Joined
Jun 17, 2017
Posts
3,401
Reaction score
1,923
Location
Rockaway Beach, NY
If the broken bolt is easily accessible, it shouldn't be too hard to get out, just a bit more work. Google "extracting broken bolt".

Generally, if you can, you start with a "left handed drill". It drills in the opposite direction and if the stub is not tight it may pull it right out. You drill in the center of the bolt. Removing more and more metal from the bolt can loosen the tension on the threads. You just have to carefully center the drill but (sometimes with a "center punch") and be cautious not to drill too deep into the part.

If that doesn't work, an "extractor" is tapped into the hole, which tightens left handedly and should pull it out.

My only advise is to only buy USA-made extractors and bits. The rest is garbage.

Removing broken bolts is an art.
 
Top