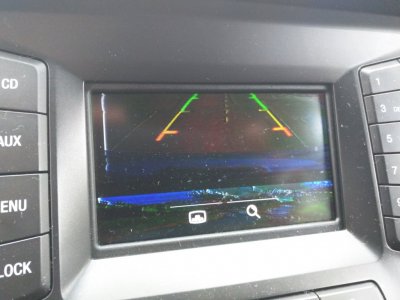
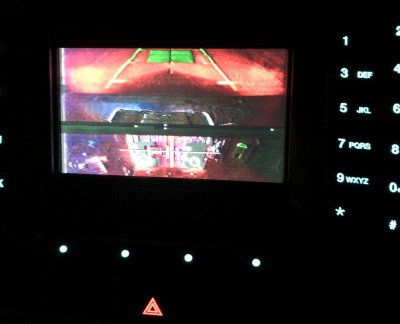
Reverse camera distortion

Disclaimer: Links on this page pointing to Amazon, eBay and other sites may include affiliate code. If you click them and make a purchase, we may earn a small commission.

JasonH

Full Access Members
Joined
Nov 12, 2018
Posts
1,329
Reaction score
707
Location
Houston, TX
Good evening everyone. A strange problem cropped up with the reverse camera in my 2017 EL. When I shift into reverse, the picture is now badly distorted. I am unsure what may have caused the problem. Has anyone ever seen this issue?


jeff kushner

Full Access Members
Joined
Nov 30, 2014
Posts
2,332
Reaction score
1,275
Location
North of Annapolis
Hate to say this.....but reboot and see what happens. It might be a one time thing or you have gotten some moisture at a connection.....the vid appears to show a failing/faulty transmission/connection rather than a failing camera itself?

jeff
 

Steve Tanner

Member
Joined
Apr 5, 2019
Posts
8
Reaction score
5
Location
Arizona
Had the exact same issue with my 2017 EL about 6 months ago. It would come and go if the back was shut hard.The dealer said it was caused by "moisture in one of the connections" (in Phoenix...riiiight), but I'm not sure which as they opened and cleaned all of them between the front and back under warranty. It hasn't happened since.

2018-11-29 14.11.02.jpg

You might try banging/shutting the back while watching the display to see if it changes any. I've also read (on this forum I think) that the cameras can get moisture in them.

The bad news is, if you have to replace the module they're about $250 OEM, or $160 aftermarket on amazon. The part number is FL1Z-19G490-B. I have no idea how hard they are to change or where the connectors the dealer cleaned are. Someone here probably knows though :biggrin:.
 
OP
OP
JasonH

JasonH

Full Access Members
Joined
Nov 12, 2018
Posts
1,329
Reaction score
707
Location
Houston, TX
This problem seemingly resolved itself. I was checking the fuse box for a blown fuse, and accidentally removed and dropped the unused CCD suspension fuse (I have the fuse, but not the feature). The camera begin working again. I suspect the camera cord plugs into the fuse box, and I jostled the cord while inspecting the fuses. But for now, it has been resolved.
 

Munkiebunz3

Full Access Members
Joined
Sep 20, 2018
Posts
261
Reaction score
92
Location
Soviet Monica, Kommiefornia
I fixed this myself today. Such a pain in the butt to make sure that nothing breaks upon removal. I will say that I will not ever remove the trim that says "expedition" because there are so many holes that would have to be patched...
I ended up removing the electrical tape at the camera connector and re-doing it. Did not clean the connector since it was clean to start. Just seems to be needing a disconnect and reconnect. As a side note, I'll be taking the next failure to install a rocker switch to allow me to pop the glass or door from the inside.
 

Phil M

New Member
Joined
Aug 15, 2019
Posts
1
Reaction score
1
Location
Youngwwod, Pa 15697
I have the exact same issue with my 2017 Expedition. The distortion comes and goes. I never know when it's going to work or not. Sometimes I will open and close the back hatch and that seems to fix the problem. I assume it's a loose connection inside the back hatch. The only way I can see to get to the actual camera is to pull off the inside trim cover. Correct me if i'm wrong . Are there any videos out there on how to remove that cover? Any help is greatly appreciated.
 

Munkiebunz3

Full Access Members
Joined
Sep 20, 2018
Posts
261
Reaction score
92
Location
Soviet Monica, Kommiefornia
I didn't take pictures or video but I posted a walk through of the process somewhere on the forum.
Hey guys, so I just had this same issue. It went from sporadic snow on the screen to "not available". I was able to fix it with just reseating the connection and re-wrapping the cable at the connection. I didn't take pics since I had a time constraint & I'm doing this by memory here.

You first will need to remove the panel on the inside of the door.
Door panel removal:
1. Pop the glass open. Remove the screw push pins behind the glass latch. Open the hatch (keep the glass open) then use a screwdriver to close the main gate latch so you can freely manipulate the door without closing it & having the motor activate every time.
2. Pop the side trim off the sides of the door where the glass goes. I think they slide towards the middle of the opening? Just keep them loose.
3. Remove the grab handle. T27 torx bit I believe.
4. From the main latch, pry down a bit on the panel to peek inside and find the stupid plastic nipples held in by the metal barbs. Use a long screwdriver (I mean long like over 18" long) or panel popper to pop out those barbs without breaking the nipples. This is hard but possible. The barbs will need to be bent back in order to pop the panel back on.
4. After releasing all the barbs, (the side trim needs to be loose here) slide the panel "upwards" to slide over the glass latch. Then it drops free.
5. Remove the top half of the plastic. Don't use a razor, just a smooth round metal shaft like that of a screwdriver and use quick motions to rip the adhesive from the metal without stretching it. Then disconnect the electrical connector that feeds the camera.

Get at least 2 wedges, a bent nose plier or a hose plier, and a 10mm socket with an extension.
6. Back out but do not fully remove the 4 10mm bolts from the outer trim that are on the inside of the door.
7. Push on the bolts to lift the trim so you can stick the wedge between the trim and the door.
8. Use the pliers to squeeze the plastic retention clips.
9. Remove the bolts all the way once all the clips are released.
10.Squeeze the rubber grommet & remove the trim.
11. Torx 20? For the camera bracket.

I got a quote for the harness for about $90. I did nothing other than re-wrapping the harness at the camera connector and reseating the connections. My camera is working well.

Mine was very dusty and dirty behind the panel and the harness was aged despite also being a 2016.
 

Michael McC

Well-Known Member
Joined
Oct 14, 2017
Posts
96
Reaction score
42
Location
Corpus Christi

Michael McC

Well-Known Member
Joined
Oct 14, 2017
Posts
96
Reaction score
42
Location
Corpus Christi
Instead of taking apart the inside of the tailgate, I keyed on someone's observations that there was a lot of dust in there. I used compressed air to blow out the area around the camera while hitting it with my palm. I did it with all systems on and the car in reverse but not running. I was able to look through the back window and see when the camera lost its distortion. It has been a few weeks, and the distortion has not returned. If you have a compressor with air jet attachment you might try this before taking apart the tailgate.
 
Top