Third row window water leak

Disclaimer: Links on this page pointing to Amazon, eBay and other sites may include affiliate code. If you click them and make a purchase, we may earn a small commission.

Mako825

Full Access Members
Joined
Dec 29, 2018
Posts
108
Reaction score
58
Location
Charlotte
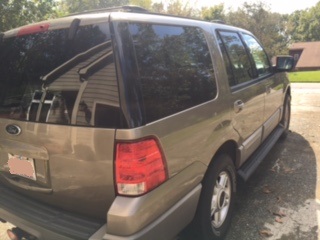
I have a 2003 Ford Expedition XLT.
2003 Ford Exp XLT.JPG
I've long suspected that I have a leak somewhere on the roof or side window on the passenger side of the 3rd row seat.


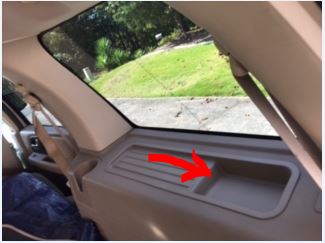
After the heavy rains this weekend, the small interior storage area was nearly full of water (I cleaned it up so the picture shows that it is empty)

Read 3rd Seat Area.JPG


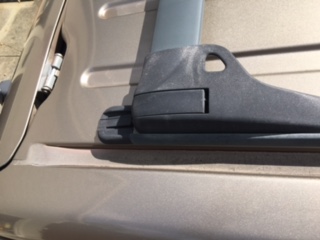
I haven't water tested it yet, but I did look at the exterior roof channel.
Roof Channel 1.JPG

I'm guessing that this channel has some sort of body seal in it?
Roof Channel 2.JPG

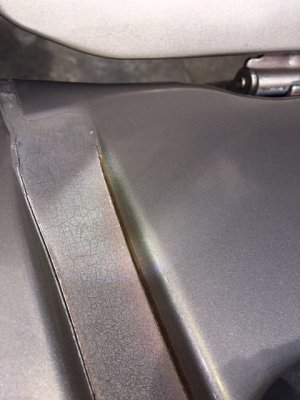
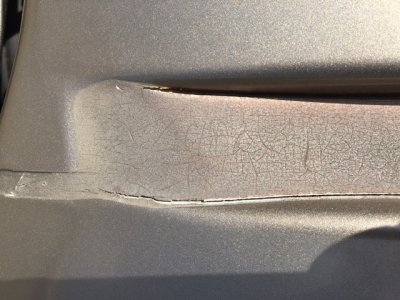
It looks like it's cracked and shrunk. Could this be the source of the water coming in?

Roof Channel 3.JPG
 

Hamfisted

Full Access Members
Joined
Nov 20, 2012
Posts
2,594
Reaction score
1,476
Location
Ft Lauderdale
If you don't see any water tracks on the quarter window then I'd say that roof area is a good bet. You can drop the headliner down on that corner and see if you can see anything obvious from underneath, and seal it up.
 
OP
OP
M

Mako825

Full Access Members
Joined
Dec 29, 2018
Posts
108
Reaction score
58
Location
Charlotte
Thanks Hamfisted - I did find water tracks on the on the quarter window. The Expedition is still parked in the same position in the driveway - with the nose up the driveway's incline and the backend lower than the nose. So I used a garden hose and water tested running water all down the roof, cargo rack and the side window. I did this for about 15 minutes and never saw a leak. If there is a problem with the seal for this fixed window, is there a DIY solution?

While doing the water test, I did find that the rubber seal for the rear window had slipped out of the inner opening. So, when I ran water over the back, it dripped inside the back of the liftgate. I repositioned the rubber gasket and it fixed the leak until I can reseal it with gasket silicone. But the location of that leak doesn't explain how water left tracks on the quarter window - upstream from the rear window.

Do you think dropping the headliner would provide any insights into what is going on? Or, is this simply a side window problem?

Thanks again for your help!
 

Hamfisted

Full Access Members
Joined
Nov 20, 2012
Posts
2,594
Reaction score
1,476
Location
Ft Lauderdale
Did you open the rear quarter glass on that side and inspect it's gasket? I would think that window gasket could be leaking too.
 
OP
OP
M

Mako825

Full Access Members
Joined
Dec 29, 2018
Posts
108
Reaction score
58
Location
Charlotte
Hamfisted - Unfortunately, the rear quarter windows on my 2003 Expedition are fixed / closed and do not open. But. I suspect that the seal material in there needs to be replaced. I know from reading, that the process to remove the interior trim to just get at the quarter window is pretty involved.

I'm curious if anyone on the Forum has any intel getting this window out and replacing the seal (and what type of seal product is needed)?
 

heston gee

Member
Joined
Jan 3, 2020
Posts
12
Reaction score
2
Location
Madison, SD
I have the same issue and have actually found it coming through the roof. Most noticeable in the winter under ice and snow loads. Only thing I can think of is to check under the cargo rack for loose screws and seal around the the roof lines
 
OP
OP
M

Mako825

Full Access Members
Joined
Dec 29, 2018
Posts
108
Reaction score
58
Location
Charlotte
Well, I finally decided to tackle the pesky water leak. I pulled the Expedition into the garage and tested the seals around the 3rd row seat windows and didn't find a leak. So, figured it had to be coming from the roof rack bolt holes or the cracks in the roof channel (see pics of cracks in first post in this thread). So I purchased some Permatex flowable clear silicone windshield & glass sealer. I setup my lightweight foldable work platform. I worked one side and then the other to pull off the roof rack by removing the 7 mounting screws on left and right side rails (T25 bit). Vacuumed all the dirt and grime from under the roof rack rails and the recessed screw holes. Took the roof rack outside and cleaned it up with some soapy water and a scrub brush. Then rinsed it off and left it out to dry.

I went back to the Expedition and cleaned the recessed roof channel on the drivers and passenger side to remove dirt and dust. I opened the Permatex flowable silicon package, cut the tip of the dispensing nozzle to be pretty small and screwed it onto the tube. With nitrile gloves on, I slowly squeezed the silicone into the cracks all down the sides of the roof channel. I was careful not to apply too much. It did as advertised "Wicking action silicone “seeks the leak”. Flows into hidden and hard-to-reach areas. Forms a tough, waterproof, durable, clear seal that is resistant to weather, extreme temperatures, vibration, shock and most shop chemicals. Fills surface voids and irregularities." Then ran a gloved finger down the length of the roof channel to further press the excess into the cracks. Used a shop towel with light pressure to clean up any visible excess silicone. The consistency of this silicon product is much thinner than any silicone product I've ever used and really does flow well into the gaps.

Then took the 14 roof rack screws and wound Teflon thread seal tape around each. Went back to the roof and squeezed a dab of the silicone into each of the 14 screw holes in the roof. Set the roof rack back in place on the roof. Reinserted each of the screws and gave them a few turns. Came back and tightened each until they were seated and tight.

I pulled the Expedition out of the garage today so I could inspect it in the sun. I was pleased how well the clear silicone filled the gaps and moreover how clean and undetectable it was. Products specs say that it takes 24-hours to fully cure. I'll probably give it an extra day or so and then run it through the drive-though car wash for a test. I'll report back on what I find.
 

Loudpedition

Member
Joined
Jan 11, 2021
Posts
5
Reaction score
1
Location
Hobe sound Florida
My 04 is was doing the same thing and I also did what you have done
my reason is my expy was a chief of polices personal truck and he had Antennas and low prow red and blues light bar on top that when retired and removed roof had globs of "sealant" maybe? All messy and as abundant on the top just before cross bar of roof rack!!

If it were not for heavy rains and my storage tray filling up as yours did I would have not have stepped on the rear bumper and noticed the crappy patch job someone did after retiring the police equipment towards the front

I though. Hmmm no way it came in there and traveled 8 feet and is making the drip/flight/whatever to this point!
Just no way.
But I did know I was going to fix the mounds of glob on roof even tho at 5'10" I cannot almost see the roof I was going to correct it!
I figured heck thing is a project let's do it right. I dug globs out of holes and sanded around them cleaned well and put a silicone product into the 1/4 holes and indentations that were around them,

Not good enough. I thought. That is nothing to do with rear water issue cant be so like you did I thought. Roof rack and track need a paint job just pull them. Why not!?
So before first repair got tack I was at store getting herculiner as it was beautiful Florida day and back to the expy
Removed them cleaned up years of uuck out from around them and I lightly sanded 120 grit i think from out side roof track to out side roof track now at this point I'm all in but i did see cracked sealant and also a sa crew holding track in rear passengers side that didnt feel ass if it were attached to anything. Just spun freely
Vacuumed it all up wiped and blew off roof

I put silicone along track valley and went and sanded roof rack down

Next day i taped off a line close to the rounding edges of roof that I thought were acceptable visually and went beast mode with berliner onto of my expy roof

Let that product cure a day and hit it one more time just cause I personally thought it looked bad ass

About week later I had cross bars and tracks painted metallic black and adjustable ends of crossbars a cool blueish green color that I chose to paint rear pumpkin, reese hitch and tow hooks just cause I'm repainting the ugly marronish red thing to a pretty pearl white and think that will look primo against the white

It's been since about Thanksgiving and not a drop of water in that tray!! So in my case I definitely thing roof rack track was the issue. Just wanted to share. Thanks for detailed explanation of your process
 

Aspen03

Full Access Members
Joined
Apr 24, 2019
Posts
727
Reaction score
357
Location
Indianapolis
I had water blowing in past the weather strip on the rear gate of our navigator. It was just not seated perfectly in one tiny area, maybe an inch wide. It was difficult to even tell. I removed it, cleaned it up and tapped it back into place all along w an small dead blow. Surprisingly hard to seat the thing completely.

We had water streaks on rear glass and a few splashes in the trim. Nothing close to the volume you describe however. Hopefully you found the leak, if not double check around the hatch. What I found is water was able to enter from the top, go into the plastic trim at the rear of the headliner and just follow to wherever it found an exit.
 

Hamfisted

Full Access Members
Joined
Nov 20, 2012
Posts
2,594
Reaction score
1,476
Location
Ft Lauderdale
I found my rear glass hinges loose and that caused the glass not to seat properly against it's gasket. They also rattled annoyingly. Tightened 'em up with a Torx driver and that solved all of it for me. It's always something .... got new Michelins today at Costco, so I got that going for me ..... LOL ....
 
Top