Not so Good Vibrations

Disclaimer: Links on this page pointing to Amazon, eBay and other sites may include affiliate code. If you click them and make a purchase, we may earn a small commission.

OP
OP
whtbronco

whtbronco

Full Access Members
Joined
Nov 13, 2021
Posts
518
Reaction score
225
Location
Winchester, VA
I replaced the driver side upper rear control arm to knuckle bushing. Once the right bits and pieces are figured out it wasn't too bad. I used a rented ball joint press and receiver cup to press it out. I actually had to press the center out first since I was not able find anything that would clear the mounting flange of the bushing while being thin enough to fit inside the knuckle. This worked out okay since it kept me from separately taking it apart on the bench. I wanted to see how this thing really works and it is not what I thought, I mean it really is a ball joint. For install I used a bolt, 1/8" thick washers, nut and 33mm deep impact socket to push to install and a 1-1/2" socket to receive.

Something else that surprised me is that this is where the camber adjustment is, the control arm mounting holes are ovals. I was not expecting to need to get it aligned.

I drilled a 2x4 and pushed it onto a pair of lug studs to help support the knuckle. Here's a couple pics of the bushing/ball joint. I thought it was interesting, maybe some of you will as well. I'm wondering where the rest of the rubber seal went. You can see the seal that's still on there is in decent shape, the other is torn up and it's not from pressing the center out or I'd have found the pieces.

Test drive proved that was almost all of the vibration. There's still a little something above 75mph and that may be 1 or more of the remaining 3 control arm to knuckle bushings. I will replace them all in the near future. I am really terrible at determining which bushing or ball joint is bad. I knew some bushing on the driver side rear was not right, but I had to get my wife to move the tire while I got under and put my hand on the joints to determine the faulty one.
 

Attachments

  • 2x4 support.jpg
    2x4 support.jpg
    163.3 KB · Views: 4
  • Upper bushing 1.jpg
    Upper bushing 1.jpg
    112.1 KB · Views: 4
  • Upper bushing 2.jpg
    Upper bushing 2.jpg
    129.3 KB · Views: 4
  • Upper bushing 3.jpg
    Upper bushing 3.jpg
    145.5 KB · Views: 3
Last edited:
OP
OP
whtbronco

whtbronco

Full Access Members
Joined
Nov 13, 2021
Posts
518
Reaction score
225
Location
Winchester, VA
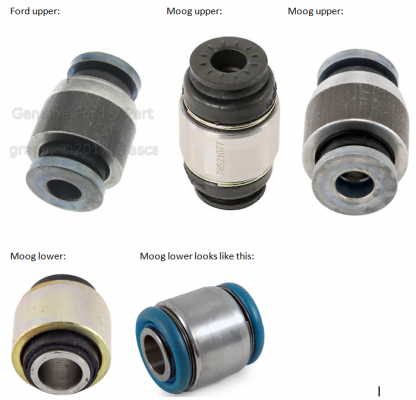
I have found an interesting issue. I can't find OEM replacements for the lower bushing and the upper OEM bushing is $125-150. So I decided to get Moog. However, Moog apparently sells 2 different designs under the same part number. Not the R series vs K series, these are all K80212 upper and K80213 lower. I bought 1 K80212 from Advance Auto Parts and got the design I want that also looks just the Ford design. I went to get another and they only have the other design in stock now. The K80213 from Advance is different and I'm not sure how I could press it in so I took it back. There is only about a 1/16" lip and that requires compressing the grease boots to get to.

I bought another lower from Rock Auto and both upper and lower from Amazon and all 3 seem unusable to me. What I received also does match the item picture from either vendor. I will likely get an OEM upper for the other side despite the 5x cost, but I don't know what to do about the lower. Maybe I'll just keep trying different vendors. I'm not confident in the other brands I have found and I know Moog is not what it used to be, but I think the K series parts are better than ACDelco Gold, Delphi, Dorman, Mevotech which are the other brands I have found.

1715819112516.png
 
OP
OP
whtbronco

whtbronco

Full Access Members
Joined
Nov 13, 2021
Posts
518
Reaction score
225
Location
Winchester, VA
I hope I don't regret this decision, but I ordered some Delphi bushings since they appear to match the original design. We'll see, they should be here Friday.

I need to get this all wrapped up so I can get to the normal annual maintenance, rusted rocker panel on the Expedition and engine seals in my sons Ranger.
 
OP
OP
whtbronco

whtbronco

Full Access Members
Joined
Nov 13, 2021
Posts
518
Reaction score
225
Location
Winchester, VA
Well to say I am disappointed in the Delphi lower bushing is an understatement. In fact after reviewing the pics on the RockAuto site I clearly did not get the same item that I wanted, just like the Moog's I ordered. The Delphi bushing I received looks just like the Dorman. In fact the only difference in appearance is the Delphi name and part number printed on it in the same font and color as the Dorman one. I found the Delphi bushing very difficult to install it just did not want to go in straight. I ended up filing it down twice. First the transition from the bevel to the mounting surface was exceptionally poor and basically was a small 90 degree. I tried to install it, but that edge just cut in so it had to go. Then I realized the angle was too steep and kind of curved. Maybe the curve is okay, but it needed to be longer/shallower so another 30 minutes with the file. Now I was finally able to get it started somewhat straight, but while installing I still had to pull it in, then remove the bolt, measure and adjust it with the large socket and mini sledge. I repeated this 4 times before it was seated enough to stay straight.

The upper bushing from Delphi is as pictured, however the bevel is too steep once again and in person I just don't care for the design of the rubber seals so I will return it. I am going to try to find 1 or 2 of what I suspect is the older Moog design. If that fails I will just go ahead and pay the $150+ from the local dealer for an OEM upper.

I don't really want to use the other lower Delphi bushing, but if I do I'll file it down beforehand. I am going to try to find the older design Moog as well, if I can I will replace the Delphi bushing and the passenger side original. I've not found another brand I want to try and I cannot find an NOS OEM lower bushing, so I have to do something.

I used a ball joint press to remove the original bushing, but it wasn't wide enough for the required bits I had on-hand to install. So I just used a grade 3 nut/bolt again. After 2 installs the grade 3 bolt is pretty much trashed, it was just something I had on-hand. I'll replace it with a grade 5 or 8 for the passenger side bushings.

After a couple short trips around town up to 75mph I noticed the coasting vibration is gone. It just doesn't feel right though. There seems to be some vibration from 40-50mph close to wheel speed and it can be felt up to 75mph, though it gets faster and harder to feel. I'll know better after driving it to work the next few days.

I'm wondering if I should go ahead and replace the rear toe adjusters as well. They don't move much and I can't feel or see any play. I couldn't feel any play in the lower driver side bushing either, but it was very easy to move after removing the knuckle indicating it was nearly worn out.
 
OP
OP
whtbronco

whtbronco

Full Access Members
Joined
Nov 13, 2021
Posts
518
Reaction score
225
Location
Winchester, VA
Turns out I was unable to acquire any OEM rear upper knuckle ball joint/bushings. Well I found 1 at a dealer in Brooklyn, NY, but I'm not gonna ask my wife to drive 10+ hours to pickup just 1. So I continued to look for some decent ball joints that I could also install, both upper and lower. I have no idea how the newer style Moog ball joints could be installed. It looks like Moog made a tool just for these that they listed for $280 and goes with a ball joint press. However, it would have fit just 1 of the ball joints, it's no longer being made and I could not find any for sale. So the ball joint hunt continued. I went to Advance, Autozone, O'Reilly, Napa and the local Ford dealer with no luck. The local dealer did tell me about the 1 in Brooklyn. In total I have purchased 18 ball joints, only 3 upper units have been what I wanted and what was pictured. I have 1 new Moog upper in hand and another confirmed correct enroute. I am pretty sure I messed up the first 1 I installed and it has a bit of play already. I did not realize it had reached the other side of the knuckle and I kept cranking on the ball joint press, oops.

My wife and I did some troubleshooting to identify the odd feeling and the minor vibration that's left. We found some play in the already replaced upper ball joint and also some play in the forward bushing of the lower left control arm. Neither had much play, but play none the less.

I have given up trying find lower ball joints and the tie rod boots are starting to dry rot. So I ordered OEM replacements from eBay for both lower arms which includes the lower ball joint and 2 new tie rods, $975 ouch. At least these parts should last the remainder of the vehicles useful life. I did not want Mevotech tie rods and I will never use Dorman suspension parts again.

I believe replacing these parts will finally resolve the multiple causes of vibration that I had.
 
Last edited:
OP
OP
whtbronco

whtbronco

Full Access Members
Joined
Nov 13, 2021
Posts
518
Reaction score
225
Location
Winchester, VA
I finally had time to replace the driver side rear lower control arm, tie rod and upper ball joint and align it over the last 3 days. The vibration kept getting better with each piece I replaced. The control arm got rid of the 35-55mph vibration. The tie rod eliminated the odd and kind of squirmy feeling, the upper ball joint resolved the vibration from 60-75mph. It feels much better. I never found any play in the tie rod. Even with it removed, but it's not tight anymore, though it's not loose either so I dunno. I confirmed, as suspected, I had messed up the upper ball joint I installed a couple weeks ago. It was very loose and, well no surprise, it was causing vibration.

I had twice rented a ball joint press from Advance Auto Parts, 1 of them was brand new, the other had been abused and I had to file the bolt threads to use it. They worked okay for removal, but I did not have pieces/bits to enable using it for installation. Last weekend Harbor Freight had the Maddox brand ball joint press for $50 and it worked much better. I used only the parts inlcuded with the ball joint press for removal. With a standard length 12point 32mm socket to push and a 1/2" deep receiver cup I was able to use the press to install the ball joint which worked oh so much better than the a 1/2" bolt I used last time. The hardest part this time was simply holding all the bits while I snugged up the press bolt. Just under 2hrs to replace the ball joint, align it and get everything cleaned up and put away. The right tools make all the difference some times.

Hopefully next weekend I can get the passenger side done as well.
 
Top