
New member here, but thought I would contribute by documenting my diagnosis and treatment of what appears to be a common issue with 2nd gen expeditions, roof rust. To be honest, I've been dealing with this problem for about 5 years, but in the past month decided to take the deepest dive I could to solve this issue, short of paying $1000s for a new roof panel.
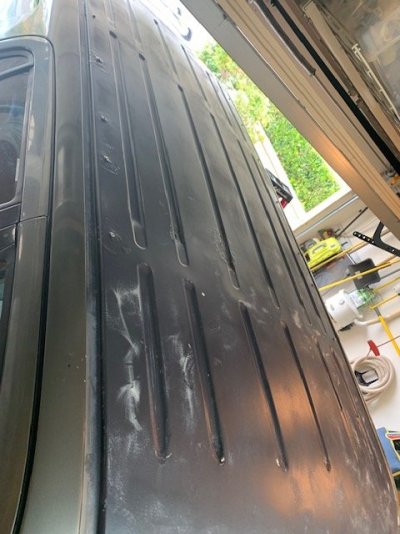
To start, I live in SoCal and my expedition sits outside exposed to the elements which does include coastal weather. I started noticing rust back in 2017. Like others, this rust seems to have started at the roof channels and more specifically, where those channels end both at the front of the roof and at the back. My solution back then was taking loctite extend rust neutralizer and some sandpaper, then priming and painting the area. That worked fine for about 4 years. At this time, I had no water leaks.
Flash forward to 2021 and the rust returned again. I really attribute this to the channels themselves because during rain or even just heavy condensation in the early AM, I would usually see pools of water just sitting in those channels. Unfortunately, I didn't catch the rust returning soon enough and it got so bad that holes started to appear.
Like others that have posted here, I first noticed water ingress into the cabin area around the A pillar and the cupholders. This of course frustrated me, so again, I went back to the roof, used rust neutralizer and sandpaper to get rid of as much rust as I could. However, now I was also dealing with holes some as small as pin holes and some as large as a dime. Using these forums I often heard suggestions of bondo, fiberglass, sealant or flex seal. I opted for bondo/flex seal in the quart bottles that you could apply with a paint stick/brush. I won't go to the trouble of documenting this process because ultimately this fix only lasted 1 1/2 years. I basically started getting drips again during the recent stormaggeddon of 2022/2023 that affected all of California. Just to get by, I basically put empty containers where the drips were happening in the cabin area(each of the rear corners and the front A pillar). I drained water from these containers after a big rain and just went on with my life, but I knew once spring/summer came I had to tackle this issue.
Rather than paying $1000s for a new roof panel, I am lucky enough to have a body shop guy in my family. So, we partnered up to create what I have to believe is a unique solution to this problem. So myself and my body guy proceeded to take grinders to all my old repairs and really take the rust completely off the roof. This led to ginormous holes in the roof some as big as 2" in diameter. We then proceeded to cut square holes with a cutting wheel to completely get rid of the rust. On average, the square holes were about 3" square. We then took some cardboard paper to create templates from these squares. Then we cut up some old honda accord body panels that were lying around the shop against the cardboard templates. My body guy and formed the panels up and welded them into their respective areas. All told, we used 8 patch panels.


At this time, my body guy also noticed that the roof channel seams were also coming apart, so we then added seam sealer as well during this repair.
Once the welds and seam sealer were in place, he then proceeded to bondo everything, then primer the entire roof and then paint the entire roof blue, yes blue even though my expedition is dark grey. Why? Because of my next step.

End of Part I.
To start, I live in SoCal and my expedition sits outside exposed to the elements which does include coastal weather. I started noticing rust back in 2017. Like others, this rust seems to have started at the roof channels and more specifically, where those channels end both at the front of the roof and at the back. My solution back then was taking loctite extend rust neutralizer and some sandpaper, then priming and painting the area. That worked fine for about 4 years. At this time, I had no water leaks.
Flash forward to 2021 and the rust returned again. I really attribute this to the channels themselves because during rain or even just heavy condensation in the early AM, I would usually see pools of water just sitting in those channels. Unfortunately, I didn't catch the rust returning soon enough and it got so bad that holes started to appear.
Like others that have posted here, I first noticed water ingress into the cabin area around the A pillar and the cupholders. This of course frustrated me, so again, I went back to the roof, used rust neutralizer and sandpaper to get rid of as much rust as I could. However, now I was also dealing with holes some as small as pin holes and some as large as a dime. Using these forums I often heard suggestions of bondo, fiberglass, sealant or flex seal. I opted for bondo/flex seal in the quart bottles that you could apply with a paint stick/brush. I won't go to the trouble of documenting this process because ultimately this fix only lasted 1 1/2 years. I basically started getting drips again during the recent stormaggeddon of 2022/2023 that affected all of California. Just to get by, I basically put empty containers where the drips were happening in the cabin area(each of the rear corners and the front A pillar). I drained water from these containers after a big rain and just went on with my life, but I knew once spring/summer came I had to tackle this issue.
Rather than paying $1000s for a new roof panel, I am lucky enough to have a body shop guy in my family. So, we partnered up to create what I have to believe is a unique solution to this problem. So myself and my body guy proceeded to take grinders to all my old repairs and really take the rust completely off the roof. This led to ginormous holes in the roof some as big as 2" in diameter. We then proceeded to cut square holes with a cutting wheel to completely get rid of the rust. On average, the square holes were about 3" square. We then took some cardboard paper to create templates from these squares. Then we cut up some old honda accord body panels that were lying around the shop against the cardboard templates. My body guy and formed the panels up and welded them into their respective areas. All told, we used 8 patch panels.
At this time, my body guy also noticed that the roof channel seams were also coming apart, so we then added seam sealer as well during this repair.
Once the welds and seam sealer were in place, he then proceeded to bondo everything, then primer the entire roof and then paint the entire roof blue, yes blue even though my expedition is dark grey. Why? Because of my next step.
End of Part I.