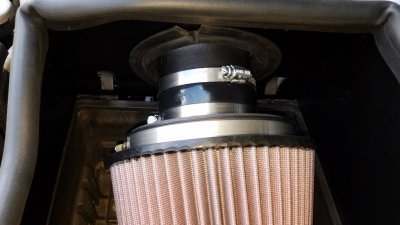
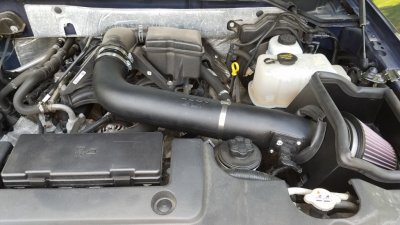
K&N 57-2595 FIPK CAI

Disclaimer: Links on this page pointing to Amazon, eBay and other sites may include affiliate code. If you click them and make a purchase, we may earn a small commission.

OP
OP
D

dj lpm

Member
Joined
Oct 21, 2014
Posts
6
Reaction score
2
Location
Whittier, CA
Ok, so the install took about 2 hrs and that was taking my time. A couple of install points:

1) Having a socket, extension and ratchet/nut driver for the hose clamps go a long way. Easier than a flat head to me.

2) On the diagram, the M and J hose clamps are labeled wrong. The M hose clamps (#64) go on the lower hump hose (K). The J hose clamps (#56) go on the Upper 3 ½” hose (N). I let K&N know; I don’t know if they’ll do anything.

3) The “bulb” trim piece will go on as one piece; the corners take a little playing with, but it does wrap around and seat properly. I started at the top right of the shield housing. Once it was installed, I trimmed off the excess with some shears.

4) The lower 9” trim pieces for the heat shield go on the sides of the shield, not the front and back (front being where the air filter connects). I measured out how much on each side by laying it on the heat shield frame itself, rather than cutting to 9 inches each (although it works out to about that). The super glue thing is a little messy. I just put very little on the heat shield edge and pressed on the trim pieces and then wiped up the excess.

5) I found that taking off the coolant return hose on the coolant reservoir made the placement of the completed heat shield box easier. Just make sure you plug the hose with a screwdriver or something so it doesn’t leak, and make sure you reinstall it afterwards.

6) The middle latch for the air box has to be removed. It has two prongs that hold it onto the latch bar; they are plastic and simply pry off. I used a small screwdriver to help.

7) Removing the air temp sensor from the stock filter housing is a little cumbersome. You need to lift the prong up slightly to get it over the catch, and then counterclockwise ½ turn. Once you have done that, you should be able to pull it out. I used an awl too lift the plastic prong and a pair of pliers to twist the sensor. BE DELICATE when you do it. Don’t forget to remove the blue o-ring before you install into the new grommet.

8) When you are ready to install tube assembly, I seated the bottom first, the air box tube second, and the passenger side tube third. Once seated, I tightened the passenger tube clamp first (seems to help keep the whole thing in the right positions). Make sure the hose clamps are seated correctly before tightening.

Results: Definitive power pick up, especially at lower speeds. There’s a slightly sucking/gurgling sound when the turbos kick it at low rpm. I asked K&N about that, and they said that it is normal, and simply the result of not having a cover over the filter housing anymore (i.e. you would hear it if you took the cover off the stock unit as well). The overall sound is slightly deeper, but not by much. No significant increased cabin noise either at idle or WOT, other than the gurgling at lower speeds. I’ve attached a couple of vids with the pre- and post sounds.

Before:
After:
Cheers!

DJ LPM
 

99WhiteC5Coupe

Full Access Members
Joined
Jun 3, 2015
Posts
2,629
Reaction score
1,332
Location
USA
Ok, so the install took about 2 hrs and that was taking my time. A couple of install points:

1) Having a socket, extension and ratchet/nut driver for the hose clamps go a long way. Easier than a flat head to me.

2) On the diagram, the M and J hose clamps are labeled wrong. The M hose clamps (#64) go on the lower hump hose (K). The J hose clamps (#56) go on the Upper 3 ½” hose (N). I let K&N know; I don’t know if they’ll do anything.

3) The “bulb” trim piece will go on as one piece; the corners take a little playing with, but it does wrap around and seat properly. I started at the top right of the shield housing. Once it was installed, I trimmed off the excess with some shears.

4) The lower 9” trim pieces for the heat shield go on the sides of the shield, not the front and back (front being where the air filter connects). I measured out how much on each side by laying it on the heat shield frame itself, rather than cutting to 9 inches each (although it works out to about that). The super glue thing is a little messy. I just put very little on the heat shield edge and pressed on the trim pieces and then wiped up the excess.

5) I found that taking off the coolant return hose on the coolant reservoir made the placement of the completed heat shield box easier. Just make sure you plug the hose with a screwdriver or something so it doesn’t leak, and make sure you reinstall it afterwards.

6) The middle latch for the air box has to be removed. It has two prongs that hold it onto the latch bar; they are plastic and simply pry off. I used a small screwdriver to help.

7) Removing the air temp sensor from the stock filter housing is a little cumbersome. You need to lift the prong up slightly to get it over the catch, and then counterclockwise ½ turn. Once you have done that, you should be able to pull it out. I used an awl too lift the plastic prong and a pair of pliers to twist the sensor. BE DELICATE when you do it. Don’t forget to remove the blue o-ring before you install into the new grommet.

8) When you are ready to install tube assembly, I seated the bottom first, the air box tube second, and the passenger side tube third. Once seated, I tightened the passenger tube clamp first (seems to help keep the whole thing in the right positions). Make sure the hose clamps are seated correctly before tightening.

Results: Definitive power pick up, especially at lower speeds. There’s a slightly sucking/gurgling sound when the turbos kick it at low rpm. I asked K&N about that, and they said that it is normal, and simply the result of not having a cover over the filter housing anymore (i.e. you would hear it if you took the cover off the stock unit as well). The overall sound is slightly deeper, but not by much. No significant increased cabin noise either at idle or WOT, other than the gurgling at lower speeds. I’ve attached a couple of vids with the pre- and post sounds.

Before:
After:
Cheers!

DJ LPM


The K&N website states the power gain is 6.94 hp at 4,100 RPM.

You can feel a "definitive power pick up, especially at lower speeds"? Are you sure it is not the additional noise that you are hearing?

I own a 2015 Ford Expedition Limited 4x4.
 

theoldwizard1

Full Access Members
Joined
Jul 29, 2013
Posts
320
Reaction score
81
Location
SE MI
Any of the aftermarket oil impregnated cloth air filter do work well, WHEN THEY ARE CLEAN ! They can get extremely dirty, extremely quickly and even in typical driving conditions require servicing more often than a paper filter, sometimes as short as 5,000 miles.

Over oiling can cause "coating" on the mass air flow sensor.
 

mjhicks

Member
Joined
Mar 17, 2017
Posts
6
Reaction score
0
Location
West Chester, Ohio
So, I also recently purchased and installed a K&N intake for my 2012 Expy, but was less than pleased. I purchased the 57-2575 kit, which was what was called for, and the fit was horrible. At least 3/4" gap between the passenger side of the air box and the stock air box base, and another large gap where the K&N tube goes into the air box. After speaking with support at K&N, they told me this was how it was supposed to be. So frustrated now with them, I'll likely never by from them again. Here are some pics. I am planning on doing something to clean up the fit a little bit, but I was just too frustrated to do that at the time of install.20170702_135319.jpg 20170702_135329.jpg 20170702_135319.jpg 20170702_135329.jpg 20170702_135310.jpg
 

Deesko

Member
Joined
Jul 5, 2017
Posts
17
Reaction score
1
Location
Virginia
I just finished putting the 57-2575 kit on my 2010 and agree with the above poster that the fit and finish leaves a little to be desired for the cost.

IMO, thee gasket strips should be molded into place rather than having the purchaser put it on and requiring the inevitably ugly cut in the strip and the air box hole should be done better (maybe a molded flange the air intake tube and filter each separately connect too) but at the very least, why not make the K&N box the same size as the factor box?

Overall, I'm fine with the performance of the intake but the design is meh.
 

J Ski

3.5plati
Joined
Apr 4, 2017
Posts
1,021
Reaction score
484
Location
VA
Ok, so the install took about 2 hrs and that was taking my time. A couple of install points:

1) Having a socket, extension and ratchet/nut driver for the hose clamps go a long way. Easier than a flat head to me.

2) On the diagram, the M and J hose clamps are labeled wrong. The M hose clamps (#64) go on the lower hump hose (K). The J hose clamps (#56) go on the Upper 3 ½” hose (N). I let K&N know; I don’t know if they’ll do anything.

3) The “bulb” trim piece will go on as one piece; the corners take a little playing with, but it does wrap around and seat properly. I started at the top right of the shield housing. Once it was installed, I trimmed off the excess with some shears.

4) The lower 9” trim pieces for the heat shield go on the sides of the shield, not the front and back (front being where the air filter connects). I measured out how much on each side by laying it on the heat shield frame itself, rather than cutting to 9 inches each (although it works out to about that). The super glue thing is a little messy. I just put very little on the heat shield edge and pressed on the trim pieces and then wiped up the excess.

5) I found that taking off the coolant return hose on the coolant reservoir made the placement of the completed heat shield box easier. Just make sure you plug the hose with a screwdriver or something so it doesn’t leak, and make sure you reinstall it afterwards.

6) The middle latch for the air box has to be removed. It has two prongs that hold it onto the latch bar; they are plastic and simply pry off. I used a small screwdriver to help.

7) Removing the air temp sensor from the stock filter housing is a little cumbersome. You need to lift the prong up slightly to get it over the catch, and then counterclockwise ½ turn. Once you have done that, you should be able to pull it out. I used an awl too lift the plastic prong and a pair of pliers to twist the sensor. BE DELICATE when you do it. Don’t forget to remove the blue o-ring before you install into the new grommet.

8) When you are ready to install tube assembly, I seated the bottom first, the air box tube second, and the passenger side tube third. Once seated, I tightened the passenger tube clamp first (seems to help keep the whole thing in the right positions). Make sure the hose clamps are seated correctly before tightening.

Results: Definitive power pick up, especially at lower speeds. There’s a slightly sucking/gurgling sound when the turbos kick it at low rpm. I asked K&N about that, and they said that it is normal, and simply the result of not having a cover over the filter housing anymore (i.e. you would hear it if you took the cover off the stock unit as well). The overall sound is slightly deeper, but not by much. No significant increased cabin noise either at idle or WOT, other than the gurgling at lower speeds. I’ve attached a couple of vids with the pre- and post sounds.

Before:
After:
Cheers!

DJ LPM
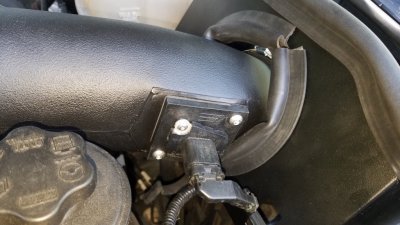
You get any check engine codes that you remember? I got one for crankcase ventilator system disconnected (P04DB)
 
OP
OP
D

dj lpm

Member
Joined
Oct 21, 2014
Posts
6
Reaction score
2
Location
Whittier, CA
J ski - apparently I have entered the twilight zone. I'm now asking you the exact same question on your install thread. P04db just came on at 24k miles (12k time with cai on).
 
Top