rex450se
Full Access Members
Sorry for the long post but here goes.
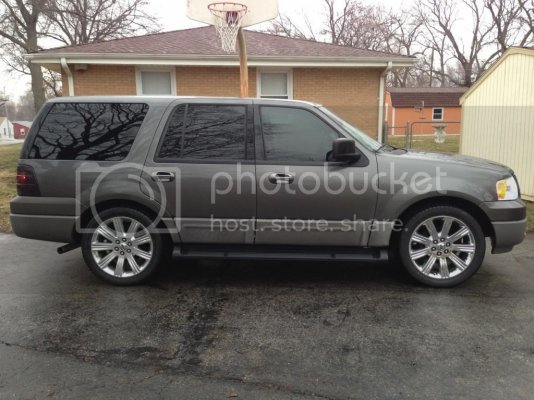
So this was one big ordeal but I am pretty happy with where I'm at right now (except I want to go even lower now). So after I determined that there are really only 2 kits to lower a 4wd 2nd gen Expedition I decided to go with the Ground Force kit. The Eibach kit doesn't lower the truck as much and also doesn't come with the camber kit which I would also need. So after using the Googles, I found a website that had the kit the cheapest, $461.99, and ordered it. I figured it was one of those websites that just has 1 guy behind the computer and when you order a part, turns around and orders it from the distributer or manufacturer and it gets drop shipped to you, but he was the cheapest so I didn't care. Before ordering I talked with Ground Force and they said they didn't even have it in stock and was about 6-8 weeks out. So I knew when I ordered it that it would be awhile, no big deal. I ordered it on a Friday and on the next Monday I got an e-mail that they canceled my order and where refunding my purchase. I called and wanted to know what was up and he said he'd look into it. Supposedly the distributer said the part was discontinued and he even verified himself through Ground Force that it wasn't. I just said screw it, give me my refund and I'll find it elsewhere. I turned around and ordered it from AutoAnything.com and told him the story and how I knew it would take awhile but I am okay with that, don't just cancel my order without talking to me. So I ordered it and prepared to wait. Within a week I got an e-mail that it had shipped. Then snowpacalypse hit Kansas City, but I wasn't deterred. I called UPS to make sure it was going to get delivered and was told that there was no delay and it would be on the truck Thursday. So all day Thursday I was checking the tracking and it never said out for delivery. I was pissed. So I called UPS again and he said because of the snow it was still on the truck and wouldn't be unloaded until Friday and wouldn't go out until probably Monday. I couldn't wait, so I had him hold it at the counter for pick up at the distribution center and picked it up Friday afternoon. So the install began Friday night. To anyone looking to do this, start spraying the nuts and bolts with something like PB Blaster at least a few days before, trust me, it will save you. So the first time I installed everything it took me about 10 hours between Friday and Saturday, but a lot of that was fighting rusty bolts and figuring out what could stay attached and what needed to come undone. The backs weren't bad at all but the fronts were a real pain. Also, when trying to remove the strut from strut mount the nut was so rusty that I just snapped the threaded part off. So since I had to replace one I went ahead and replaced both rear struts with Monroe replacements. After all was said and done the back dropped 2" almost exactly but the front dropped less than 1". I took it Sunday to get aligned and just had them throw on the camber kit when they did the alignment. I wasn't happy with the cali lean but was hoping it would settle a bit and called Ground Force that Monday. They said it should be almost instant like the back with minimal settling. I said I'd double check everything and planned on tearing it apart to double check everything. Here's a pic of how it was at that point.

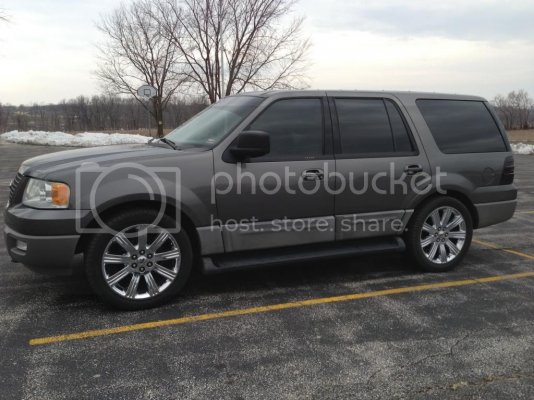
So that Friday I started on just the front since I was satisfied with the back. Everything looked right so I had decided to cut the spring to bring it down. I only cut 1/4 of a coil to start since I didn't want to take to much. I was pretty nervous already about cutting them. Here's how it turned out.

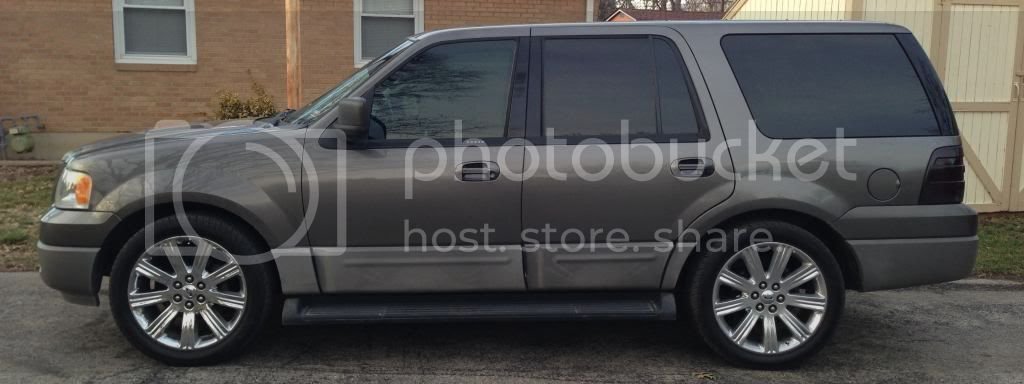
Which was definitely better but not perfect. So the following Monday I went back at the front. I took off another 1/4 of a coil and put it all back together. By this time I was getting pretty good and had both sides from start to finish done in less than an hour and a half. Now it is darn near perfect with about 1/16" difference between the front and back with the front being a hair lower. I was looking for even or a hair lower in the front so I am satisfied. So it turned out to be a pain but I'm happy with the outcome. I'm also happy that I did it myself and didn't have to worry about working with a shops schedule and trying to get them to fix it. So I am pretty confident that I could answer most questions about doing this type of drop or even the conversion since it would require the same removal and installation. So here is the final product.

So now I am wanting to go lower. I am thinking of taking another 1/4 or so of the front and the same amount for the rear. If would love another 1/2-1" lower. I may just leave it for now. I haven't decided yet.
Victor
Freeway- I think we both had the same problem, we just solved it differently. In both cases, the back was significantly lower than the front. I just think that because you are working with a tire that's almost 2" taller you had the rubbing in the back and raised the back to solve the problem. Since my tires are smaller it allowed me to drop the front to compensate. If this is the case you may have been able to use the stock spring and would have only been 1/2" higher than you are now since you used a 1-1/2" spacer. It may have been worth trying the conversion with stock springs to see where you were at. May not be what you wanted to hear but just my .02.
So this was one big ordeal but I am pretty happy with where I'm at right now (except I want to go even lower now). So after I determined that there are really only 2 kits to lower a 4wd 2nd gen Expedition I decided to go with the Ground Force kit. The Eibach kit doesn't lower the truck as much and also doesn't come with the camber kit which I would also need. So after using the Googles, I found a website that had the kit the cheapest, $461.99, and ordered it. I figured it was one of those websites that just has 1 guy behind the computer and when you order a part, turns around and orders it from the distributer or manufacturer and it gets drop shipped to you, but he was the cheapest so I didn't care. Before ordering I talked with Ground Force and they said they didn't even have it in stock and was about 6-8 weeks out. So I knew when I ordered it that it would be awhile, no big deal. I ordered it on a Friday and on the next Monday I got an e-mail that they canceled my order and where refunding my purchase. I called and wanted to know what was up and he said he'd look into it. Supposedly the distributer said the part was discontinued and he even verified himself through Ground Force that it wasn't. I just said screw it, give me my refund and I'll find it elsewhere. I turned around and ordered it from AutoAnything.com and told him the story and how I knew it would take awhile but I am okay with that, don't just cancel my order without talking to me. So I ordered it and prepared to wait. Within a week I got an e-mail that it had shipped. Then snowpacalypse hit Kansas City, but I wasn't deterred. I called UPS to make sure it was going to get delivered and was told that there was no delay and it would be on the truck Thursday. So all day Thursday I was checking the tracking and it never said out for delivery. I was pissed. So I called UPS again and he said because of the snow it was still on the truck and wouldn't be unloaded until Friday and wouldn't go out until probably Monday. I couldn't wait, so I had him hold it at the counter for pick up at the distribution center and picked it up Friday afternoon. So the install began Friday night. To anyone looking to do this, start spraying the nuts and bolts with something like PB Blaster at least a few days before, trust me, it will save you. So the first time I installed everything it took me about 10 hours between Friday and Saturday, but a lot of that was fighting rusty bolts and figuring out what could stay attached and what needed to come undone. The backs weren't bad at all but the fronts were a real pain. Also, when trying to remove the strut from strut mount the nut was so rusty that I just snapped the threaded part off. So since I had to replace one I went ahead and replaced both rear struts with Monroe replacements. After all was said and done the back dropped 2" almost exactly but the front dropped less than 1". I took it Sunday to get aligned and just had them throw on the camber kit when they did the alignment. I wasn't happy with the cali lean but was hoping it would settle a bit and called Ground Force that Monday. They said it should be almost instant like the back with minimal settling. I said I'd double check everything and planned on tearing it apart to double check everything. Here's a pic of how it was at that point.

So that Friday I started on just the front since I was satisfied with the back. Everything looked right so I had decided to cut the spring to bring it down. I only cut 1/4 of a coil to start since I didn't want to take to much. I was pretty nervous already about cutting them. Here's how it turned out.

Which was definitely better but not perfect. So the following Monday I went back at the front. I took off another 1/4 of a coil and put it all back together. By this time I was getting pretty good and had both sides from start to finish done in less than an hour and a half. Now it is darn near perfect with about 1/16" difference between the front and back with the front being a hair lower. I was looking for even or a hair lower in the front so I am satisfied. So it turned out to be a pain but I'm happy with the outcome. I'm also happy that I did it myself and didn't have to worry about working with a shops schedule and trying to get them to fix it. So I am pretty confident that I could answer most questions about doing this type of drop or even the conversion since it would require the same removal and installation. So here is the final product.

So now I am wanting to go lower. I am thinking of taking another 1/4 or so of the front and the same amount for the rear. If would love another 1/2-1" lower. I may just leave it for now. I haven't decided yet.
Victor
Freeway- I think we both had the same problem, we just solved it differently. In both cases, the back was significantly lower than the front. I just think that because you are working with a tire that's almost 2" taller you had the rubbing in the back and raised the back to solve the problem. Since my tires are smaller it allowed me to drop the front to compensate. If this is the case you may have been able to use the stock spring and would have only been 1/2" higher than you are now since you used a 1-1/2" spacer. It may have been worth trying the conversion with stock springs to see where you were at. May not be what you wanted to hear but just my .02.


