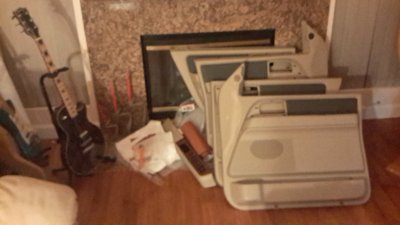
2007+ expedition how to remove front and rear door panels

Disclaimer: Links on this page pointing to Amazon, eBay and other sites may include affiliate code. If you click them and make a purchase, we may earn a small commission.

thegeneral

Active Member
Joined
May 17, 2012
Posts
41
Reaction score
0
Location
california
Since it took me awhile to find it, I figured i'd post directions on how to remove the front and rear door panels on a 3rd generation expedition 2007 2008 2009 2010 2011 2012

(i'm only being wordy for google searchers)

the rear-

One phillips screw on the rear top back of the panel-remove

two bolts at the bottom (plain sight)- remove

Near the door handle there is a small square cover inside the handle part where your hand would go, pop that cover with a small screw driver and remove the bolt behind the panel

in the part of the door that you would grab to close it, there is another rectangle panel that will (with some work) pop up exposing two more bolts- remove

The plastic trim around the door handle can be removed at this point. I just got ahold of it and pulled and eventually it came undone. If you want to be careful with it, pop the bottom off first. The lock tabs are at the bottom, and the "hinges" are at the top.

unscrew the lock post.

You can now lift up on the panel and remove it (after undoing the window connector).


Front door is the same, but the tweeter panel above needs to be popped off prior to lifting it up. If you pull on the tweeter panel youll hear two pops, you can then pull up on the panel. The lock post on the front does not need to be removed.

One thing to remember on the front is that there alot more connectors to undo than the back, including the tweeter connection.

Have fun doing it!
 

GAINMOB

Supporting Member
Supporting Member
Joined
May 19, 2010
Posts
14,561
Reaction score
888
Location
Hampton, VA
No pics? LOL

Sent from my BlackBerry 9810 using Tapatalk
 

soultrain99

New Member
Joined
Apr 27, 2011
Posts
1
Reaction score
0
Location
NY
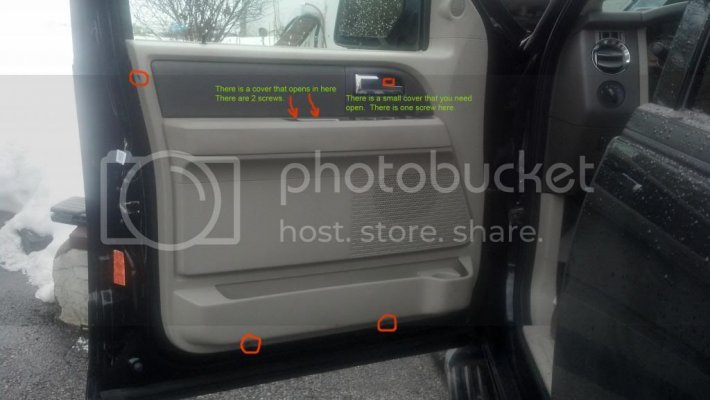
This post was a huge help for me. Thanks. I had to replace the side view mirror. I took a picture and pointed out where the screws were.

I have a 2011 Ford Expedition King Ranch.

expedition-door-edit_zpsa8097a2b.jpg
 

MUSKYMAN52

Full Access Members
Joined
Feb 5, 2013
Posts
109
Reaction score
9
Location
Illinois
almost exact same on older models too, took me a while to find hidden screws above handle mechanism
 

2007EXPY

Member
Joined
Oct 19, 2014
Posts
22
Reaction score
0
Location
Nj
My drivers side door handle broke off.
With it missing I was able to pull out the retention pin and spring assembly.
I'm wondering if i can simply pop it back in place with out the entire door covering removed.
Not sure if any one has tried, but it would save a helluva amount of time.
 

an7mal

New Member
Joined
Feb 12, 2017
Posts
3
Reaction score
3
Location
Dayton
The door handle latch panel can be removed more easily after the door panel is off (just slide the panel forward off the door latch after freeing it upward from the door, after you have the wiring disconnected use needle nose pliers to gently squeeze and push out the three locking tabs). Leave door latch panel off until after installing the door, then snap it in before putting in the screw.

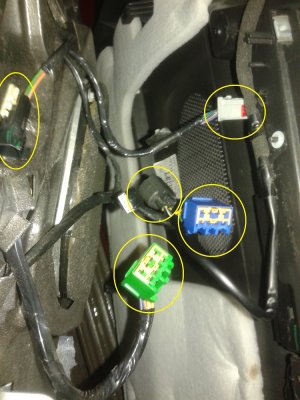
I found the wire connections difficult to remove until I looked at them with a mirror and found were all the tabs are located:

Drivers side:
Green (rear windows/power), tab located to rear (pinch it toward front)
Blue (front windows), tab to rear
Black (locks, white tip in pic) tab to door (out)
Grey (mirrors), tab to front

Tweeter hookup (on door), tab on top, connector pulls toward rear

Crash Sensor (under water shield), tab is toward car (inside), slide red lock tab down first.

Passenger side:
Lock and window tabs are both towards car (inside), up against the door panel (not like drivers side at all).


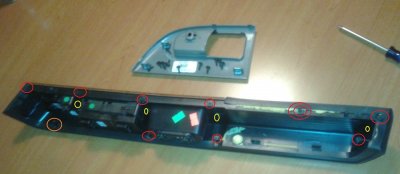
If your doing this to repair the window switches, it's perhaps a bit easier, but much slower the first time to remove the arm rest/switch panel mount but you don't have to. Arm rest/switch assembly mount is removed via the 10 circled red Phillips screws in the picture; note the screw with two circles is under insulation, simply cut a small hole in the insulation to poke a screwdriver through. The vertical screws circled in yellow remove the arm rest panel and aren't required (unless you are replacing that piece of trim).

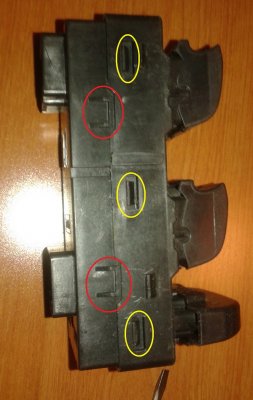
Whether you remove the switch panel/arm rest assembly or not, the switch itself is removed by sliding a small screwdriver up and unhooking the four locking tabs (two on either side, circled in red on picture) and then sliding the switch down. Usually unhook two, try to slide it down a bit and use another screwdriver to get the other side. Once you have the switch out, you can replace it, or clean the contacts: same kind of locking tabs (6 tabs circled in yellow on picture), pull entire switch assembly out from the top switch cover assembly; gently pry sideways to pull out the white switch lever, gently bend the led lights out of the way, gently pry upward to pop off the black contact covers (and orange auto-down actuator), and then you will have access to the metal bars which lift out: file/sand/clean the offending contact, and reassemble in reverse order. If you grease the contacts, I would only use silicone dielectric grease. Good pics available from F150 repairs (don't have to remove the door panels on newer F150's as the switch panel pries up, but the switches themselves are the same).

My window switch contacts were bad, and after cleaning them up, the motors started working again, but my regulators were bad (wouldn't go up). I normally hate slow youtube videos, but better than any writeup I've seen is the excellent video on replacing the regulators on YouTube by FordTechMakuloco - he even shows you how to practice when disassembling the door latch handle so you don't break the new one upon reassembly. Took him 25 minutes, took me ~90 minutes including the door panels. New regulators were $80 from Rockauto.
door terminals.jpg switch panel.jpg switch.jpg
 

Adieu

Full Access Members
Joined
Dec 22, 2016
Posts
3,700
Reaction score
786
Location
SoCal
This weeks project for me as well

Got some fresh looking clean Eddie Bauer panels to replacd my mangy beatup gubmint door plastics

20170214_011427.jpg
 
Top