A Little Pushing. A Little Screwing. A little Pinning...

Disclaimer: Links on this page pointing to Amazon, eBay and other sites may include affiliate code. If you click them and make a purchase, we may earn a small commission.

Expedition Dave

Full Access Members
Joined
Jun 7, 2020
Posts
577
Reaction score
269
Location
A Tiny Little Dot in Florida
A Little Pushing/Screwing/Pinning

BEFORE:

full?d=1616332220.jpg


full?d=1617012656.jpg


full?d=1617020725.jpg


full?d=1617020687.jpg


AFTER
(and with a little cutting, sanding and then adding some sexy black items):

full?d=1617827326.jpg


full?d=1617827356.jpg


full?d=1617828137.jpg


full?d=1617828137.jpg


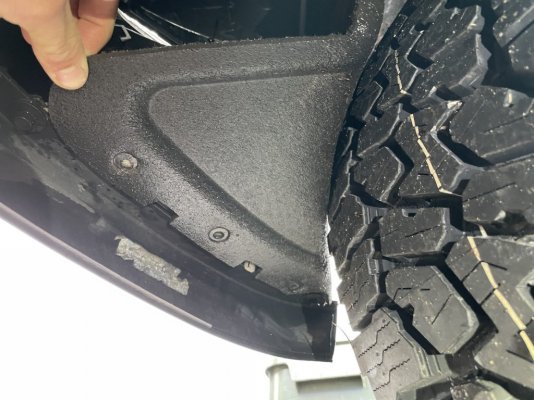
The cut to the lower valence looks pretty factory, and I kept the sharp "scallop" to match the lines. The point almost looks like it will hit the tire--but does not come close. With this mod, one can fit a slightly bigger tire than a 34.3 for sure, at least in the front for normal driving--no promises during articulation.

I will probably add another black Allen head screw per side (very large washer on the inside unseen to crush as much material down as possible) though I don't think it is truly necessary. **Whatever** bolts you use, I recommend rounded heads as square ones can catch on objects and tear if you get hung up and back up off it.

The heavy duty Zip Ties are more sturdy and secure--and possibly unnecessary (especially two). And yes, I cut the tails off after I took the pic.

YMMV.
 
Last edited:

scottdm

Full Access Members
Joined
Dec 2, 2018
Posts
828
Reaction score
489
Location
Western PA
I know how floppy the bottom of the bumper gets when you remove the front valance. I decided to trim mine really short and leave the rest in place to give the bottom of the bumper additional rigidity. Your current setup looks like you'll have to take that apart if you want to drop the skid plate to change oil, etc.
 
OP
OP
Expedition Dave

Expedition Dave

Full Access Members
Joined
Jun 7, 2020
Posts
577
Reaction score
269
Location
A Tiny Little Dot in Florida
IT is actually pretty stable already as I have put a decent amount of tension on the sides by redoing the front fenderliners (moving them forward they had to be pulled and stretched) but yes, trimming that valence really short is a great idea to keep the rigidity. My next oil change I will just go to one Ziptie.

Please post pics or a write up? The Gen4 section needs way more DIY action :)
 

sjwhiteley

Full Access Members
Joined
Nov 28, 2019
Posts
482
Reaction score
278
Location
Kentucky
I know how floppy the bottom of the bumper gets when you remove the front valance. I decided to trim mine really short and leave the rest in place to give the bottom of the bumper additional rigidity. Your current setup looks like you'll have to take that apart if you want to drop the skid plate to change oil, etc.
I've trimmed the horizontal portion of the lower bumper after removing the valance. I'll agree, it's a bit less rigid. However, mine rests against the raptor skid plate (which doesn't require removal to get at the filter - there's a little hatch you can unbolt :)), so doesn't seem to flex back that much. As @Expedition Dave noted, the fender liners add a bit of rigidity back, so can see his modifications making it even better.
 
OP
OP
Expedition Dave

Expedition Dave

Full Access Members
Joined
Jun 7, 2020
Posts
577
Reaction score
269
Location
A Tiny Little Dot in Florida
IT is literally the cost of a few zip ties to do an oil change. The ZTs may not even be necessary, but gives me more of a "feel good" feeling since I am slightly altering the aeros. Overall, this portion completes the "box set" (lift, tires, clean up nose) of how to make your FX4 look like it should off from the factory. The truck gets more looks than a plain-jane Expy should, and I attribute this to the above "box set."
 

Fozzy

Full Access Members
Joined
Sep 5, 2019
Posts
1,200
Reaction score
1,159
Location
Riverton
ExpyD,

I must have missed this thread the first time around. Looks super clean, nice work.
 

PNWExpy

Well-Known Member
Joined
Mar 26, 2019
Posts
59
Reaction score
54
Location
Oregon
Thanks @Expedition Dave for the pics and write up! Referred back to this while doing mine. I pretty much did the same thing but I used the stock screws
and then added a few to tuck the lip in. Also, I opted to cut the horizontal portion of the valence and reinstall the rest. Figured being all plastic down there it could use any extra strength if/when it gets drug in the mud. I rounded the bottom trim piece a bit forward as well so the tip wasn’t so close. Very happy with how this came out.


9CA2DE48-1B26-4C04-BF79-9100389AA2EF.jpegF9F5627B-28CB-433F-A738-ADEE38CF5255.jpeg57A58E3D-3BFC-4A7F-BB5C-FE6D398E1138.jpeg
 

Attachments

  • 0A87BB13-1C4C-4949-A7EE-35206F9A77A6.jpeg
    0A87BB13-1C4C-4949-A7EE-35206F9A77A6.jpeg
    160.6 KB · Views: 12
Last edited:
Top