Updated 12-16-15
Well, rear wiper had worked over a year from my last update. Went through a car wash and the spinning brush ripped the arm up and destroyed the nylon gear assembly inside of the wiper motor. Back to square one.....
Updated 11-13-14
Been one month now and the rear wiper is still working well. I believe my update from Oct is the secret to keeping the wiper motor working. I am convinced that the tolerances of the copper sensor plate in the motor, or the jamming of the drive gear is what was causing my motor to stop working. Anyway, give this a try and let us know if this works for you too.
John
Updated info 10-3-14.
OK, I finally think I figured out how to keep the rear wiper working. If after following all these instructions, you reinstall the wiper arm so that it fits loose in the cradle when off, I think that is the problem. When the motor is turning back to the home position, if left to its own, it rotates too far before stopping. Not sure if that is jamming the gear wheel or letting the position sensor fingers go off the end of the copper plate. To fix this, I reinstalled the arm so that it would go about 1/4-1/2" past the stop (if no stop was there). Now when the motor is going to the home position, the wiper stops it before it rotates too far. My wiper has been working reliably now for the past few weeks. One other thing, I cleaned the lube off the sensor fingers and copper plate. Not sure if that area needed the lube, but I was concerned that it was affecting the ability of the position sensors to fully contact the copper plate. That by itself did not help, but remounting the wiper arm as described above seemed to do the trick. If you try this, report back and let us know if it works for you.
Updated info 3-6-14: Wiper has failed again, bummer. Although the lubrication issue existed, I now also suspect the electrical contacts (see pic below) are not making proper contact to the copper plate on the drive gear. I am going to do some more experiments and will report back in this space.
After reading a lot of the posts about things that go wrong with the rear wiper assembly, I did some work and tore into some of these and tested them thoroughly and found that the issue most might be having (after first verifying the fuses and relays are working properly, see other posts for the initial checks) is simple cleaning and lubrication. The motor does not provde enough force to overcome a sticky shaft or worm gear assembly if the lubrication has migrated out of those areas (which after tearing apart several of these assemblies I can verify this was seen in all of them). These attached pictures will help someone wanting to fix their rear wiper. This post is not for those who will no doubt say, "I don't want a rear wiper so I removed it, ..." . Living in Idaho during the spring, the roads are most often wet and the rear window will become obaque with road slime. I really like having my rear wiper working. OK, here is how to fix the problem.
1.Remove rear wiper arm. Pry up the cover at the pivot point. Remove retaining nut. Gently work arm off.
2.Remove lower interior rear door panel. You will need to take off the interior door pull down handle and remove the two plastic fasteners in the bottom. Then work out the rest of the door fasteners by systematically prying off the rear door panel. Remove the panel completely.
3. Carefully lift off the plastic membrane so that you get access to the rear wiper motor.
4. Disconnect the wiring harness and then remove the three bolts securing the wiper motor.
5. Remove motor/gear assembly from mounting bracket.
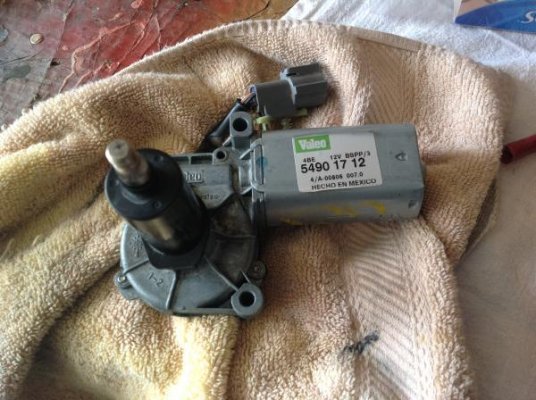
At this point I tested the assembly by applying 12V DC to the motor terminals (white/orange-black/lightblue). I did this with a power supply and tested both ways (plus/minus and then minus/plus). With this motor, no operation was seen, but you could hear the motor trying to turn.
6.Remove the black shaft cover. Take care to notice if the O-ring that makes the seal at the wiper arm end of the shaft has come off with the black shaft cover.
7. Remove the 4 screws securing the gear housing cover.
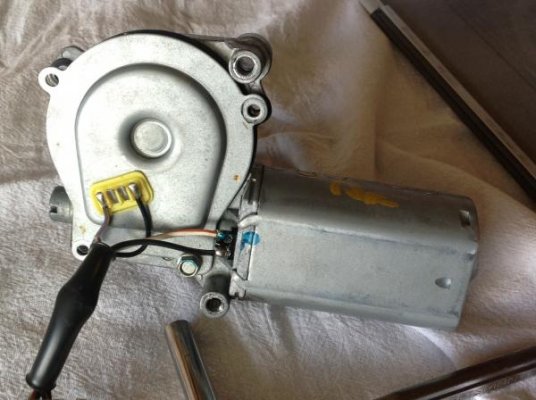
8.Notice how the lubricant has migrated to one spot. Use Q-tips to clean out the dirty lubricant (leave the good stuff).
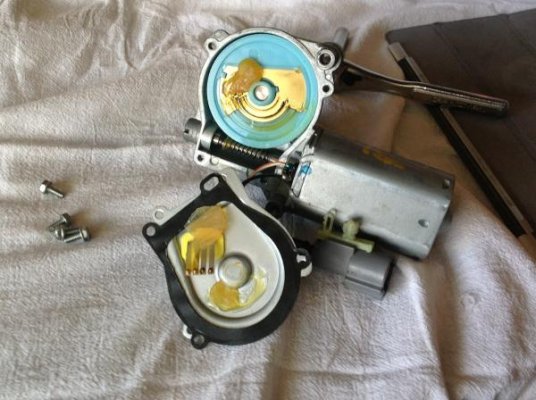
9. Use a hammer to tap out the wiper arm shaft/gear. Once released from the motor worm gear, try turning in the shaft housing to feel how dirty it might be. Verify that the main gear is in good condition. If so, proceed. If not, you may need to go pick a replacment at the salvage yard.
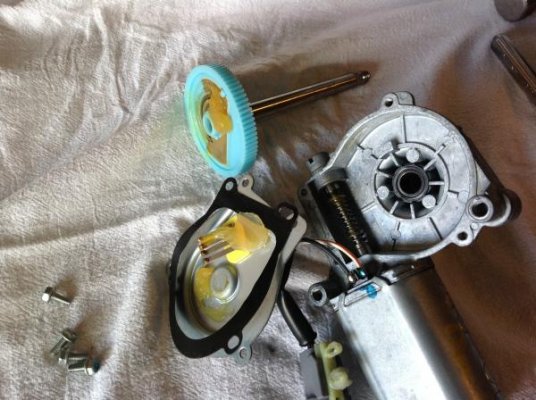
10. Clean the shaft assembly. Remove and clean the O-ring. Use Q-tips and WD-40 to clean out the housing shaft. Also clean out the end of the black shaft cover.
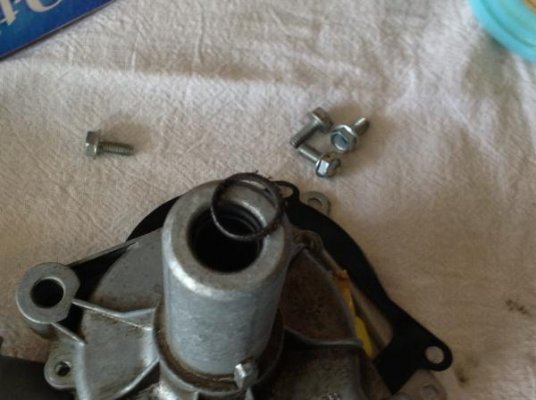
Notice how dirty the O-ring was.
11. In this case there was no lubricant left on the underside of the main gear slot where it slides on the tab in the housing. Use some of the lubricant that is on left on the top of the main gear to lubricate the slot and also the worm gear.
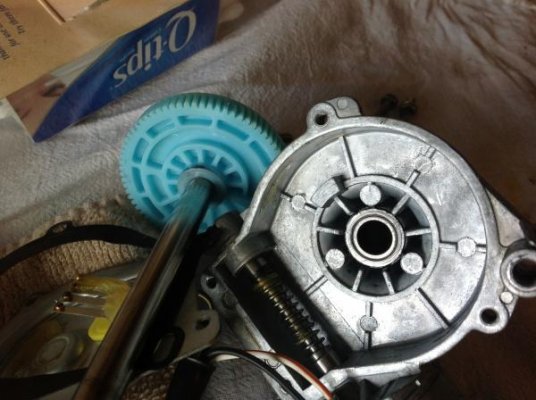
12. Use some more of the lubricant on the wiper arm shaft. Reinstall the O-ring and black shaft cover (first), then reinstall the wiper arm shaft into the assembly. Before engaging the worm gear, rotate the assembly to see how much easier the shaft is now turning. Make sure the slot on the main gear goes over the tab. Finish pushing the shaft/gear assembly all the way into the housing. Pull the black shaft cover back off to make sure the O-ring is still in place. If not, pull the shaft back out and start this step again. If O-ring is ok, then put the black shaft cover back on.
13.Reinstall the gear housing cover with the 4 screws. Make sure the gasket is in place.
14. If you are equipped to test, apply 12VDC onto the motor terminals to verify operation. If you reverse polarity, the motor will go in the opposite direction.
14. Remount motor/gear assembly back onto the mounting bracket and reinstall into rear door. Make the harness connection. Close the rear door (must be secured) and turn on the rear wiper assembly (key in accessory position). Verify that the shaft is turning. Then put rear wiper control in off position. This will then put the shaft into the full down position.
15. Reinstall the wiper arm with the arm guide in the arm cradle.
16. Reinstall the rear door lower panel.
Hope this works for you.
Well, rear wiper had worked over a year from my last update. Went through a car wash and the spinning brush ripped the arm up and destroyed the nylon gear assembly inside of the wiper motor. Back to square one.....
Updated 11-13-14
Been one month now and the rear wiper is still working well. I believe my update from Oct is the secret to keeping the wiper motor working. I am convinced that the tolerances of the copper sensor plate in the motor, or the jamming of the drive gear is what was causing my motor to stop working. Anyway, give this a try and let us know if this works for you too.
John
Updated info 10-3-14.
OK, I finally think I figured out how to keep the rear wiper working. If after following all these instructions, you reinstall the wiper arm so that it fits loose in the cradle when off, I think that is the problem. When the motor is turning back to the home position, if left to its own, it rotates too far before stopping. Not sure if that is jamming the gear wheel or letting the position sensor fingers go off the end of the copper plate. To fix this, I reinstalled the arm so that it would go about 1/4-1/2" past the stop (if no stop was there). Now when the motor is going to the home position, the wiper stops it before it rotates too far. My wiper has been working reliably now for the past few weeks. One other thing, I cleaned the lube off the sensor fingers and copper plate. Not sure if that area needed the lube, but I was concerned that it was affecting the ability of the position sensors to fully contact the copper plate. That by itself did not help, but remounting the wiper arm as described above seemed to do the trick. If you try this, report back and let us know if it works for you.
Updated info 3-6-14: Wiper has failed again, bummer. Although the lubrication issue existed, I now also suspect the electrical contacts (see pic below) are not making proper contact to the copper plate on the drive gear. I am going to do some more experiments and will report back in this space.
After reading a lot of the posts about things that go wrong with the rear wiper assembly, I did some work and tore into some of these and tested them thoroughly and found that the issue most might be having (after first verifying the fuses and relays are working properly, see other posts for the initial checks) is simple cleaning and lubrication. The motor does not provde enough force to overcome a sticky shaft or worm gear assembly if the lubrication has migrated out of those areas (which after tearing apart several of these assemblies I can verify this was seen in all of them). These attached pictures will help someone wanting to fix their rear wiper. This post is not for those who will no doubt say, "I don't want a rear wiper so I removed it, ..." . Living in Idaho during the spring, the roads are most often wet and the rear window will become obaque with road slime. I really like having my rear wiper working. OK, here is how to fix the problem.
1.Remove rear wiper arm. Pry up the cover at the pivot point. Remove retaining nut. Gently work arm off.
2.Remove lower interior rear door panel. You will need to take off the interior door pull down handle and remove the two plastic fasteners in the bottom. Then work out the rest of the door fasteners by systematically prying off the rear door panel. Remove the panel completely.
3. Carefully lift off the plastic membrane so that you get access to the rear wiper motor.
4. Disconnect the wiring harness and then remove the three bolts securing the wiper motor.
5. Remove motor/gear assembly from mounting bracket.

At this point I tested the assembly by applying 12V DC to the motor terminals (white/orange-black/lightblue). I did this with a power supply and tested both ways (plus/minus and then minus/plus). With this motor, no operation was seen, but you could hear the motor trying to turn.
6.Remove the black shaft cover. Take care to notice if the O-ring that makes the seal at the wiper arm end of the shaft has come off with the black shaft cover.
7. Remove the 4 screws securing the gear housing cover.

8.Notice how the lubricant has migrated to one spot. Use Q-tips to clean out the dirty lubricant (leave the good stuff).

9. Use a hammer to tap out the wiper arm shaft/gear. Once released from the motor worm gear, try turning in the shaft housing to feel how dirty it might be. Verify that the main gear is in good condition. If so, proceed. If not, you may need to go pick a replacment at the salvage yard.

10. Clean the shaft assembly. Remove and clean the O-ring. Use Q-tips and WD-40 to clean out the housing shaft. Also clean out the end of the black shaft cover.

Notice how dirty the O-ring was.
11. In this case there was no lubricant left on the underside of the main gear slot where it slides on the tab in the housing. Use some of the lubricant that is on left on the top of the main gear to lubricate the slot and also the worm gear.

12. Use some more of the lubricant on the wiper arm shaft. Reinstall the O-ring and black shaft cover (first), then reinstall the wiper arm shaft into the assembly. Before engaging the worm gear, rotate the assembly to see how much easier the shaft is now turning. Make sure the slot on the main gear goes over the tab. Finish pushing the shaft/gear assembly all the way into the housing. Pull the black shaft cover back off to make sure the O-ring is still in place. If not, pull the shaft back out and start this step again. If O-ring is ok, then put the black shaft cover back on.
13.Reinstall the gear housing cover with the 4 screws. Make sure the gasket is in place.
14. If you are equipped to test, apply 12VDC onto the motor terminals to verify operation. If you reverse polarity, the motor will go in the opposite direction.
14. Remount motor/gear assembly back onto the mounting bracket and reinstall into rear door. Make the harness connection. Close the rear door (must be secured) and turn on the rear wiper assembly (key in accessory position). Verify that the shaft is turning. Then put rear wiper control in off position. This will then put the shaft into the full down position.
15. Reinstall the wiper arm with the arm guide in the arm cradle.
16. Reinstall the rear door lower panel.
Hope this works for you.

Last edited:

