In an attempt to upgrade the look of the lighting on my 07 Expedition EB, I decided to go the "less expensive" route and get some aftermarket 6000K bulbs with dismal results. The color was good, but the light output was horrendous (it was almost as if the lights were not even on  ).
).
So then I looked into HIDs. After going into initial sticker shock on some of the HID kits that were offered ($200+ in some cases for just the headlights) I came across DDM Tuning. I was able to upgrade both my headlights and fogs for $70 . DDM Tuning offers a lifetime guarantee on their systems so I feel confident with the purchase, compared to some eBay kits in the same price range. Even if I had to pay full price to replace any of the components, the replacement cost is very reasonable.
For the headlights I bought the Apexcone Raptor 35W H13 Hi/Low kit since the 07+ Expeditions have only one bulb for both hi and low beams, thus a "bi-xenon" setup is required. For the fog lights I bought the Apexcone Raptor 35W H10 kit. I got the 6000K color as a good compromise between color upgrade over OEM and overall brightness (the more blue/purple, the less bright the bulbs). I also went with 35W vs 55W since the extra brightness is not necessary IMO, especially since these HIDs are being installed in standard halogen lamp housings, not projector housings which is what HIDs should be installed in (due to the extra brightness of HIDs).
The best part of this upgrade was the install. Everything was plug and play (no wire splicing) and only took minimal wire routing (for the H13 headlights only). The bulbs installed in the stock locations with no issues. The install directions on the DDM Tuning site are very straightforward and easy to follow. They also offered kits that had slightly smaller ballasts (for slightly more $$), however there is plenty of room to install the standard size ballasts as you will see below so I don't think the extra cost is worth it IMO.
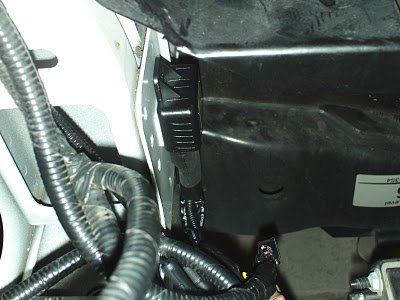
This first pic shows where I installed the ballasts. This side shows the passenger side. Both ballasts fit side-by-side on the frame rail using some industrial strength double sided tape (just make sure you thoroughly clean this surface first obviously). The small black wire going to that bolt on the left is the grounding wire for the H13's to control the Hi/Lo functionality. When I removed the bolt, I cleaned and brushed off the surface to make sure I had a good ground connection (i.e. no paint). The driver side is exactly the same setup.
The next pic shows where I mounted the relay assembly to control the Hi/Lo function of the H13's, which is right next to where the ballasts are installed (on the passenger side). Again it is mounted using double sided tape since there was no suitable bolt to mount it (and I didn't want to drill a new hole for another bolt/screw). It is very light so I am not worried about it coming off and even if it does, the harness connectors will keep it from going anywhere.
The last pic is of the lights after the install was complete. It is very hard to photo lights but this will give you an idea of what they look like.
So in a nutshell, this upgrade is a no-brainer if you want want brighter, better looking lights for a good price and easy install on your 07+ Expedition.
).So then I looked into HIDs. After going into initial sticker shock on some of the HID kits that were offered ($200+ in some cases for just the headlights
) I came across DDM Tuning. I was able to upgrade both my headlights and fogs for $70 . DDM Tuning offers a lifetime guarantee on their systems so I feel confident with the purchase, compared to some eBay kits in the same price range. Even if I had to pay full price to replace any of the components, the replacement cost is very reasonable.For the headlights I bought the Apexcone Raptor 35W H13 Hi/Low kit since the 07+ Expeditions have only one bulb for both hi and low beams, thus a "bi-xenon" setup is required. For the fog lights I bought the Apexcone Raptor 35W H10 kit. I got the 6000K color as a good compromise between color upgrade over OEM and overall brightness (the more blue/purple, the less bright the bulbs). I also went with 35W vs 55W since the extra brightness is not necessary IMO, especially since these HIDs are being installed in standard halogen lamp housings, not projector housings which is what HIDs should be installed in (due to the extra brightness of HIDs).
The best part of this upgrade was the install. Everything was plug and play (no wire splicing) and only took minimal wire routing (for the H13 headlights only). The bulbs installed in the stock locations with no issues. The install directions on the DDM Tuning site are very straightforward and easy to follow. They also offered kits that had slightly smaller ballasts (for slightly more $$), however there is plenty of room to install the standard size ballasts as you will see below so I don't think the extra cost is worth it IMO.
This first pic shows where I installed the ballasts. This side shows the passenger side. Both ballasts fit side-by-side on the frame rail using some industrial strength double sided tape (just make sure you thoroughly clean this surface first obviously). The small black wire going to that bolt on the left is the grounding wire for the H13's to control the Hi/Lo functionality. When I removed the bolt, I cleaned and brushed off the surface to make sure I had a good ground connection (i.e. no paint). The driver side is exactly the same setup.
The next pic shows where I mounted the relay assembly to control the Hi/Lo function of the H13's, which is right next to where the ballasts are installed (on the passenger side). Again it is mounted using double sided tape since there was no suitable bolt to mount it (and I didn't want to drill a new hole for another bolt/screw). It is very light so I am not worried about it coming off and even if it does, the harness connectors will keep it from going anywhere.
The last pic is of the lights after the install was complete. It is very hard to photo lights but this will give you an idea of what they look like.
So in a nutshell, this upgrade is a no-brainer if you want want brighter, better looking lights for a good price and easy install on your 07+ Expedition.