Power running board broken arm casting.

Disclaimer: Links on this page pointing to Amazon, eBay and other sites may include affiliate code. If you click them and make a purchase, we may earn a small commission.

Miekk

Full Access Members
Joined
Jan 9, 2012
Posts
156
Reaction score
33
Location
Madison Lake, MN
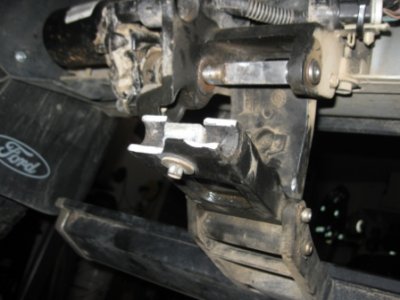
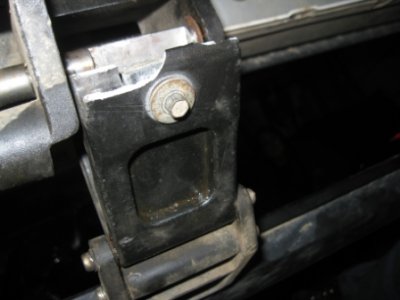
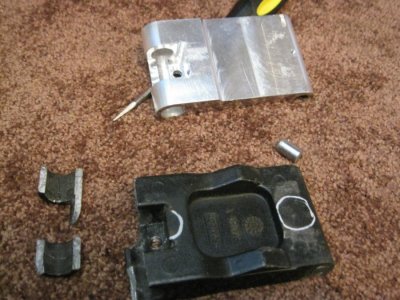
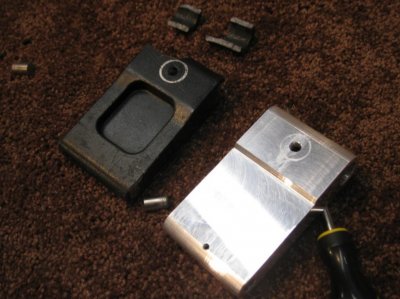
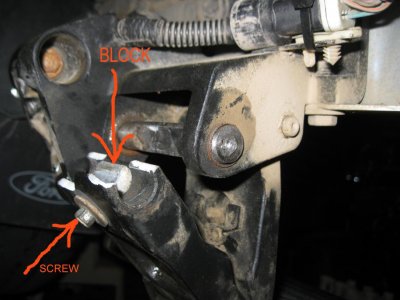
The power board deployed about half way down and when it got stepped on I heard a sharp snap. It went up and down a few times then wouldn't stay up. It's on the passenger side. I drove it up on the ramps and started looking. It turns out that the main drive arm casting that has the wedge block in it broke and well, nothing but bad thoughts of "you have to buy the entire thing" came to mind...
I attached some pictues, where can I find this part and how does that lower pin come out??


While I was already there, I removed the gearbox and took it completely apart. Not the motor, just the gearbox. It was almost completely dry. I flushed out the rest of the crap, reloaded it with grease and assemblet it back together. It's nice and quiet again now.

Little trick to keep the board up now that it's broken. manually push it up and use a vise-grip C-clamp on the bracketry. Don't foget to unplug the motor...

Thanks for your help!
 

Attachments

  • Power Board Arm 01 sm.JPG
    Power Board Arm 01 sm.JPG
    66.2 KB · Views: 974
  • Power Board Arm 02 sm.JPG
    Power Board Arm 02 sm.JPG
    61.3 KB · Views: 515
  • Power Board Arm 03 sm.JPG
    Power Board Arm 03 sm.JPG
    66.7 KB · Views: 1,872
  • Power Board Arm 04 sm.JPG
    Power Board Arm 04 sm.JPG
    55.7 KB · Views: 512
  • Power Board Arm 05 sm.JPG
    Power Board Arm 05 sm.JPG
    70.7 KB · Views: 589

RI-Matt

Full Access Members
Joined
Jan 13, 2011
Posts
445
Reaction score
43
Location
Rhode Island
Bad news bro. How much do you like using the vise grip C-clamp?

Being that it's the front, you can only buy it with the motor.
Check with Tasca.

Part for Regular Length # 9L7Z-16A506-A = $670 :bawl:

Part for EL # 9L7Z-16A506-B = $1072 :bawl::bawl::bawl:


Sorry,

Matt
 

wyo_vr4

Well-Known Member
Joined
Mar 24, 2012
Posts
83
Reaction score
3
Location
Tampa, FL
Damn, that sucks! Assuming the vehicle is no longer under warranty, I would either leave it deactivated or install non-moving running boards. $670-$1070 is crazy expensive and it may eventually break again.
 

Toyman

Full Access Members
Joined
Dec 16, 2011
Posts
53
Reaction score
0
Location
Canada
The bracket looks like it can be removed. If it can, I'll bet someone could fabricate one fairly inexpensively.
 
Joined
Nov 18, 2011
Posts
18
Reaction score
0
Location
Kettering,Ohio
You will probably have to cut the pin, and use a bolt to replace it with , it looks like its pressed in there, have you checked a junkyard yet? You might be able to buy just that part, and not the whole thing.


Sent from my iPhone using Tapatalk
 
OP
OP
Miekk

Miekk

Full Access Members
Joined
Jan 9, 2012
Posts
156
Reaction score
33
Location
Madison Lake, MN
Bad news bro. How much do you like using the vise grip C-clamp?

Being that it's the front, you can only buy it with the motor.
Check with Tasca.

Part for Regular Length # 9L7Z-16A506-A = $670 :bawl:

Part for EL # 9L7Z-16A506-B = $1072 :bawl::bawl::bawl:


Sorry,

Matt

I could just drill a hole through the bracket and the stop, but a bolt in it and I have really expensive rocker panels that constantly get full of crap under there..

I have a fairly local dealer that I've never found anyone beat for price, but $600 is still too much...
 
OP
OP
Miekk

Miekk

Full Access Members
Joined
Jan 9, 2012
Posts
156
Reaction score
33
Location
Madison Lake, MN
The bracket looks like it can be removed. If it can, I'll bet someone could fabricate one fairly inexpensively.

Plan A: Remove and have friends shop remake from billet.
Plan B: Model in ProE and have friends shop program CNC.
Plan C: (probably most likely) 3x5 1/4" flat with single long tube welded to the bottom and two shorter with a gap for the wedge on the top. Weld a short wall on the top for the wedge to slide on and drill a hole.

Unless I happen to run across one somewhere, will initiate plans next week.
 
OP
OP
Miekk

Miekk

Full Access Members
Joined
Jan 9, 2012
Posts
156
Reaction score
33
Location
Madison Lake, MN
All fixt.

I does pay to know people....
 

Attachments

  • IMG_0661.jpg
    IMG_0661.jpg
    98.1 KB · Views: 381
  • IMG_0663.jpg
    IMG_0663.jpg
    92.5 KB · Views: 366
OP
OP
Miekk

Miekk

Full Access Members
Joined
Jan 9, 2012
Posts
156
Reaction score
33
Location
Madison Lake, MN
For those that want to take the gearbox out, open it, clean, and repack with grease. Remember the wedge block is what ties the power board arm to the motor shaft. In order to get the motor out, after removing it's mounting bolts, the wedge block needs to be removed by backing the screw out about 1/8 - 1/4" and taping it in with a hammer, this dislodges the wedge block so it can be removed. After that the board should move freely up and down and the motor should rotate easily. The gearbox should work its way forward this way.
I had someone open the door and when the board was half way down, I unplugged it so everything was in the center of the stroke. It was much easier to work with that way. Same when putting it back together, have someone open or close the door and run the motor till the gearbox flat orientates where it's easiest to get the wedge block back in.
Remember not to hit on the end of the motor shaft or it will mushroom and when it goes through the arm, it will expand it and break it open as is what happened to me. Also, don't over tighten the wedge block or the same thing can happen. I think that's why the screw was designed so small as to prevent this.

Here's a pic for reference. Yours shouldn't look like this one, if it does, its been a bad day!

Anyway, good luck.
 

Attachments

  • Power Board Arm 02.jpg
    Power Board Arm 02.jpg
    90 KB · Views: 1,842
Last edited:
OP
OP
Miekk

Miekk

Full Access Members
Joined
Jan 9, 2012
Posts
156
Reaction score
33
Location
Madison Lake, MN
For future reference, did it break because it got stepped on before it was fully deployed?

No, it broke because someone beat on the end of the shaft and mushroomed it larger. When I tapped it out, that larger diameter expanded that thin aluminum casting and cracked it. When the wedge block was tightened later, it just broke the whole thing apart.
 

NMExpy

Member
Joined
May 26, 2012
Posts
10
Reaction score
0
Location
New Mexico
No, it broke because someone beat on the end of the shaft and mushroomed it larger. When I tapped it out, that larger diameter expanded that thin aluminum casting and cracked it. When the wedge block was tightened later, it just broke the whole thing apart.

Ok. I guess I misunderstood the original post. My bad.
 
OP
OP
Miekk

Miekk

Full Access Members
Joined
Jan 9, 2012
Posts
156
Reaction score
33
Location
Madison Lake, MN
Ok. I guess I misunderstood the original post. My bad.

That is how it actually broke apart, but I did figure out later that it was already cracked because of the scenario I just described. I dont think stepping on it in other positions would break a good part, but I wouldn't want to try it either...
 

dadfor4

New Member
Joined
Aug 8, 2012
Posts
1
Reaction score
0
Location
michigan
step on and break

I can tell you from recent experience that stepping on the power deploying running boards before they are all the way down will break them. My oldest son did this a couple of weeks ago and broke the same casting in exactly the same way.
I have been looking around on the internet to see if I could avoid the $1,700 Ford wants for the whole assembly (I have the EL and it has a long rod connecting the front and rear hinges). MIEKK, can you get me the info for the shop that made your part? Also any tips for the replacement process; what did you replace the hinge pin with, does the motor shaft just slide right out (mine looks like it has some kind of a circlip locked onto the end), etc. Also, my breakage occured on the passenger side. The machined part in the thumbnail you posted looks like it would be a "universal" part and work on both driver and passenger sides. Is that correct.
Any help you can give would be greatly appreciated!
 
OP
OP
Miekk

Miekk

Full Access Members
Joined
Jan 9, 2012
Posts
156
Reaction score
33
Location
Madison Lake, MN
The guy that made mine was a friend of mine that works at a shop. He made the replacement shaft from SS stock he had laying around. To get the arm off the lower, I used a thin sawzall blade and cut between the arm and the step bracket, you could never get the shaft out of the assembly while under there. It's nurled, loctited and pressed in.
Mine was on the passenger side as well.
I'd like to see a pic of yours to see how the rod connects the two together. I'll ask if my friend would like to make another one or get the program from him and get quotes from another shop.
If you take the part to a weld shop, it can be made out of about 4 pieces of 1/4 flat welded together also. That's what I was going to do myself if it came down to it. A good blacksmith will see the part made in their head as soon as he sees yours.

Oh, the things on the ends that look like clips are actually the ends of the brass bushings. They are in the step brackets.

To use everything while it's apart, just unplug the motor or remove it and find 1 maybe 2 C-clamps to clamp the parallel brackets tight with someone holding the board up into the stowed position.

***Safety note****
Put a zip-tie around the clamp so it doesn't unclamp itself and also back to something on the truck so if it did ever come off, it doesn't end up in someone elses grill or worse their windshield.
 

shawnrod1

New Member
Joined
May 23, 2013
Posts
1
Reaction score
0
Location
Massachusetts
Pro-E Model

Would you be willing to share the Pro-E Model of this part for all to enjoy. I have someone that will machine the part for me but if I can provide model that will speed things up quite a bit.

Thanks,

Shawn
 
Top