You are using an out of date browser. It may not display this or other websites correctly.
You should upgrade or use an alternative browser.
You should upgrade or use an alternative browser.
Aftermarket Gauges
- Thread starter tekrsq
- Start date
Disclaimer: Links on this page pointing to Amazon, eBay and other sites may include affiliate code. If you click them and make a purchase, we may earn a small commission.
tekrsq
Full Access Members
I don't like those, but might end up having to go that route. I talked to a tech at AutoMeter today about the coolant gauge. He said, they try to stay away from water jackets unless it's close to the thermostat housing. Said, flow through the blocks are so varied, it's hard to get accurate temps from the block water jackets. Although, he recommended switching the sensor leads between the trans temp gauge, and the coolant temp gauge to see if I still get the same readings. That would eliminate the sensor and gauge as issues.
He said the best place to put it on the 5.4 is in the lifter valley with the stock sensor...although he admitted he knew what a pain in the ass it is to install it there. So, I'll switch the wires around when it stops raining to make sure it isn't a bad gauge or sending unit. If they're good, I guess I'll see about putting it in the lifter valley. It really shouldn't be that bad...pull the alternator, and the mounting plate. It should be right behind them. Just not sure if there is enough room to put a "T" in there along with both sensors. I'll keep the post updated. lol.
He said the best place to put it on the 5.4 is in the lifter valley with the stock sensor...although he admitted he knew what a pain in the ass it is to install it there. So, I'll switch the wires around when it stops raining to make sure it isn't a bad gauge or sending unit. If they're good, I guess I'll see about putting it in the lifter valley. It really shouldn't be that bad...pull the alternator, and the mounting plate. It should be right behind them. Just not sure if there is enough room to put a "T" in there along with both sensors. I'll keep the post updated. lol.
tekrsq
Full Access Members
Just a quick update.
So switched the wires around on the gauges as the AM tech suggested, and still had the screwy readings, so they set me a new sending unit. After replacing the sending unit, I've still got the screwed up readings on the coolant gauge. So the techs got me to check the ohm readings at the sending unit, and compare the to the gauge readings. The sending unit and gauge match up perfectly, so I'm guessing my issue is having the sending unit placed in the water jacket...although I found an article on Autometer's site that states to place it in the exact water jacket I have it in.
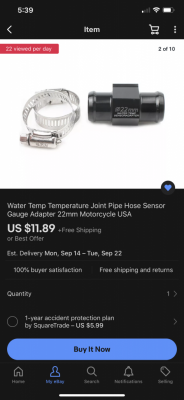
Craig, have you got the "T" you mentioned above in service yet ? Curious if it fit in the hose, and how it's working out. By any chance do you know the I.D. of the upper radiator hose ?
tekrsq
Full Access Members
Well, I think I'm finally set up correctly. I hate when people post up shit but never return to tell everybody how the situation was resolved. So, this is how my issue panned out.
As already posted, my trans temp sensor is in the driver side test port on the tranny. It seems to run fairly close with my SCT programmer. It's about 3 degrees cooler than the SCT until the trans reaches about 160 degrees. Over 160 degrees, the Autometer gauge runs about 7-10 degrees cooler than the SCT...even on 100 degree days. As long as I know this, I'm good. I still need to replace the cooler bypass valve, but that might have to wait until spring (unless I get lucky). My list of fall "honey do's" is getting longer by the day. lol
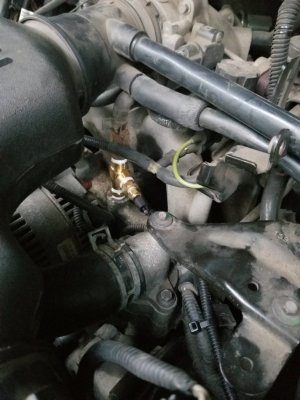
The coolant temp sensor was originally mounted in a water jacket on the driver side of the block. The instructions on Autometer's page specifically states this is the best place to put the sensor. However, after speaking with several AM tech guys, they stated they thought the water jacket was the worst place to put it. SO, after MUCH deliberation and research for possible locations to mount the sensor (I REALLY did not want to try to "T" off the head temp sensor under the intake), I stumbled on an article (on an Excursion page) where guys were mounting their sensors on the intake manifolds, with the EGR heater valve. SO, of course this seemed like the logical place to me since it's right there at the thermostat. I had looked at this position for months, but I had no idea what that thing sticking out of the intake was, lol, and didn't want to chance screwing up something. Anyway, I installed a brass "T", and put the sender right there with the EGR heater valve. This is without a doubt the best place for an aftermarket gauge sender. Our ambient temps have dropped, and it was only 75 degrees today, but the AM gauge never ran more than 3 degrees cooler than the SCT programmer. As far as I'm concerned, this situation is resolved, although I think I'm going to put the EGR heater valve on a 90 fitting to clear things a little better. You can see it in the pic below.
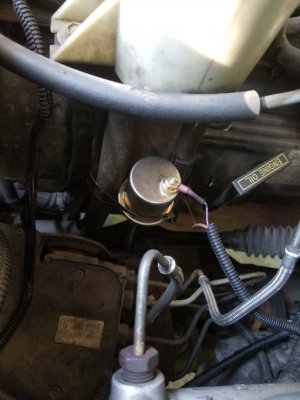
I also finally got around to hooking up the oil pressure gauge. I spent a lot of time researching this also, and eventually decided to go with a GlowShift oil filter sandwich adapter (part #GS-AF5). It's the 22mm 1.5 version. This thing seems fairly well built, and provides optional ports for placement of up to 4 devices. I also went with the A-1 Racing Products 24" oil pressure line kit with 1/8" NPT fittings (part #18400-24GLK-O) to remotely mount the sending unit for the gauge. After installing it today, I probably should have went with the 42" kit, and more than likely I'll change. I don't like where I had to strap the sending unit, but that's all the line I had. I want to bring it up more in the engine compartment. You can see it in the pic.
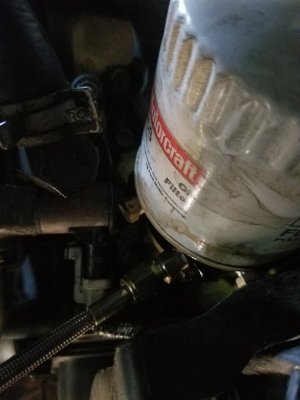
Here's a bad pic of the braided line mounted in the sandwich adaptor. I couldn't get my phone in there any further to get a better pic.
I was also able to resolve an issue with the lighting on the gauges. If you have ever used a digital Autometer gauge, you know it is bright as hell, even when you connect them to the stock dimmer. AM is apparently aware of this, and makes their own dimmer to put inline with the stock dimmer. So I bought one and installed. Set it where I wanted the lights, and I can still dim them (or turn them off) with the stock dimmer switch. LOVE it. Below is a pic of them during the daytime, and the other is with the headlights turned on. Granted, it's still daytime, but you can definitely see the difference.
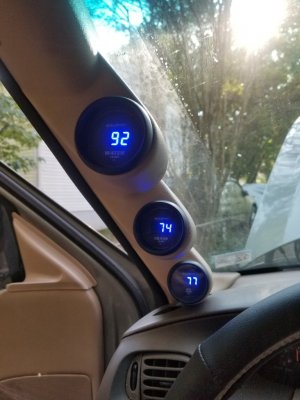
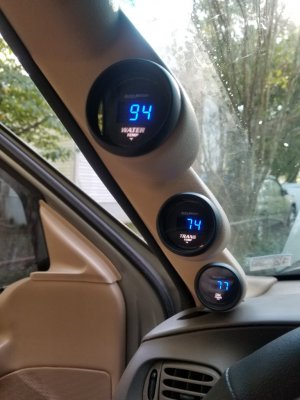
Hopefully, this provides enough info for anybody wanting to do this mod to their trucks, or at least helps with understanding how the gauges work.
As already posted, my trans temp sensor is in the driver side test port on the tranny. It seems to run fairly close with my SCT programmer. It's about 3 degrees cooler than the SCT until the trans reaches about 160 degrees. Over 160 degrees, the Autometer gauge runs about 7-10 degrees cooler than the SCT...even on 100 degree days. As long as I know this, I'm good. I still need to replace the cooler bypass valve, but that might have to wait until spring (unless I get lucky). My list of fall "honey do's" is getting longer by the day. lol
The coolant temp sensor was originally mounted in a water jacket on the driver side of the block. The instructions on Autometer's page specifically states this is the best place to put the sensor. However, after speaking with several AM tech guys, they stated they thought the water jacket was the worst place to put it. SO, after MUCH deliberation and research for possible locations to mount the sensor (I REALLY did not want to try to "T" off the head temp sensor under the intake), I stumbled on an article (on an Excursion page) where guys were mounting their sensors on the intake manifolds, with the EGR heater valve. SO, of course this seemed like the logical place to me since it's right there at the thermostat. I had looked at this position for months, but I had no idea what that thing sticking out of the intake was, lol, and didn't want to chance screwing up something. Anyway, I installed a brass "T", and put the sender right there with the EGR heater valve. This is without a doubt the best place for an aftermarket gauge sender. Our ambient temps have dropped, and it was only 75 degrees today, but the AM gauge never ran more than 3 degrees cooler than the SCT programmer. As far as I'm concerned, this situation is resolved, although I think I'm going to put the EGR heater valve on a 90 fitting to clear things a little better. You can see it in the pic below.

I also finally got around to hooking up the oil pressure gauge. I spent a lot of time researching this also, and eventually decided to go with a GlowShift oil filter sandwich adapter (part #GS-AF5). It's the 22mm 1.5 version. This thing seems fairly well built, and provides optional ports for placement of up to 4 devices. I also went with the A-1 Racing Products 24" oil pressure line kit with 1/8" NPT fittings (part #18400-24GLK-O) to remotely mount the sending unit for the gauge. After installing it today, I probably should have went with the 42" kit, and more than likely I'll change. I don't like where I had to strap the sending unit, but that's all the line I had. I want to bring it up more in the engine compartment. You can see it in the pic.

Here's a bad pic of the braided line mounted in the sandwich adaptor. I couldn't get my phone in there any further to get a better pic.

I was also able to resolve an issue with the lighting on the gauges. If you have ever used a digital Autometer gauge, you know it is bright as hell, even when you connect them to the stock dimmer. AM is apparently aware of this, and makes their own dimmer to put inline with the stock dimmer. So I bought one and installed. Set it where I wanted the lights, and I can still dim them (or turn them off) with the stock dimmer switch. LOVE it. Below is a pic of them during the daytime, and the other is with the headlights turned on. Granted, it's still daytime, but you can definitely see the difference.


Hopefully, this provides enough info for anybody wanting to do this mod to their trucks, or at least helps with understanding how the gauges work.
craig sargood
Full Access Members
Hey, I have not installed tee. I’m not sure if I’m going to, as I don’t have anywhere to put gauges and I don’t think I could do much more for cooling. Already have aluminum radiator and flex a lite electric fans. Although I did just see the steering column pod that I may try. I like your setup with tee, easy for me as I’m a plumber.
Mr_Neutron
Member
Looking at the Autometer website they only list a-pillar pods for one or two gauges for the Expedition. Am I missing something, or did they discontinue the three gauge pod?
tekrsq
Full Access Members
Looking at the Autometer website they only list a-pillar pods for one or two gauges for the Expedition. Am I missing something, or did they discontinue the three gauge pod?
For the first gens, you have to order the corresponding yr F150. Mine is a 99 F150 pod.
Similar threads
- Replies
- 0
- Views
- 586
- Replies
- 2
- Views
- 348


