Pretty sure that the only interaction of coolant in that setup is at the fixture. Two coolant lines (one in, one out), and two vacuum lines (one in, one out). The coolant doesn't ever transfer to the vacuum lines. The fixture actually the PCV checkball flow. (NOT the PCV valve at the vavle cover, but a checkball valve at the intake in the '99). The winter version is just a reverse radiator (heater) jacket equipped version of the checkball input at the intake manifold. The vacuum "in" to the fitting comes from the PCV valve, the vacuum "out" flows into the intake. The fitting/checkball/heaterjacket/assembly fits into and is glued into the intake manifold in the '99. (Later versions stopped doing this idiotic thing.) Your temp fix could be a permanent fix (bypass the radiator fixture, by connecting the two coolant hoses together), as long as your vehicle seems to operate OK in your cold weather. (If you have a lot of sub-freezing temps, and you may want that feature (fixture) to actually work.) All this does is stop putting coolant through the heater jacket loop. If you vehicle was actually dumping coolant into the intake, then the fitting rotted through in the inside as well, and the coolant loop and the vacuum loop (line) have decayed so that coolant leaks into the vacuum line.
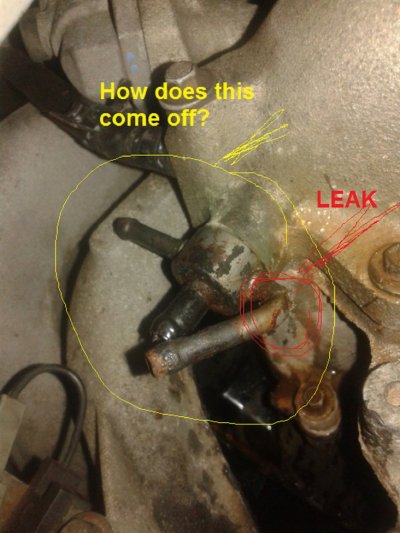
Assuming the coolant really leaks into the intake, then you have two problems. First, per your OP picture, you have a leak in the coolant nipple. But ALSO, you have a look in the water jacket to the vacuum checkvalve. (Your vacuum checkvalve is either good, or stuck open. Better stuck open than closed.) But coolant leaking into the vacuum from the water jacket. (I would just disconnect, as you have. Then you just have a vacuum leak, because your coolant jacket has decayed open into your vacuum line.)
Since this is a vacuum checkball, you cannot just fill it up with expoxy, and then drill it later. I would instead attempt to repair the coolant nipple "leaks" on the two coolant nipples (with soldier, or epoxy), and then just put rubber vacuum caps on those two coolant nipples. (So that the water jacket becomes a permanent dead-end part of the vacuum system instead. The vacuum will pull through the internal leak, and then pull on the rubber caps on the water-jacket nipples, and be a closed vacuum, like its supposed to be. Leave the two coolant input/output lines externally bypassed as you have already done, and abandone the "winter" feature.
https://www.ford-trucks.com/forums/996692-pcv-valve-connected-to-water-pump.html Found this related post on Ford Trucks.
This shows a newer year 2000, 2001, 2002, version. Looks like most of the "new" versions of this feature put the "heater" right at the PCV valve. But in your '99 version (I also have the '99, but not the Winter-Cold feature version), the heater jacket is instead embedded into the intake manifold at the intake checkball instead. ONLY the '99 version has this solution, so there are no replacement parts for the fixture. You need a whole new intake to get a proper solution (cannot get new intakes either anymore.) On the "newer" installations, the water heater jacket goes around the vacuum line right at the PCV valve as it comes out of the valve cover. In your '99 version, the water jacket heater appears to be a special version of the intake vacuum checkball valve fitting on the intake manifold input. (Essentially on the other end of the vacuum pipe between the PCV and the intake input. So later on, they moved the fitting so as to have a special valve cover, rather than having a special input fitting on the intake manifold.) Only the '99's used an embedded checkball fitting IN the stupid intake. (Mine is standard, its just a checkball valve in the intake. Yours is a winter-checkball, which is a checkball with a water jacket on it.)
I recall on my non-winter special cold air intake (e.g., the regular version) that this input "fixture" is actually a PCV checkball one-way flow valve. It (stupidly) embedded into the intake, and is glued in (on my '99 plastic intake). On metal intakes, I believe the fixture is similarly permanent. (But if you look at the link above, you can see the fitting uninstalled, the check-ball valve is the cylinder part that disappears into the intake (that you cannot see), and only the vacuum input comes out. Also, the two water jacket input/output lines comes out.
In my intake, I had found through testing that the checkball was stuck closed. I had to use a lot of carb cleaner and air pressure (once installed) to unfreeze the stupid checkball, since I could not determine a means of getting the fixture out. (Not clear how its head in! RTV? Some other glue, how?)
On newer units, its simply held in place around the PCV valve inself, with a plastic clamshell clip. But on the '99 intake, its part of the intake assembly. I recall trying to find the standard checkball part, and not being able to get it anywhere. (Ford parts, fordpartsgiant, cheapparts, dealer), anywhere. The heated checkball is probably that much more impossible to get for the '99. See this picture. THis is the PCV version, but the '99 check valve version is simlar. The in the '99 the cylinder part at the bottom here disappears into the intake, and is glued into the intake somehow. (RTV? Rubber gasket, Glue, unclear). Does not matter anyway, because you cannot buy the part. In the not-'99 versions, it the water jacket just wraps around the normal PCV valve, and then the PCV valve is pushed into a rubber PCV valve gasket in the valve cover.

Because, in the '99 version, the water jacket is on the intake manifold vacuum line input checkball assembly, you cannot just glue and drill.
I would just try and glue over the external coolant line leaks, then cap it off with vacuum caps, making the winter checkball basically an "almost" standard checkball, and then leave the coolant lines bypassed as you have already done.