2007 Heater Hose assembly leak

Disclaimer: Links on this page pointing to Amazon, eBay and other sites may include affiliate code. If you click them and make a purchase, we may earn a small commission.

4x4Dude

Full Access Members
Joined
Jul 25, 2007
Posts
314
Reaction score
1
Location
Scottsdale AZ
Hey guys, been a while since i posted but my 07 expo just sprung a nice little leak in the heater hose right above the spark plug location. it's leaking right at the t junction I haven't really been able to find anything online related to a newer style expo removing these hoses just 1st gens. Does anyone out there have any experience in replacing this part? I was able to get the parts i need from a friend who works for ford for 80 bucks total. The dealer wanted 450 bucks for do the work which i thought was crazy talk. going to attempt to do this myself just wanted to see what i might be in for or if anyone had any advice.
 

911jason

Full Access Members
Joined
Apr 11, 2010
Posts
204
Reaction score
12
Location
Simi Valley, CA
Sounds like the same problem I had last summer. Cost me $900 because they also had to replace the coil packs the fluid had leaked onto.
 
OP
OP
4

4x4Dude

Full Access Members
Joined
Jul 25, 2007
Posts
314
Reaction score
1
Location
Scottsdale AZ
Well after buying the replacement hose from ford i went to install it and it's about 6 inches too long. I went back to ford and apparently it's the only hose they offer as the new models design for the hose has changed. I want to know what the technician would have done when he went to go replace the part? would he have just cut the hose and spliced it and called it a day? It took me 10 minutes to pull the old one off and put the new one on but now i have to deal with this ********. Am i crazy here or am i justified in thinking this is completely wrong on fords end? you mean to tell me that my 07 has this mystery part that can no longer be purchased by ford? I think i'm going to try another dealer.
 

Attachments

  • IMG_8826.jpg
    IMG_8826.jpg
    81.6 KB · Views: 3,504

jimb726

Active Member
Joined
Feb 19, 2011
Posts
30
Reaction score
0
Location
Cleveland, Ohio
Well after buying the replacement hose from ford i went to install it and it's about 6 inches too long. I went back to ford and apparently it's the only hose they offer as the new models design for the hose has changed. I want to know what the technician would have done when he went to go replace the part? would he have just cut the hose and spliced it and called it a day? It took me 10 minutes to pull the old one off and put the new one on but now i have to deal with this ********. Am i crazy here or am i justified in thinking this is completely wrong on fords end? you mean to tell me that my 07 has this mystery part that can no longer be purchased by ford? I think i'm going to try another dealer.

Sounds like your buddy might have gotten you the wrong part? if not then you may have to buy the other half of the hose, might be why the dealer was so expensive?
 
OP
OP
4

4x4Dude

Full Access Members
Joined
Jul 25, 2007
Posts
314
Reaction score
1
Location
Scottsdale AZ
Actually for anyone that might have this issue in the future. there is an extra smaller hose that extends from the heater core that Ford stopped using in the newer models and replaced it using one big longer hose. So at least for the 2007 models once you remove the first heater hose you just need to reach back and remove this smaller adapter. Once this came off the hose that Ford gave me ended up being the right part.
 

CJ0920

Well-Known Member
Joined
Oct 10, 2012
Posts
90
Reaction score
4
Location
Gainesville, VA
Mine started leaking pretty bad flooding the spark plug chambers on the coil packs.

Do you have pictures or part numbers you replace. I need to find out exactly what part number it is.
 

CJ0920

Well-Known Member
Joined
Oct 10, 2012
Posts
90
Reaction score
4
Location
Gainesville, VA
OK, part should be here today, anyone know how this hose comes off? Do I need a quick disconnect tool or do I just squeeze and pry them off?
 

CJ0920

Well-Known Member
Joined
Oct 10, 2012
Posts
90
Reaction score
4
Location
Gainesville, VA
Very frustrating no one has responded yet, so I will answer my own question in hopes to help others here that may run into the same issue.

The heater hose has a quick disconnect connector on the end of the 5/8" hoses with the exception of one hose clamp closest to the thermostat.

Rather than using a quick disconnect tool I used a skinny small vice grip and squeezed the plastic ends in at the same time. You will hear a click, then push in the hose and pull it back. The hose should remove leaving the plastic clip on the line.

I don't have the part number handy at this moment but if any one needs that let me know, or I'll update that when I have it handy. Purchased the replacement part from tasca shipped for $49 ordered Tuesday was here Thursday.

Caution, the new hose is longer than the original. The original has an extension about 6" that goes very close to the firewall. I took out the OEM hose (first section) first and climbed up and used my fingers to disconnect the connector and yanked the hose out. The replacement is one piece. Also when removing the hose be ready for coolant to be draining. I used a wet vac to get all the coolant sitting around the coil packs.

My OEM hose seems fine however it was leaking somewhere on the plastic T on those plastic things. They don't look like they move or separate which is why I just ordered a replacement hose.


Sent from my iPad using Tapatalk HD
 

dcook

New Member
Joined
Mar 24, 2011
Posts
1
Reaction score
0
Location
Dallas
Heater Hose Assembly

Hi, Thanks for the update. It does help.


How were you able to access the disconnect clips on the hoses? I have a 99 expedition 1st-gen.

Thanks in advance. Darryl
 

GSXR1100

Member
Joined
Jun 11, 2012
Posts
14
Reaction score
0
Location
Great planes
Please post part number if it's the T over the passenger side cylinder bank leaking. Just found antifreeze pooling in my plugs over there.
 

Charly

Full Access Members
Joined
Feb 18, 2012
Posts
53
Reaction score
0
Location
Miami
I had the same problem there's another clip right before the fire wall on the heater core. The new hose is a redesign to one piece.
 

Attachments

  • 2013-10-18 11.57.47.jpg
    2013-10-18 11.57.47.jpg
    90 KB · Views: 3,817
Last edited:

EL Trucko

Member
Joined
Apr 8, 2014
Posts
7
Reaction score
0
Location
Florida
OK Guys-
My 'special order' hose has come in and I'll be attacking this same issue myself today (and sounds like tomorrow too) I've read all your helpful tips, and watched a you tube 'how-to'. I'll let you know how it goes. I'm off to pick up the hose, a quick connect tool AND a case of beer to handle the inevitable ensuing frustration. :p
 

Bedrck47

Full Access Members
Joined
Jul 4, 2014
Posts
5,639
Reaction score
659
Location
Elizebethtown, PA
Heater Hose Coupling

Special Tool(s) Remover, Heater Hose Inlet Tube
412-042 (T85T-18539-AH)

Disconnect

WARNING: The engine must be off, fully cool and the cooling system fully depressurized before attempting to disconnect any heater water hoses. Failure to comply with this warning can result in serious injury or burns from hot liquid escaping out of the engine cooling system.

Depressurize the engine cooling system.
Push the heater water hose toward the tube to fully expose the locking tabs.
NOTE: When compressing the white coupling retainer, the Heater Hose Disconnect Tool must be perpendicular to and on the highest point of the coupling.

Push the special tool over the coupling retainer windows to compress the retainer locking tabs.

NOTE: A slight twisting motion while pulling on the heater water hose may be necessary to assist in the removal.

Pull the heater water hose away from the heater core tube.

Plug the heater water hose.
Remove the white coupling retainer from the tube.
Spread the retainer tabs apart and slide the retainer off the tube.

Discard the retainer.
Connect

Clean the tubes and lubricate with plain water.
Install a new coupling retainer, spacer, and lubricated O-ring seals into the quick disconnect coupling housing.

Push the heater water hose with a quick disconnect coupling onto the tube.

Make sure the coupling is fully engaged by lightly pulling on the heater water hose.
 

Bedrck47

Full Access Members
Joined
Jul 4, 2014
Posts
5,639
Reaction score
659
Location
Elizebethtown, PA
also kindly update your signature line to show your expy's information this can be done in the user CP sections that helps to give you better advice specific to your year and model
 
Last edited:

EL Trucko

Member
Joined
Apr 8, 2014
Posts
7
Reaction score
0
Location
Florida
The hose replacement took me less than 2 hours. (There were interruptions by the offspring) Overall, it went well with the added bonus of WAY better performance than anticipated. I'm posting a link to a youtube video that helps in planning for this adventure.

https://www.youtube.com/watch?v=bJmZjPxyoWY

Things that made it go easier:
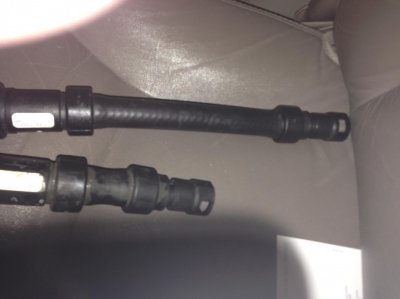
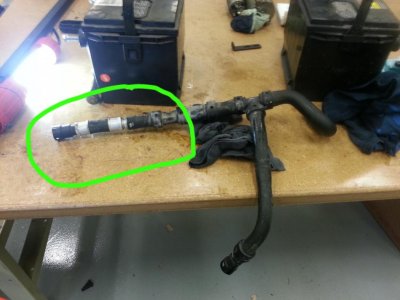
1) Knowing that the extension was there, next to the firewall, and a pain to remove...
2) Knowing exactly where to look for the nipple to drain the coolant. I knew where it was and I still had a hard time locating it until I removed the water shield underneath and got just the right angle. (from under the front of the vehicle)
3) Using the 'small profile' quick-connect tools instead of the ones with the handles. (Don't use the ones in the video)
4) A 90 degree, long handled, needle-nosed pliers. This tool was GREAT! I borrowed it from O'Reilly's. The manager had to replace the same hose in the past and told me it would be useful. OH YEAH IT WAS! When trying to get to the back of the extension, this tool helped me get the quick-connect tool into place in that small space, and then I was able to use it to apply back pressure BEHIND the quick-connect tool in order to push against since the firewall has a small piece of black foam behind the extension which wouldn't provide any support when trying to press the quick-connect into the coupling.
5) Having a beautiful assistant to hand me what I needed as I had to literally lay across the engine in order to reach deep into the back of the firewall and still be able to use my arms
6) Having a good light set up to see back by the firewall.

Getting that extension off was definitely a 2 beer accomplishment in itself!

Now here was my bonus:
Prior to the hose replacement, the computer was reading a misfire in the third cylinder. It was VERY obvious in the performance, skipping and lurching under heavy acceleration. (not that I have a lead foot or anything... well OK - I do.) I feared the leaking coolant had damaged the coil and it too would need replacing. I only hoped that after drying up the coolant around the coil bases (1,2, & 3) that the skipping would go away and I not have to replace a coil.

Also something I had noticed since I bought the truck a few months ago was the obvious and ludicrous shifting the computer did with the transmission. I constantly complained to my beautiful wife how I hated computers in vehicles because a 5.4 liter V8 has WAY more power available in it than this computer was allowing the truck to put out. I want to rip it out and stick a metal rod through the floor so I can shift it MYSELF! I'm sorry, I want my own control over things... it must be the republican coming out in me.

Well!- On the first test run after refilling the coolant ... NO SKIPPING! YAY! AND... the computer allows the truck now to really use its power. From a stop it actually rubbed the rear wheels on take off and through the first several gears it allowed red-line to be achieved and shifted rapidly! The difference in power just from replacing this leaky hose and cleaning off the coils was SO obvious that my wife sitting next to me had a giddy grin on her face as we slammed through gears and the big V8 roared. Granted- it's still a big lumbering Expedition EL, but finally the power of the V8 is revealed.
I'm so excited!

Good luck to the next of you to replace it!
 

sls1980

Member
Joined
Jun 21, 2012
Posts
10
Reaction score
0
Location
Arizona
Passenger side lower radiator leak

We replaced the hoses that cause the coilpacks/spark plug issues a few years back. The car now has 135,*** miles on it and is leaking coolant from under the passenger side radiator. I think this is causing the a/c to blow warm at idle. We live in AZ and things get hot for the wife and kids with this issue. Anyone have similar problems?
 

chart75

Active Member
Joined
Feb 2, 2011
Posts
34
Reaction score
6
Location
Denver
Had the same issue about the time you posted this on my wife's 07 expedition with ~159K miles . Radiator was leaking on the passenger side. I was hoping it was just a hose but turned out that the radiator itself was leaking. The labor was just about as expensive as the cost for the new radiator itself since it's so well tucked in there. I asked about just fixing it but you have to pull it out to re-solder it and my mechanic recommended just replacing it. That's fixed; now I'm dealing with the heater hose issue.
 

Curtis

New Member
Joined
Jun 3, 2011
Posts
2
Reaction score
0
Location
Orlando
I just did this repair.
I did the "T" fix about a year ago, but another part of the hose failed a couple days ago and started leaking.

The videos online make is sound like a big job. And needs a special spreader tool like a fuel line, this is not the case. If you squeeze the white clips outside the black connector you can pull the black connector/hose off leaving the white clip on the pipe. Then just pull off the white connector.

Took me about 10 mins to replace.


Old hose / New hose
You can see the 6" extension on the old one
72BCD9FA-AD40-40FA-9717-7BCC32AD2928.jpg


Old hose with the T replaced
7AC31274-DDB2-4E78-9A37-5FBC898BAAAE.jpg


New hose part number
Note this is the longer part, you'll need to remove the 6" extension to the firewall if you have it. Its close to the firewall but disconnects the same way with the same connector
43D74F7C-6DCC-4089-8FF1-8A2CDC00FA47.jpg


All done
82B9AB9F-AAB4-4C43-A0B4-26BD4421FAAD.jpg


Here's the connector you squeeze
816D9D77-9534-49C8-B3C5-F80677E40390.jpg

2163CDBE-F705-4985-8E31-E93DD53087D5.jpg

4D2563CC-CF07-425D-8F02-9A2E5217697D.jpg
 
Top