

You are using an out of date browser. It may not display this or other websites correctly.
You should upgrade or use an alternative browser.
You should upgrade or use an alternative browser.
CAN'T WAIT for THURSDAY!!!
- Thread starter CertusExpo
- Start date
Disclaimer: Links on this page pointing to Amazon, eBay and other sites may include affiliate code. If you click them and make a purchase, we may earn a small commission.


Gruz7
Full Access Members
Where will that light bar be placed on your truck??
Sent from my iPhone using Tapatalk
Sent from my iPhone using Tapatalk
OP
OP
CertusExpo
Customizing trucks since I was 7 with my Legos
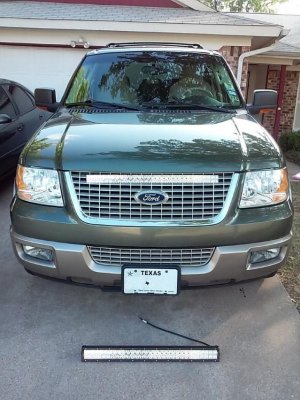
I'm going to install it high up behind the grille so it's hidden and protected from easy theft
(Superimposed in pic)
And, with a little trimming.
 These should fit in place of the stock fog lights!
(Superimposed in pic)
And, with a little trimming.
Attachments
Last edited:
Gruz7
Full Access Members
Nice its gonna look good man I was planning on a light bar too for the roof though
Sent from my iPhone using Tapatalk
Sent from my iPhone using Tapatalk
DetroitDarin
Full Access Members
check out Olympus Off Road and their Zeus lighting, too!
OP
OP
CertusExpo
Customizing trucks since I was 7 with my Legos
Nice its gonna look good man I was planning on a light bar too for the roof though
Sent from my iPhone using Tapatalk
Same here. I want one facing forward and a second facing rear.
I want the Yakima MegaWarrior but will check out the Olympus stuff too.
Last edited:
OP
OP
CertusExpo
Customizing trucks since I was 7 with my Legos
Update with pics
I haven't installed it yet. Had stuff come up on my days off and then, due to weather looking to switch to winter fast. I put my drilled/slotted rotors and caliper paint job on the To Do NOW list.
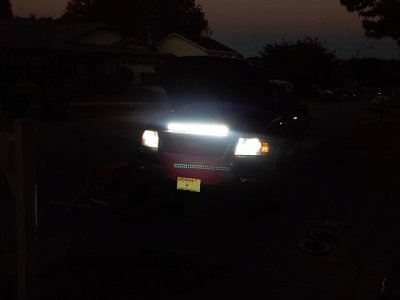
I did manage to snap a few 'test run' pics of the lightbar sitting on the fan cowl.
Here are a few highlight pics but I plan on writing up a complete How To with ALL the pics I took of the process.
I haven't installed it yet. Had stuff come up on my days off and then, due to weather looking to switch to winter fast. I put my drilled/slotted rotors and caliper paint job on the To Do NOW list.
I did manage to snap a few 'test run' pics of the lightbar sitting on the fan cowl.
Here are a few highlight pics but I plan on writing up a complete How To with ALL the pics I took of the process.
Attachments

OP
OP
CertusExpo
Customizing trucks since I was 7 with my Legos
Thanks!
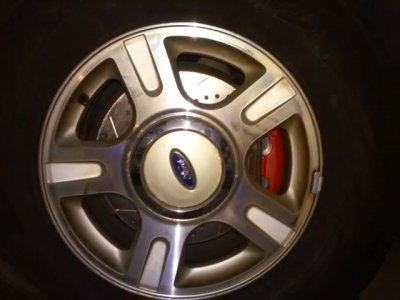
I went ahead and uploaded the brake upgrade pics to an album in my profile if anyone is curious.
I went ahead and uploaded the brake upgrade pics to an album in my profile if anyone is curious.
sgtowing
Supporting Members
Pics or it never happened.
OP
OP
CertusExpo
Customizing trucks since I was 7 with my Legos
What kind of paint did you use?
Sent from my SM-N900V using Tapatalk
I decided to give the Plasti-dip a try. Worst case scenario, I peel it and try another option.
OP
OP
CertusExpo
Customizing trucks since I was 7 with my Legos
They (Plasti-Dip) called me back and they advised me of the exact temperature extremes it is tested for but... called me WHILE I was doing the brakes so it was moot but if I remember right, up to somewhere in the 400 degree range.
I've used Plasti-Dip before for rims and trim. I have even used it for blacking out a tailpipe and it handled that heat just fine. I don't expect the calipers to heat more than a tailpipe although I could be wrong.
I will updated as needed.
I've used Plasti-Dip before for rims and trim. I have even used it for blacking out a tailpipe and it handled that heat just fine. I don't expect the calipers to heat more than a tailpipe although I could be wrong.
I will updated as needed.
OP
OP
CertusExpo
Customizing trucks since I was 7 with my Legos
The key is the prep of the dirty calipers. I used both brake cleaner and caliper cleaner that I found in the automotive paint area along with scrubbing with an old toothbrush.
In hindsight (and if I had thought about it before) I should have done a pre cleaning by soaking with a HD pump spray household degreaser, rinsing and repeating a couple times and then following up with the brake cleaners.
The inherent nature of Plasti-Dip is that it seems to want to merge and adhere to itself so as long as it's layered in several nice coats it should stay conformed to that shape.
I had at least 6 main coats with more layered on the sides/edges.
Last edited:
Otters07
Full Access Members
Nice I have a 20" Rigid light on my F150 and it is EXTREMELY bright!
Similar threads
- Replies
- 3
- Views
- 874
- Replies
- 4
- Views
- 473
- Replies
- 1
- Views
- 937
- Replies
- 9
- Views
- 2K
- Replies
- 12
- Views
- 3K