k4vbb
Active Member
This is not a step-by-step HOW-TO. Instead, this post is designed to give someone insight into the swap, what to look out for, and to list part numbers that worked for me. That way you can assemble all of the needed parts before the swap happens, have an idea of what you're getting into, and have some information available that might make the job easier.
I didn't want to be in the position where I find out too late that a critical cooling system component was compromised. Normally, when I buy a used vehicle, one of the first things I do is to replace the upper/lower radiator hoses, and any heater hoses. I want to KNOW that these are in good shape, and I want the confidence in knowing that I'm not going to have any unexpected surprises down the road, on the road. Nothing worse than being stranded somewhere because of a $30 dollar part.
My current Expedition is no different in that respect. However, the cooling system on the 5.4L is a bit more complex. Beneath the intake manifold is a steel coolant-return tube that runs between a small "spigot" at the back of the water pump to an outlet to the rear, and just above the rear passenger-side cylinder head. This tube runs along the bottom of the valley between the cylinders, and is only accessible by the removal of the intake manifold.
Again, the tube is made of steel and is sealed to the water pump spout with 2 O-rings. Although my tube looked great from the outside, there was no telling what it looked like on the inside, how much rust was forming within it, and what kind of shape those 2 O-rings were in. Since I want my cooling system to be 100%, I decided to address this tube, along with every other hose on the truck.
At the same time I wanted to upgrade to an aluminum intake manifold. The one installed on my truck was plastic, and of the Dorman brand. Other than a very small "weeping" of coolant from the rear driver's-side coolant passage, there wasn't anything technically wrong with it. But, I don't like ANY coolant leaks, and I wanted an aluminum intake in order to maintain the seals long term.
Since my truck was a 2001, I had PI heads. This means that the only available PI intake manifold that would work, and that was made from aluminum, would have to come off of a 1999 model year. Everything else would have had either a plastic OEM intake, or a non-PI intake manifold. Lucky for me, the local Pick-and-Pull had 2 1999 Expeditions in inventory, both of which still had their aluminum PI intake manifolds. I pulled them both. I took all the brackets and all the bolts along with them, something that wound up saving my bacon later.
DIFFERENCES:
--PCV heating: Some trucks in 1999 had a system that would heat the incoming PCV gases. A manifold from one of these would have a small riser on the front driver's side of the coolant crossover, where a coolant hose would attach and run to the throttle body. From there, another coolant hose would connect to a spout on the rear of the steel coolant tube. My 2001 had none of that, so that riser needs to be removed and plugged off.
--Temperature sending unit: Some trucks had a temperature sending unit in this location, instead. None of the intakes I scored had one of these, but again, this would need to be removed and plugged off.
--Heater Core coolant supply: On my 2001, the heater cores (I have 2) are supplied by a hose that runs from the front passenger side of the intake coolant crossover into the front heater core. However, in 1999 the heater core supply was located at the REAR passenger-side.
--Intake manifold bolt size (may only apply to aftermarket intakes)
In my case, the first two differences were easy to overcome. My truck did not have the PCV heating system in it, nor did it have a temperature sending unit installed on the intake manifold. One of the intake manifolds I scored from the JY had that port already plugged off, so I used that one.
However, the heater hoses for a stock 2001 Ford Expedition would no longer work for me, since the heater cores would be supplied at the rear of the intake once the swap was done. I needed heater hoses for a 1999, and here are the part numbers:
Gates 22513
Gates 22540
The heater hoses could be connected with simple hose clamps, but I chose to use the quick-connect fittings (more on these later) because accessing the space to tighten the hose clamps in this location is 'grueling'. If you're keeping the quick-connect fittings, you'll need either 4 of these:
Gates 28500
In my case I also needed 6 hose clamps -- two for the quick connect fittings at the front heater core, 2 for the quick connect fittings for the rear heater core, and 2 for the connections to the engine.
As I understand it, some Expeditions only came with 1 heater core in the front. Those of you with this setup don't know how lucky you are! You'll need the following heater hoses:
Gates 19193
Gates 19219
Additionally, you'll only need 2 of the quick connect fittings (Gates 28500) and 4 hose clamps.
ANOTHER THING TO NOTE:
If you're doing this work, I HIGHLY recommend replacing the steel heater supply tube underneath the intake manifold. This tube comes in 2 forms: 1 WITH PCV heating, and 1 without. These tubes are almost identical, except that the one designed for PCV heat has an extra nipple on it. Pay attention and order the correct one for your application:
WITH PCV heat: Dorman 626517
WITHOUT PCV heat: Dorman 626221
For the O-rings, I used the following:
MAHLE / CLEVITE GS33800
Speaking of steel heater tubes, there is also one at the back of the aluminum intake manifold. It's a riser that is gracefully bent at 90 degrees. These can be rusty inside, too, but can be replaced with the following part number:
DORMAN 626229
With the amount of work that goes into this swap, it's better to be safe than sorry.
QUICK-CONNECT FITTINGS:
As stated, these are quick-connect. Super easy to just stab them onto the pipe and listen for the "click of engagement". HOWEVER, by no means are these fittings quick to DISconnect. New, old, worn-out, or in great shape, these things just don't want to release in the manner they are designed to. Supposedly, you can squeeze the ends, and with a push-pull simply slip them off of the tube. That works on paper, but only worked in practice on one of mine. Additionally, in the space you're going to be working in, it's an absolute nightmare to reach back there with any coordination to release them gracefully. I found a way, using a pair of dikes, to cut them free without damaging the tubes. These things were much easier to deal with by clipping the black part of the locking mechanism. Do this on both sides of the connector and they'll slip right off. Be sure and remove ALL of the remaining O-rings and any remnants of the locking mechanism.
Replacing the intake manifold was straightforward. Nothing is hard, but all of it is very tedious. I started with all of the intake tubing, mass-air, moved to removing the emissions controls, then the throttle body assembly. After that, remove the fuel rail, all of the injectors, and then move on to removing the coil packs. You're going to want to remove the alternator, as well. Once all that stuff has been removed you'll have access to the bolts that hold the intake onto the cylinder heads.
Installation is the reverse. However, there is one thing of note that is very IMPORTANT!. The intake manifold installed on my truck was a plastic Dorman. This intake requires bolts that are longer than those used on a stock aluminum intake manifold. The result is that they seat before applying sufficient pressure on the intake. Torque these to spec and you have a recipie for disaster. Best case scenario the intake doesn't seal. Worst case scenario you strip the threads in the cylinder head, or worse, crack the material around the bolt holes in the cylinder head. When you strip a JY truck of an intake manifold, be sure to grab all of the bolts that held it on.
GASKETS:
I found that the stock intake manifold gaskets for a 1999 Ford Expedition fit nicely. There are several versions, most of which have the stock-type silicone ring seal around the intake and coolant ports. However, after all of this work I wanted to be EXTRA sure that I wasn't going to have either a vaccum leak or a coolant leak. I spend a bit of extra cash to by the Fel-Pro "upgraded" version, which has a good bit more rubber around every port. Here's the part number:
Fel-Pro MS98008T
RECOMMENDATIONS:
--Heater Hoses: Simply cut the old ones out of the way. To me, even if they were new, it wasn't worth the effort and time required to remove them in one piece, and it bought me valuable space to get to the quick-connect fittings at the heater core.
--Heater tube: The heater tube simply slides onto the spout at the back of the water pump. On the other end, it is held to the cylinder head by 2 bolts. The bottom bolt has to be removed completely. The upper bolt can simply be loosened enough to swing the tube off of it. Each one of these bolts ALSO holds a support bracket for a wiring harness. First, a 10mm nut needs to be removed. Once that nut is gone, the remaining stud can be worked out with a 13mm wrench. There is not much room at the back of the cylinder head, and positioning your body to get back there can be "painful" for the lack of a better term. Be patient. I think that was the hardest part of the entire job.
The Dorman tube fit like a glove. No need to bend it into shape.
--DO! inspect the steel heater tube. Mine looked GREAT from the outside, and did not leak. However, there was a lot of rust and scale on the inside, and I could easily bend it. The new tube was quite stiff, and coated with a protective layer on both the inside and the outside of the tube.
--Attach the heater core supply hose to the steel coolant tube BEFORE you mount the tube. This saved me from having to reach all the way back to the firewall and fiddling with a hose clamp. Do not attach the other end until after the new manifold is fitted. Simply "flop" the excess hose out of the way until it's time to connect it up.
--Coil Pack Plugs: On some vehicles these have a locking tab that eventually breaks off. If you run into this, fix the connector while the intake manifold is removed. There is a lot more space to work with it out of the way, and there is a youtube video that explains how to do this simply, without cutting/soldering new plugs.

 www.youtube.com
--Now is a good time to do your spark plugs. When you install them, ignore the torque spec from Ford and torque them to ~23 ft/lbs. This will save you from a blown-out spark plug later. AT THE VERY LEAST, check the torque on the spark plugs that are in there.
--The 2001 model has a restrictor in one of the heater hoses. This restrictor is designed to reduce flow (not pressure!) to the heater cores. For what purpose I don't know. In any case, mine was toast. I didn't bother adding it to the new setup.
--Allot enough time for the swap. Look at the swap as if it were a project, as opposed to a quick repair. I've been wrenching since I was a kid, and despite my vast experience it took me a whole weekend to do this. None of the work is hard, but all of it's tedious, and much of it requires patience to work in tight spaces, bolts you can't see, and less-than-optimal body positioning. Literally anyone with a tool set can do this job. Just make sure and go slowly and don't take any shortcuts.
RESULTS:
The Good:
--Increased power! There is a noticeable increase in power, especially off the line. I've read posts that indicate that the Dorman intake is supposed to have been "dyno'ed", and that it is supposed to produce better HP. However, if it does, it does so at an RPM where the engine doesn't really need it. My truck is much more "zippy" than it used to be. Since I also decided to rebuild all of the injectors, this 'could' be attributed to that. However, the injectors that were really not in bad shape to begin with. I only have about 40 miles on the truck since the swap, so there's not a whole lot of data gathered as of yet. I expect, however, that towing my RV will be a better experience now.
I also have better heat inside the truck now.
The Bad: This was a lot of time-consuming and tedious work. Cleaning the filthy JY manifold, scrubbing bolt heads and threads in the parts cleaner, repairing broken coil-pack plugs, and the like all takes time. The only good thing I can say about the time it took is that this was a planned event as opposed to a repair due to failure. If you're doing this to get your truck back on the road, just know this won't be a quick fix.
The Ugly: In the past, getting to the #3 and #4 coil packs, injectors, and spark plugs was difficult, as the heater core hoses were in the way. Removing one of the ends, and flopping the hose out of the way made things easier. However, with the new hose routing and configuration, I have what amounts to a "ball" of heater hose in the way now. To access the #3 and #4 ignition components will require the complete removal of these hoses now. Those of you with only one heater core may not experience this.
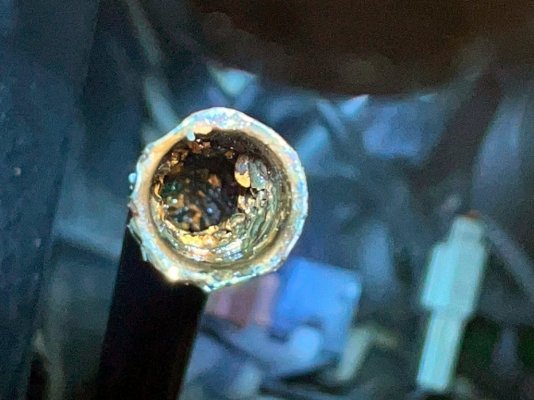
Pictures:
These are of the busted-up restrictor I found inside of the heater hose, the inside of the steel coolant tube, and the outside of that very same tube. Note that it looks great on the outside (except where the paint flaked off during removal), but on the inside its a total mess. I also show the difference in intake manifold bolts between the Dorman plastic intake and the stock aluminum one.
I didn't want to be in the position where I find out too late that a critical cooling system component was compromised. Normally, when I buy a used vehicle, one of the first things I do is to replace the upper/lower radiator hoses, and any heater hoses. I want to KNOW that these are in good shape, and I want the confidence in knowing that I'm not going to have any unexpected surprises down the road, on the road. Nothing worse than being stranded somewhere because of a $30 dollar part.
My current Expedition is no different in that respect. However, the cooling system on the 5.4L is a bit more complex. Beneath the intake manifold is a steel coolant-return tube that runs between a small "spigot" at the back of the water pump to an outlet to the rear, and just above the rear passenger-side cylinder head. This tube runs along the bottom of the valley between the cylinders, and is only accessible by the removal of the intake manifold.
Again, the tube is made of steel and is sealed to the water pump spout with 2 O-rings. Although my tube looked great from the outside, there was no telling what it looked like on the inside, how much rust was forming within it, and what kind of shape those 2 O-rings were in. Since I want my cooling system to be 100%, I decided to address this tube, along with every other hose on the truck.
At the same time I wanted to upgrade to an aluminum intake manifold. The one installed on my truck was plastic, and of the Dorman brand. Other than a very small "weeping" of coolant from the rear driver's-side coolant passage, there wasn't anything technically wrong with it. But, I don't like ANY coolant leaks, and I wanted an aluminum intake in order to maintain the seals long term.
Since my truck was a 2001, I had PI heads. This means that the only available PI intake manifold that would work, and that was made from aluminum, would have to come off of a 1999 model year. Everything else would have had either a plastic OEM intake, or a non-PI intake manifold. Lucky for me, the local Pick-and-Pull had 2 1999 Expeditions in inventory, both of which still had their aluminum PI intake manifolds. I pulled them both. I took all the brackets and all the bolts along with them, something that wound up saving my bacon later.
DIFFERENCES:
--PCV heating: Some trucks in 1999 had a system that would heat the incoming PCV gases. A manifold from one of these would have a small riser on the front driver's side of the coolant crossover, where a coolant hose would attach and run to the throttle body. From there, another coolant hose would connect to a spout on the rear of the steel coolant tube. My 2001 had none of that, so that riser needs to be removed and plugged off.
--Temperature sending unit: Some trucks had a temperature sending unit in this location, instead. None of the intakes I scored had one of these, but again, this would need to be removed and plugged off.
--Heater Core coolant supply: On my 2001, the heater cores (I have 2) are supplied by a hose that runs from the front passenger side of the intake coolant crossover into the front heater core. However, in 1999 the heater core supply was located at the REAR passenger-side.
--Intake manifold bolt size (may only apply to aftermarket intakes)
In my case, the first two differences were easy to overcome. My truck did not have the PCV heating system in it, nor did it have a temperature sending unit installed on the intake manifold. One of the intake manifolds I scored from the JY had that port already plugged off, so I used that one.
However, the heater hoses for a stock 2001 Ford Expedition would no longer work for me, since the heater cores would be supplied at the rear of the intake once the swap was done. I needed heater hoses for a 1999, and here are the part numbers:
Gates 22513
Gates 22540
The heater hoses could be connected with simple hose clamps, but I chose to use the quick-connect fittings (more on these later) because accessing the space to tighten the hose clamps in this location is 'grueling'. If you're keeping the quick-connect fittings, you'll need either 4 of these:
Gates 28500
In my case I also needed 6 hose clamps -- two for the quick connect fittings at the front heater core, 2 for the quick connect fittings for the rear heater core, and 2 for the connections to the engine.
As I understand it, some Expeditions only came with 1 heater core in the front. Those of you with this setup don't know how lucky you are! You'll need the following heater hoses:
Gates 19193
Gates 19219
Additionally, you'll only need 2 of the quick connect fittings (Gates 28500) and 4 hose clamps.
ANOTHER THING TO NOTE:
If you're doing this work, I HIGHLY recommend replacing the steel heater supply tube underneath the intake manifold. This tube comes in 2 forms: 1 WITH PCV heating, and 1 without. These tubes are almost identical, except that the one designed for PCV heat has an extra nipple on it. Pay attention and order the correct one for your application:
WITH PCV heat: Dorman 626517
WITHOUT PCV heat: Dorman 626221
For the O-rings, I used the following:
MAHLE / CLEVITE GS33800
Speaking of steel heater tubes, there is also one at the back of the aluminum intake manifold. It's a riser that is gracefully bent at 90 degrees. These can be rusty inside, too, but can be replaced with the following part number:
DORMAN 626229
With the amount of work that goes into this swap, it's better to be safe than sorry.
QUICK-CONNECT FITTINGS:
As stated, these are quick-connect. Super easy to just stab them onto the pipe and listen for the "click of engagement". HOWEVER, by no means are these fittings quick to DISconnect. New, old, worn-out, or in great shape, these things just don't want to release in the manner they are designed to. Supposedly, you can squeeze the ends, and with a push-pull simply slip them off of the tube. That works on paper, but only worked in practice on one of mine. Additionally, in the space you're going to be working in, it's an absolute nightmare to reach back there with any coordination to release them gracefully. I found a way, using a pair of dikes, to cut them free without damaging the tubes. These things were much easier to deal with by clipping the black part of the locking mechanism. Do this on both sides of the connector and they'll slip right off. Be sure and remove ALL of the remaining O-rings and any remnants of the locking mechanism.
Replacing the intake manifold was straightforward. Nothing is hard, but all of it is very tedious. I started with all of the intake tubing, mass-air, moved to removing the emissions controls, then the throttle body assembly. After that, remove the fuel rail, all of the injectors, and then move on to removing the coil packs. You're going to want to remove the alternator, as well. Once all that stuff has been removed you'll have access to the bolts that hold the intake onto the cylinder heads.
Installation is the reverse. However, there is one thing of note that is very IMPORTANT!. The intake manifold installed on my truck was a plastic Dorman. This intake requires bolts that are longer than those used on a stock aluminum intake manifold. The result is that they seat before applying sufficient pressure on the intake. Torque these to spec and you have a recipie for disaster. Best case scenario the intake doesn't seal. Worst case scenario you strip the threads in the cylinder head, or worse, crack the material around the bolt holes in the cylinder head. When you strip a JY truck of an intake manifold, be sure to grab all of the bolts that held it on.
GASKETS:
I found that the stock intake manifold gaskets for a 1999 Ford Expedition fit nicely. There are several versions, most of which have the stock-type silicone ring seal around the intake and coolant ports. However, after all of this work I wanted to be EXTRA sure that I wasn't going to have either a vaccum leak or a coolant leak. I spend a bit of extra cash to by the Fel-Pro "upgraded" version, which has a good bit more rubber around every port. Here's the part number:
Fel-Pro MS98008T
RECOMMENDATIONS:
--Heater Hoses: Simply cut the old ones out of the way. To me, even if they were new, it wasn't worth the effort and time required to remove them in one piece, and it bought me valuable space to get to the quick-connect fittings at the heater core.
--Heater tube: The heater tube simply slides onto the spout at the back of the water pump. On the other end, it is held to the cylinder head by 2 bolts. The bottom bolt has to be removed completely. The upper bolt can simply be loosened enough to swing the tube off of it. Each one of these bolts ALSO holds a support bracket for a wiring harness. First, a 10mm nut needs to be removed. Once that nut is gone, the remaining stud can be worked out with a 13mm wrench. There is not much room at the back of the cylinder head, and positioning your body to get back there can be "painful" for the lack of a better term. Be patient. I think that was the hardest part of the entire job.
The Dorman tube fit like a glove. No need to bend it into shape.
--DO! inspect the steel heater tube. Mine looked GREAT from the outside, and did not leak. However, there was a lot of rust and scale on the inside, and I could easily bend it. The new tube was quite stiff, and coated with a protective layer on both the inside and the outside of the tube.
--Attach the heater core supply hose to the steel coolant tube BEFORE you mount the tube. This saved me from having to reach all the way back to the firewall and fiddling with a hose clamp. Do not attach the other end until after the new manifold is fitted. Simply "flop" the excess hose out of the way until it's time to connect it up.
--Coil Pack Plugs: On some vehicles these have a locking tab that eventually breaks off. If you run into this, fix the connector while the intake manifold is removed. There is a lot more space to work with it out of the way, and there is a youtube video that explains how to do this simply, without cutting/soldering new plugs.
Repair Ford Coil Over Plug Harness Adapters Without Cutting or Splicing. Broken ignition coil wire.
If his video was helpful and saved you money from going to a mechanic please click the THANKS button above and consider leaving a tip!. Instructions on how t...
www.youtube.com
--Now is a good time to do your spark plugs. When you install them, ignore the torque spec from Ford and torque them to ~23 ft/lbs. This will save you from a blown-out spark plug later. AT THE VERY LEAST, check the torque on the spark plugs that are in there.
--The 2001 model has a restrictor in one of the heater hoses. This restrictor is designed to reduce flow (not pressure!) to the heater cores. For what purpose I don't know. In any case, mine was toast. I didn't bother adding it to the new setup.
--Allot enough time for the swap. Look at the swap as if it were a project, as opposed to a quick repair. I've been wrenching since I was a kid, and despite my vast experience it took me a whole weekend to do this. None of the work is hard, but all of it's tedious, and much of it requires patience to work in tight spaces, bolts you can't see, and less-than-optimal body positioning. Literally anyone with a tool set can do this job. Just make sure and go slowly and don't take any shortcuts.
RESULTS:
The Good:
--Increased power! There is a noticeable increase in power, especially off the line. I've read posts that indicate that the Dorman intake is supposed to have been "dyno'ed", and that it is supposed to produce better HP. However, if it does, it does so at an RPM where the engine doesn't really need it. My truck is much more "zippy" than it used to be. Since I also decided to rebuild all of the injectors, this 'could' be attributed to that. However, the injectors that were really not in bad shape to begin with. I only have about 40 miles on the truck since the swap, so there's not a whole lot of data gathered as of yet. I expect, however, that towing my RV will be a better experience now.
I also have better heat inside the truck now.
The Bad: This was a lot of time-consuming and tedious work. Cleaning the filthy JY manifold, scrubbing bolt heads and threads in the parts cleaner, repairing broken coil-pack plugs, and the like all takes time. The only good thing I can say about the time it took is that this was a planned event as opposed to a repair due to failure. If you're doing this to get your truck back on the road, just know this won't be a quick fix.
The Ugly: In the past, getting to the #3 and #4 coil packs, injectors, and spark plugs was difficult, as the heater core hoses were in the way. Removing one of the ends, and flopping the hose out of the way made things easier. However, with the new hose routing and configuration, I have what amounts to a "ball" of heater hose in the way now. To access the #3 and #4 ignition components will require the complete removal of these hoses now. Those of you with only one heater core may not experience this.
Pictures:
These are of the busted-up restrictor I found inside of the heater hose, the inside of the steel coolant tube, and the outside of that very same tube. Note that it looks great on the outside (except where the paint flaked off during removal), but on the inside its a total mess. I also show the difference in intake manifold bolts between the Dorman plastic intake and the stock aluminum one.