My Stock EB Expy to Overlanding 4X4 Build

Disclaimer: Links on this page pointing to Amazon, eBay and other sites may include affiliate code. If you click them and make a purchase, we may earn a small commission.

MrBlargMan

Well-Known Member
Joined
Jul 21, 2016
Posts
48
Reaction score
55
Location
Colorado
@OverlandExpy - Cant wait to see the wheel/tire combo! Curious about seeing you make those sliders as well!

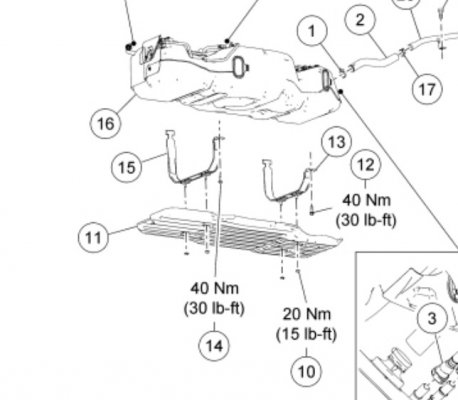
In case you are interested, here are the Ford part numbers for the stock FX4 skid plates.
Front Skid Plate - 2L1Z-5D032-AA
Transfer Case Skid Plate - 2L1Z-7E063-AA
Fuel Tank Skid Plate - 2L1Z-9A147-AA
Fuel Tank Straps (with skid mounts) - 2L1Z-9054-CA / 2L1Z-9054-DA

The fuel tank skid was discontinued when I purchased my set a few years back, but I was able to source the front skid and transfer case skid from my local Ford dealership. I have a separate thread with pics. If you just search skid plate you should be able to find it.

Cheers!
 

MrBlargMan

Well-Known Member
Joined
Jul 21, 2016
Posts
48
Reaction score
55
Location
Colorado
@OverlandExpy - That for sure looks like it would fit the shape of the tank. I am honestly not sure of what changes (if any) that were made to the fuel tanks or mounting straps on the 2005-2006 tanks vs the 2003-2004 tanks. There's certainly one way to find out if it will work, I suppose! :Big Laugh:
 
OP
OP
OverlandExpy

OverlandExpy

Full Access Members
Joined
Dec 25, 2020
Posts
128
Reaction score
38
Location
Northern California
Hopefully nothing since they are all the same model year! I'll buy it and report back. Is your fuel tank plate metal? On that website it says it's only 14lbs, seems pretty light for a piece of steel. Is it aluminum?
 
OP
OP
OverlandExpy

OverlandExpy

Full Access Members
Joined
Dec 25, 2020
Posts
128
Reaction score
38
Location
Northern California
Also do you have any pictures of the fuel tank armor on your rig? Would love to see if it looks close enough to mine. Just checked the site I linked and it says it only fits the 05/06 models but I thought they were all the same.
 

MrBlargMan

Well-Known Member
Joined
Jul 21, 2016
Posts
48
Reaction score
55
Location
Colorado
I currently do not have a fuel tank skid plate on my rig as the FX4 fuel tank skids are discontinued.
The skid that you just posted has peaked my curiosity, though. I will look into it further when I have some time.
 

MrBlargMan

Well-Known Member
Joined
Jul 21, 2016
Posts
48
Reaction score
55
Location
Colorado
I found this part explosion in the factory Ford workshop manual.
It looks like as long as you buy the straps, I don't really see a reason why the 2005-2006 skid wouldn't work.
The 2003-2004 fuel tank itself has the 2L1Z prefix and the 2005-2006 has the 5L1Z. Just like the skid plate, the rest of the part number is the same.
 

Attachments

  • 2006 Fuel Tank Explosion.jpg
    2006 Fuel Tank Explosion.jpg
    60.3 KB · Views: 20
OP
OP
OverlandExpy

OverlandExpy

Full Access Members
Joined
Dec 25, 2020
Posts
128
Reaction score
38
Location
Northern California
@MrBlargMan that's a great find! I'll keep my eye out for a metal skid or any of the fx4 skids on ebay and other sites. I've been spending a lot of money on my rig lately and am also trying to renovate a new house and attached workshop, so I'll save up for a bit while hoping one pops up somewhere. If not I think I'll probably just fabricate some myself after I get a little more practice in. I'm picking up the metal tubing tomorrow at the metal shop I'm working at on the side for my rock sliders I'm going to try to make. Will definitely be posting pictures here as I go along!

If anyone on these forums lives up in NorCal that needs some shop space and has some welding experience and can give me some pointers, PM me!
 
OP
OP
OverlandExpy

OverlandExpy

Full Access Members
Joined
Dec 25, 2020
Posts
128
Reaction score
38
Location
Northern California
@OverlandExpy - Looks mean! Let's see a photo with all 4 of them on there!
Really happy with how they turned out! Barely rubs at all at full lock, and thats only the lip of the front bumper. Im either going to trim it or remove it completely and fab up a metal one. Maybe when prices of steel come down a bit lol. I feel like I could even fit 37's on there! Although I'd be a bit worried about the CV's. Going to stick with these for awhile and see how she goes off roading before I do anything else major.

20210708-144334.jpg
 

Jb14

Full Access Members
Joined
Oct 1, 2012
Posts
281
Reaction score
64
Location
California
Looks good with my 35's I only had to do a small diagonal trim to the plastic lip can't even notice as it pretty much follows the arc of the fender and have zero rub
 
OP
OP
OverlandExpy

OverlandExpy

Full Access Members
Joined
Dec 25, 2020
Posts
128
Reaction score
38
Location
Northern California
@MrBlargMan Finally changed out every fluid in the truck and went to my local OHV park to test it out. Took it easy but had a blast!
20210801-092430.jpg

20210801-092437.jpg

I'm definitely going to need to trim my bumpers, I did a little bit already but at full deflection it was still rubbing. That while line on the bottom image is where I was thinking of making the cut. Metal is super expensive right now so I'm holding off on buying the materials to start fabricating the front/rear bumpers. Plus I haven't even had time to do much on the rock sliders I'm making besides cutting the square tubing to size, and making custom bumpers is going to be a lot bigger of a job.

Don't think she'll ever be a rock crawler but it was eating up the mud/sand/rough terrain there, even with open diffs. New gears will be super helpful, and I'm thinking of putting some detroit lockers in there while I'm at it. Also you can't beat switching it over into 2 high and ripping it around a dirt track. The place I went to has a couple great of dirt bike/rally tracks and going sideways around the corners was about as much fun as I've ever had in a car lol. I was pretty happy to find that the traction control (if there is any) wasn't getting in the way of the drifting. This was mainly just a test to make sure nothing would break right away on me after all the work I've done on it, and I was pretty happy it didn't! Planning on taking it out to some real trails as soon as I have a few days off!

I'm liking the tires so far, but I get a pretty bad wobble around 50-60 mph. Going to get the tires balanced on Friday, but I've read that most mud tires are gonna wobble a bit at high speeds pretty much no matter what. Other than that no complaints so far, they aren't wearing super quick or anything and seem to be a solid tire even though it's not a name brand. This is also my first set of M/T's though so take my word with a grain of salt lol.
 
Last edited:
OP
OP
OverlandExpy

OverlandExpy

Full Access Members
Joined
Dec 25, 2020
Posts
128
Reaction score
38
Location
Northern California
Alright boys and girls, this post is long over due. Had the rock sliders done for a little while now but I have tons of pictures from the whole process, and these forums don't really have an integrated album option. I'll post a few pictures and describe the process here, but the full album can be found here: https://ibb.co/album/8bK2gZ

For the main bar that sits under the rocker panels, I used 2x2 0.180 wall square tubing, and for the rest I used 1.5" OD 0.120 wall DOM steel. Used the tube bender to eyeball the initial bends and cut them to size. Hardest part was definitely making all the notching in the tubes that I used as supports between the square tubing and the round tubing, especially because I didn't have a tube notcher. Just used a cut off wheel, angle grinder, and a lot of back and forth & test fitting to make sure the cuts were right. Once I was happy with the fitment of everything, I welded it up then ground down any ugly welds (of which there were a few. lol.) and am now working on a way to attach them to the frame. Still on the fence about bolting it or welding it to the frame. Welding would definitely be stronger, but if they break or are damaged it would be a lot harder to remove so I could put on new ones. My biggest concern is the e-brake line on the driver's side. Its smack-dab in the middle of the frame, making it harder to place the standoffs than it is on the passenger side. Open to any suggestions as always!

Once they're attached, I'm planning on painting them with some black bedliner to give them some grip when they're acting as running boards.

20210821-145849.jpg
Starting out

20210822-174816.jpg
Test fitting and cutting out notches in supports

20210825-160847.jpg
Welded up, besides the endcaps. Ground down some of the big ugly welds on the one on the left.

20210829-140243.jpg
Welded up a quick little jig to hold the sliders at the right angle. Super happy with how it turned out. Angle of the slider matches the rocker panels almost perfectly. Going to leave an inch or two of space between the top of the round tubing and the bottom of the door once I decide how to mount them. Decided to go with an over-built approach. I want these to be able to support the entire weight of the truck, and if my back of the napkin math is correct, these should be more than up to the task. With only about 5 inches needed for the standoffs from the frame to the sliders, and the fact that I'm using the 2x2 for the standoffs, I should be able to get away with only 3 per side. May do 4, but I don't want it to take all day to cut off if they ever need to be replaced.
 
Last edited:
OP
OP
OverlandExpy

OverlandExpy

Full Access Members
Joined
Dec 25, 2020
Posts
128
Reaction score
38
Location
Northern California
Thanks!! Hope they stand up to the abuse I'll be throwing their way! Still mulling over the best way to attach them to the frame. Im thinking some 3/8 steel plate, something like 3x3 welded onto the frame, then weld the 2x2 square tubing onto that so they arent attached directly to frame and will spread out all the force being applied to them over a greater surface area. And hopefully the plate welded to the frame will give it some extra rigidity and make it less likely to buckle in that spot.
 

joethefordguy

Full Access Members
Joined
Apr 10, 2017
Posts
741
Reaction score
231
Location
Texas
I've lost track of what thread I'm on, so this may not make a lot of sense. Someone, somewhere, did ask me to post updates as the work progresses. My next upgrade would have been the headers, a lift, underbody armor including rock sliders, moving the spare and installing an aux fuel tank, and a throttle body.
the work is not progressing. I had it in the shop for some planned work which was necessary before I kept going on the upgrades, and less than a week after I got it back, the transmission died. it only had about 106,000 miles on it, but it died. The Fire Department must have abused the hell out of it. I supposed they pulled overloaded trailers or something. anyway, it died.
While they were working on it, they found the complete strut set was shot, and so was the rear axle. FML.
so, an unplanned 4500 dollars later.... it'll be a while before I do anything else.
but, while it was down for all of the above, the research continued. I've decided that fairly early in the process, whenever that might be (but after the headers), I'll be porting and polishing the heads, then flow matching them to the manifolds. I should be able to do that for about a grand or so. I should be able to keep the cost for that, the headers, and a custom tune specific for all of this under 2 grand.
so far, unfortunately, this is working out to be more talk than doing. I'm about 15 grand into this thing, including the original purchase price, and I've got about ten grand more to go.
maybe i should sell out and buy a prius. at least the tax payers will help me with that.
 
Top