radio relocation 1st gen

Disclaimer: Links on this page pointing to Amazon, eBay and other sites may include affiliate code. If you click them and make a purchase, we may earn a small commission.

OP
OP
W

workman8505

Full Access Members
Joined
Mar 17, 2012
Posts
176
Reaction score
1
Location
Knoxville, tn
It would probably be easier to mount it to the dash and make a shell around it. Would be easier to hook it up and put a cover over it than mount it to a shell and have to fumble around with it while trying to hook it up.

those are the points ive been looking at and fabbing mounts then shell

yea the only thing i have with that way is making sure there are no gaps between the display and the fiberglass.
but it does seem like the easiest way i will just need to put some body clipps or bolt it to the dash.
im glad there are people that are interested in this and that are being so helpful to bounce ideas off of.
 

rburch

Full Access Members
Joined
Jun 10, 2010
Posts
1,433
Reaction score
10
Location
Independence, Mo
You could build it as tight as you can and then wrap it in leather or vinyl to make it a tight fit.

If you dont like that idea the i would suggest that you wrap it around the back of the screen about an inch so you wont see past the screen and into the dash.
 
OP
OP
W

workman8505

Full Access Members
Joined
Mar 17, 2012
Posts
176
Reaction score
1
Location
Knoxville, tn
You could build it as tight as you can and then wrap it in leather or vinyl to make it a tight fit.

If you dont like that idea the i would suggest that you wrap it around the back of the screen about an inch so you wont see past the screen and into the dash.

i do like both oof those ideas man thanks for the ideas i am hoping to get some more work in this week if jobs are light if not tomorrow will be it for a while and ill prob only get sanding everything in tomorrow.
 

2000XLT2wdGreen

New Member
Joined
Jan 8, 2012
Posts
1
Reaction score
0
Location
Lousiana
I am working on something a little less exotic. I would just like to bypass the factory amp. I am trying to locate it based on your pictures but still can't figure out where it is. I have the radio and console trim plates removed but still can't see or feel anything. Do I need to start removing the dash?
 
OP
OP
W

workman8505

Full Access Members
Joined
Mar 17, 2012
Posts
176
Reaction score
1
Location
Knoxville, tn
Hows the progress?

:popcorn:

you can cheek up on the 19 inch here http://www.expeditionforum.com/showthread.php?t=15407

its been slow go cause of money and other problems like needing an alternator and battery now. i can get by i dug up my old alt and pulled the voltage regulator and got it going again the battery still has a little life but now my power steering is whining plenty of fluid the front bering is going out wow what next..... if business would pick up ill be getting things done but for now everything is on hold.
side note ill probably work on it a bit tomorrow get the rest of my side pieces off and track down the wiring for the factory amp for silverbackexpo he's having several problems with his. i'm trying to help out how ever i can. maybe it'll get me some good karma going and what not lol.
ha i just figured out who i was talking to here lol im tired maybe its time for sleep but thats whats going on. got you a new expy yet
 
Last edited:
OP
OP
W

workman8505

Full Access Members
Joined
Mar 17, 2012
Posts
176
Reaction score
1
Location
Knoxville, tn
wiring harness for amp detailed

ok heres the amp harness explained the best i can.

i went back and opened up the harness to try and show whats going on
this is where it splits from the main harness
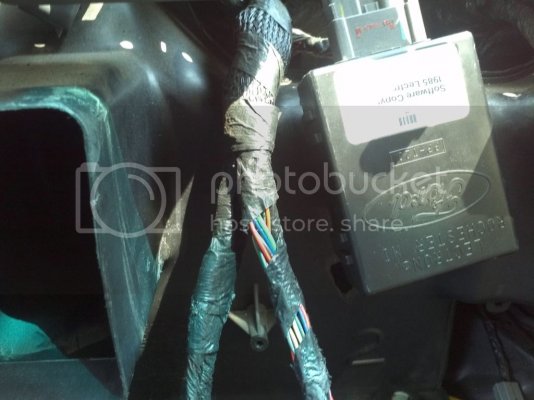
CA0D6E99-orig.jpg

here ive cut it open so you can see all the wires are split up in to groups
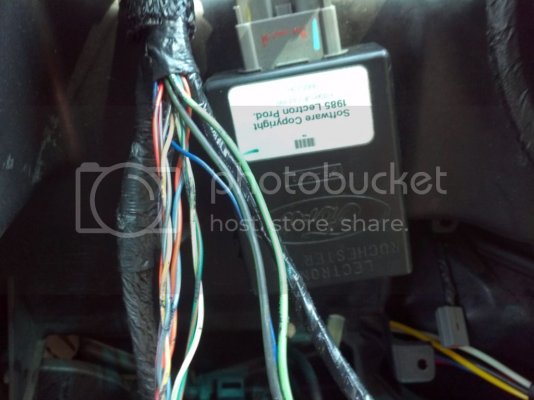
0BB003C2-orig.jpg

heres the break down of wire colors
these are the wires from the larger plug in the amp they supply power for the amp and go out to the speakers

1. blue is the amp trigger aka remote wire aka amp turn on
2. black with green stripe is ground for amp
3. green with violet stripe is +12 volts
4. black with violet stripe is right rear -
5. orange with red stripe is right rear +
6. dark green with orange stripe is right front -
7. white with green stripe is right front +
8. tan with yellow stripe is left rear -
9. gray with light blue stripe left rear +
10. light blue with white stripe is left front -
11. orange with green stripe is left front +

once you cut it open there will be another harness with in this is what comes from the radio
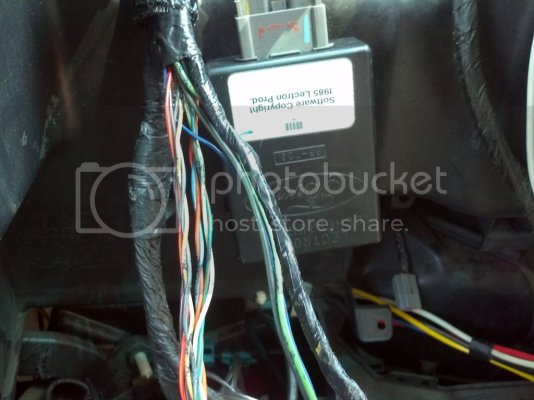
79C3D415.jpg

in this smaller harness here is the break down of wires in it

1. light blue is right rear -
2. purple with white stripe is right rear +
3. brown is right front -
4. white with dark red stripe is right front +
5. yellow is left rear -
6. light blue with black stripe is left rear +
7. white with orange stipe is left front -
8. green is left front +

well there it is to the best of my color blindness lol. if you guys see a wire that is not quite the color i said it is let me know and ill fix it like i said im not good with colors thats why i didnt do the colors the first time but there it is. and if you guys have any other questions let me know ill be happy to try and answer them.
 

Members online

Forum statistics

Threads
53,741
Posts
503,341
Members
47,408
Latest member
oelkersbrian
Top