Need To Replace My Fuel Tank

Disclaimer: Links on this page pointing to Amazon, eBay and other sites may include affiliate code. If you click them and make a purchase, we may earn a small commission.

OP
OP
Robert Wagner

Robert Wagner

Active Member
Joined
Apr 18, 2021
Posts
28
Reaction score
10
Location
Central Texas
If you can find out what it is really made of Permatex is very good at having something to fix this also contact J-B Weld all of these if you need to seal the cracks I would call the mfg.I have listed and explain what you are dealing with and maybe they can help
Noted and thanks!
 
OP
OP
Robert Wagner

Robert Wagner

Active Member
Joined
Apr 18, 2021
Posts
28
Reaction score
10
Location
Central Texas
The EVAP monitor won't run when the tank is above 3/4 full, or outside temp is below 40 degrees. It will just show monitor 'not ready'. It also takes 2 failures to trigger the CEL light. Most states allow for 1(or 2) monitors to be not ready, for state inspection. If you keep your tank between full and 3/4 the light will never come on. You just have to clear the code.
Sneaky but I like it! :)
 

Trainmaster

Old School Member
Joined
Jun 17, 2017
Posts
3,634
Reaction score
2,129
Location
Rockaway Beach, NY
The EVAP monitor won't run when the tank is above 3/4 full, or outside temp is below 40 degrees. It will just show monitor 'not ready'. It also takes 2 failures to trigger the CEL light. Most states allow for 1(or 2) monitors to be not ready, for state inspection. If you keep your tank between full and 3/4 the light will never come on. You just have to clear the code.
This may be the most valuable advice here. If you live in one of the socialist states with all sorts of emission testing it can be impossible to get a tired, rotted out old road-***** to pass the evap test. Took me years to learn what rjdelp is saying here, as it's not widely reported.
 

engineer1

Member
Joined
Apr 18, 2020
Posts
18
Reaction score
18
Location
Alabama
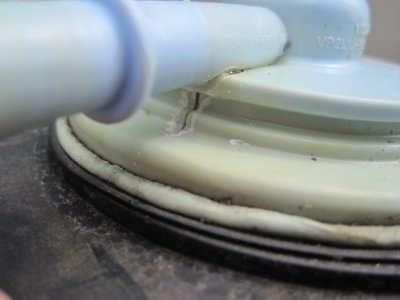
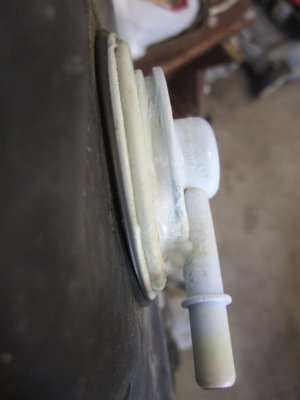
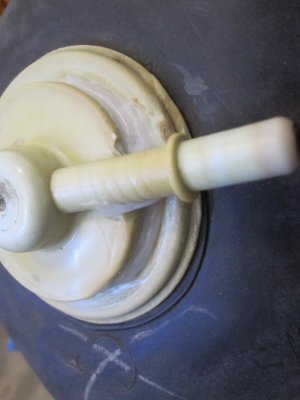
The included photos show one of the vent failures and the plastic welded repairs mentioned earlier. They are rock solid HDPE which is the same material as the original vents. I will be pressure testing the tank over the weekend and will post results, but fully expect to have a permanent repair to my fuel leak.IMG_1852.JPG IMG_1858.JPG IMG_1858.JPG

IMG_1860.JPG
 

engineer1

Member
Joined
Apr 18, 2020
Posts
18
Reaction score
18
Location
Alabama
SUCCESS! The welded areas all held pressure OK using the soap bubble detection method. I only tested at 2 psi because the vents both opened at about 1/2 psi. (I had a balloon on each vent to observe that they were working OK so I removed them & installed rubber caps) I figured 2 psi was 400% of what the vents would ever see, and I was unsure if excess pressure would do any harm to the internals.
 

Trainmaster

Old School Member
Joined
Jun 17, 2017
Posts
3,634
Reaction score
2,129
Location
Rockaway Beach, NY
Great job! What crappy materials. Truly defective stuff. I'll bet every one of them will fail that way given enough time. Lots of work pulling the tank and finding that crack.
 

engineer1

Member
Joined
Apr 18, 2020
Posts
18
Reaction score
18
Location
Alabama
Thanks, Trainmaster. Yeah - while researching I've found several other posts with this same problem, and they seem to fail in different ways. Hope this process helps someone else.
 

lateloads

New Member
Joined
Aug 3, 2024
Posts
2
Reaction score
1
Location
St. Louis Mo.
My 2000 Expedition 4.6L XLT 2WD isn't holding pressure (evap system is unhappy) as tiny cracks have formed in the 21 year old plastic tank. Not to the point where liquid gas finds a way out... only vapors.

Shop says I need to replace the tank but the tank is no longer made. Apparently my only option is to find a NOS one or roll the dice on a pull from a junk yard.

Has anyone found a source for a replacement tank?

Thanks!
I had my driveshaft drop from a blown u-joint which in turn hit the ground at 60 mph , and set the top of my tank on fire from a vent leak but luckily i cant afford more a quarter tank at a time so the flames just sat there and burned the vapor like a candle . Anyway i had immense trouble finding one without holes punched in them . Plenty to choose from but here in St. Louis , the junkyard are so lazy the take a hammer and a huge phillips and whack 2 -3 holes in the tank of every vehicle brought in to drain the gas before being put on the yard. And sell it to you anyway with the holes. I searched forever in 2 states with no luck . Then i hit the jackpot. Go to www.partshotlines.com and you will get a nice page with a find your parts now 4 step search box for you to enter year, make, model, then finally part. I did your vehicle and after u select part another search will ask 2 or 4wd and what suspension and PRESTO, up pops all salvage yard in the u.s. and canada that have your part with all their info and contact number , some have the option to order part right there from the site and some u might have to call but i ordered mine out of texas and it arrived a week later ( after i called to first verify their were no holes in tank ) and think i paid $170 with shipping included. Saved my ass and my 97 eddie . Good luck
 

vford

Member
Joined
Jul 22, 2020
Posts
14
Reaction score
2
Location
PA, USA
I think the issue with spot surface fixes of the cracks - it just makes new crack in other area and the problem repeats. I tried JB Weld and at first the cracks were on the top of the vent, but after fixing the top the new cracks appeared in usual location under the connecting tube. After fixing those new the second time - the OBD EVAC test completed in 30 miles trip. But later I have to disconnect the battery and noticed the EVAP test is taking a long time and sure enough I found new cracks in different spot with endoscope. I am thinking to model 3D sleeve over the valve, print it from transparent nylon and then glue it over the vent with structural adhesive (like 3M panel bond). It should solve the existing cracks and future ones that would not have any impact on the leaks. What a mess, lol

Maybe print it with PP filament and then just weld the bottom and around connector tube to seal it.
 
Last edited:

vford

Member
Joined
Jul 22, 2020
Posts
14
Reaction score
2
Location
PA, USA
Just some thoughts on vent repairs after inspecting used tank from salvage yard:
1. the tank material is HDPE
2. the vent quick connect tube male end has an inner tube insert to guide the vapor that looks transparent and flexible and probably is HDPE
3. the vent itself is most likely made from nylon as are most plastic quick connectors. HDPE is not suitable for quick connects, it is just too flexible and too soft.
4. the crack may appear on top (tiny cracks) or below quick connect tube (big one), but it also affects bottom of the connect tube. It is hard to see from side or above as you may not want to flip the tank over for safety reasons. So basically the lower crack is symmetrical U-shaped.

The fact, the vent itself most likely is not made from HDPE may explain why epoxy and other adhesives not designed for HDPE are working as "good enough" for most cases. But for plastic welding the nylon rod may be a better match. If you do not see the cracks on one of the vent or no cracks on the top yet - those could appear next as by fixing visible cracks on the cracked vent you will move the weak point to other vent as pressure will be restored. So as preventive care it may make sense to cover all vent surface with layer of 3M Scotch-Weld Structural Plastic Adhesive DP8010 or use DP8010 to cover the cracks and the rest of the vent surface if you do not want to weld plastic for safety reasons. The welding should be safe as fuel vapor will ignite with open flame or spark, welder temperature will not ignite the vapor.

 
Last edited:
Top