Updated: FIXED (?) New CALIPER, rotors and pads. Still HOT!!!

Disclaimer: Links on this page pointing to Amazon, eBay and other sites may include affiliate code. If you click them and make a purchase, we may earn a small commission.

Plati

Well-Known Member
Joined
May 4, 2016
Posts
2,782
Reaction score
1,364
Location
.
I'm far from a brake expert … but I agree with MrTrain. I always get a file and "clean up" the ends of the brake pads so they don't have any extra metal impeding smooth movement in & out as they wear. Also, its essential to take the caliper slide pins apart clean them up and make sure the caliper will slide smoothly. The only other issue could be a bad caliper piston … I guess.

The only grease I use is for caliper slide pins and I buy those little one application packets of high temp grease specifically for that purpose.

My trick is to use an infrared heat measuring gun on brakes after I work on them (and go for a drive using brakes hard). If all is healthy … temperatures will be the same left & right sides.
 
OP
OP
hawkman71

hawkman71

Full Access Members
Joined
Jun 25, 2018
Posts
139
Reaction score
9
Location
NC
Tested whether it was a hose or caliper. Drove it this morning, and immediately backed off the bleed screw. Fluid dribbled out. Took the caliper off, and applied brakes. Only one piston moved.

Got a new caliper, new rotor, and new pads. Replaced all but the bracket. The pins on the original were greased and moved in and out smoothly. On the new bracket, one of the two pins seemed to grate against metal and was not smooth.

While assembling, before applying any brake pressure, (i.e., before bleeding), I could spin the new rotor easily. However, once bled and tire in place, I could barely spin it.

Took it for a shirt, 3 Mile drive. Couldn't hear or feel anything. Brakes hard ONE time (after 0.5 miles ofmdriving) and immediately could smell the brakes.

Drove another mile and that wheel was hot as hell. Stumped and mad as that wheel is hot.

I did NOT file down the pad ends but felt they moved relatively easy. Will go back and do that next.

Could it have to do with using the original bracket with a new caliper?

I would've replaced the hose but the local part stores don't carry em in store.
 

TobyU

Full Access Members
Joined
Apr 5, 2013
Posts
2,479
Reaction score
869
Location
Ohio
I don't have time to go through and read all about the previous post but no, the brackets stuff wouldn't matter unless the pins are part of that bracket. The pins are all that's important. The pins have to be able to slide in and out easily with only hand pressure.
After you put a caliper back on you should be able to move it back and forth some on the pins especially before you have Pump It Up and push the Pistons out tight. After you have the brakes bled you should be able to use a lug wrench or sometimes even just your hand or put the wheel back on and you can turn the wheel by hand until someone presses the brake then of course it stops instantly. As soon as they let off the brake pedal it should again move. If it does not you will usually notice if you wait five or six seconds it will start moving. This is because a brake hose goes bad and sticks for a few seconds. A sticking brake hose will also cause a lot of heat buildup in rotor.

Check these things. I agree you shouldn't put John in your brake system but I have never purchased any junk from any of the normal Parts houses around town. O'Reilly Auto Parts, advance, AutoZone. Most all of them have lifetime warranty calipers and none of them ever been junk. I have never ordered any calipers or brake parts off of the internet. I know there are some higher-quality rotors available and some better prices but I just get what they have in stock at the stores and I have never had any problem with them. I am sure you can buy lots of junk on the internet like cheap pads Etc. There are lots of good deals on the internet but there is a lot of low quality junk too.
I just see no reason to buy anything other than what my local O'Reilly has in stock and I even use their house brand which has a lifetime warranty and works great for me. I don't even up it to their select house brand for the extra five or six dollars because I haven't noticed any real difference other than they put a nice pretty different colored self adhesive backing pad on there so you don't have to peel off the other ones and put them on yourself. I usually coat the back of the pads with the anti squeal stuff anyways.
 

mquick5

Full Access Members
Joined
Aug 27, 2018
Posts
589
Reaction score
152
Location
Buckeye Country
I heard not to use grease on the slide pin rubber boots. Because it will cause them to deteriorate and break down in time. They sell a type of silicone to use for this instead similar to silglide. I dont have any handy now but I know valvoline makes it.

Sent from my place using Tapatalk
 
Last edited:

TobyU

Full Access Members
Joined
Apr 5, 2013
Posts
2,479
Reaction score
869
Location
Ohio
It's not that important. You could spray the silicone on or buy special silicone grease or slap one of eight different kinds of grease on there and it wouldn't really matter.
I doubt the grease the new ones use or the remanufactured ones use is anything that special but they put so little in there it hardly even works out to get to the boot. The point is it really doesn't matter what type of Grease you use the key fact is getting them all cleaned up and making sure they slide smoothly and keeping the lubricated. The grease is more likely to get washed away and dry up well before the rubber can deteriorate or the rubber is going to dry rot anyways in three to four years regardless of what type of Grease you put on it for keep away from it.
 

16plati

Full Access Members
Joined
Mar 22, 2019
Posts
1,359
Reaction score
448
Location
VA
Tested whether it was a hose or caliper. Drove it this morning, and immediately backed off the bleed screw. Fluid dribbled out. Took the caliper off, and applied brakes. Only one piston moved.

Got a new caliper, new rotor, and new pads. Replaced all but the bracket. The pins on the original were greased and moved in and out smoothly. On the new bracket, one of the two pins seemed to grate against metal and was not smooth.

While assembling, before applying any brake pressure, (i.e., before bleeding), I could spin the new rotor easily. However, once bled and tire in place, I could barely spin it.

Took it for a shirt, 3 Mile drive. Couldn't hear or feel anything. Brakes hard ONE time (after 0.5 miles ofmdriving) and immediately could smell the brakes.

Drove another mile and that wheel was hot as hell. Stumped and mad as that wheel is hot.

I did NOT file down the pad ends but felt they moved relatively easy. Will go back and do that next.

Could it have to do with using the original bracket with a new caliper?

I would've replaced the hose but the local part stores don't carry em in store.
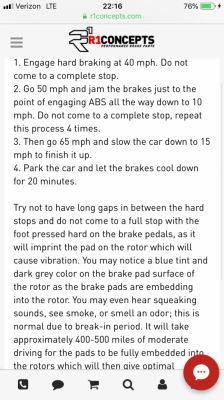
Yeah you should probably look into the break in procedure. Any reusable brake manufacturer has one. It usually involves something like this. You can’t just put them on, go drive and slam on the brakes and say they are good. It takes 400-500 miles to fully break them in

EF82E786-3703-424D-A832-1C1AB455A84C.png
 

TobyU

Full Access Members
Joined
Apr 5, 2013
Posts
2,479
Reaction score
869
Location
Ohio
While many do have a recommended break in or burnishing procedure...many also say you may just drive normally. Many say to avoid extreme or panic stops at first.
Not a big deal or even a deal at all on passenger vehicles.
If you were doing a very high performance system on a high performance car (which NONE of these are) you could take 50 of them and do the different break ins or not at all and you "might" be able to measure noticeable and patterned differences is stopping feet.
In reality, it makes little difference. It just makes some people feel better.

It kinda gets old when people in society who are not mechanics decide what is best or needed or absolutely necessary and state this as fact when they are way out of their wheelhouse or simply subscribing to what they have read on the internet or a high performance or repair website.
Many different professional companies have different procedures and recommendations. They can't ALL be right...But they CAN ALL work and get the job done.
There is not one right way most of the time.

When someone who is an engineer (usually the worst) or white collar professional or expensive or classic car enthusiast who has done a few repairs to cars starts telling people who have been doing it almost daily for decades....we just shake our heads.
 
OP
OP
hawkman71

hawkman71

Full Access Members
Joined
Jun 25, 2018
Posts
139
Reaction score
9
Location
NC
Guys, I guess I'll find out for real today but it seems that it's fixed. I'm a little tentative. Yesterday, I nearly lost all of my religion. I was so frustrated with yet another "simple" procedure becoming a long, drawn-out ordeal. I owe it folks like you who willingly take the time to give a quick reply - even in the middle of a beautiful Saturday (or Friday) to help me out.

I took a break from the vehicle and worked a little bit on my boat. I had to fix up a "simple procedure" that ended up being a long, drawn-out thing...

Got to the vehicle in a relaxed mood and got comfortable. Was determined to take the thing apart slowly and find out when the wheel freed up (if it did at all) and what was causing the binding. As soon as I got the wheel off, I was reminded of the fact that already, the wear on the rotors was not even, only on the outer half. That indicated something - but what? Something was not aligned. Was something bent?

With the wheel off, the new rotor was a little loose on the hub, with the only thing keeping it there was the caliper/pads, of course. I now, however, could spin the rub relatively easily with my hand. However, when I pressed the rotor flush against the hub and did so, it was tight!

Then I removed the caliper and repeated the procedure. This time, the rotor spun very, very freely while pressed against the hub (as it should). I was pretty sure that there was no wheel bearing issue. No sound or resistance at all.

Following advice given here (thanks, guys), I took the pads to the bench grinder. I figured that maybe they were a little tight in there. I just ground the paint off the end basically and rounded over the edges just a bit. Touched it up on the wire wheel, greased the ends, and put them back in.

As I tried to put the caliper back on, I found it stuck - there was something that was not letting the caliper past. Well, it turns out that the backsides of the pair of pads were not identical. There were two raised studs on the backside of the inside pad. Both of these studs were scuffed pretty bad. I realized that they were not lined up under the center of the caliper cylinders. In fact, I think they rested on the rim of the caliper cylinders. To me, that would affect the alignment of the pads as the caliper was tightened and brake pressure applied. The outside pad had no such 'studs'. Since there is nothing touching the backside of the pads (for the most part) on the outside, I switched the pads.

Reassembled and the wheel spun as I expected it to. It did not run on and on but if I gave it a good spin, it might turn 1.5 revolutions before stopping. Only a slight noise of pad against the rotor. I gave God a little thanks and dropped the vehicle back to the ground. Just then I realized I had not applied any brake pressure and then tested the spin.

Took it for a drive. As before, it seemed like nothing was wrong. We drove a couple of miles, came back, and found that the hub was cool to the touch. Jacked it up and it spun as before.

Fingers crossed. Thank you all very very much. I hope I'm not back updating this thread with any bad news. :)

A few photos:

A shot of the pads I replaced at Christmas. I should've known I had a problem by the uneven wear of the one pad.
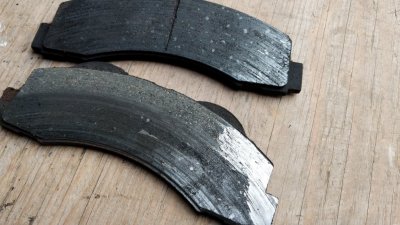
IMG_20181227_110125.jpg

These the new pads from yesterday (not the new ones from the previous week). This after a 4-mile test drive. Inner pad closest to you. (should note this is from the right front of the vehicle).
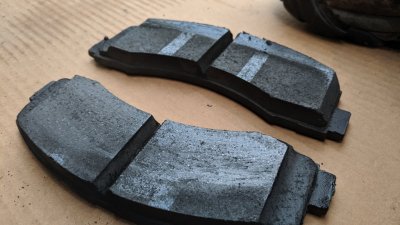
IMG_20190622_193845.jpg


The rotor after the same 4-mile test drive.
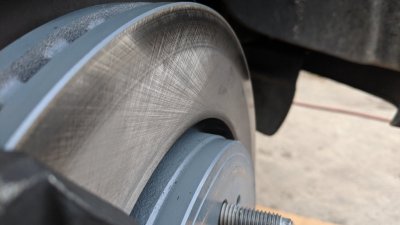
IMG_20190622_193347.jpg
 
Top