A/C Issue

Disclaimer: Links on this page pointing to Amazon, eBay and other sites may include affiliate code. If you click them and make a purchase, we may earn a small commission.

MaverikDS

Full Access Members
Joined
Jul 15, 2007
Posts
116
Reaction score
1
Location
Chico
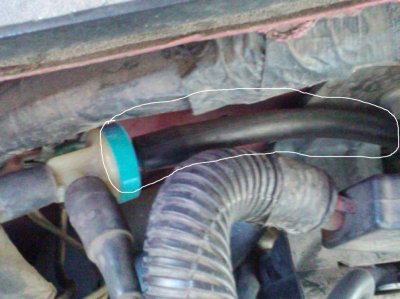
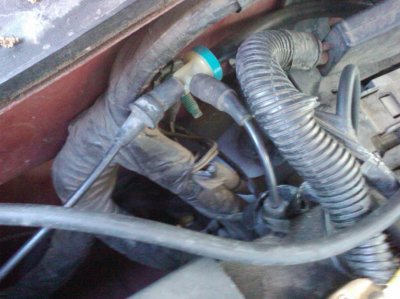
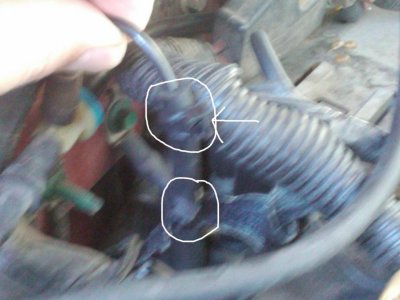
So I went to use my A/C today and on the front only air would blow through the front defrsot vents. I read the other posts and went through and checked the vacuum lines and T Valves and all seem to be in decent shape (no cracks or anything) but one of the rubber pieces looks a little spongy. The car sat from Monday-Friday and I tried to take it today and this happened. Any ideas on what could cause it other than the vacuum lines?
 

2000eb

Full Access Members
Joined
May 9, 2011
Posts
722
Reaction score
4
did you check the vacuum check valve? its on passenger side rear corner against firewall under hood. the lines can look good but thats a very common problem child. just cause it looks good doesnt mean anything its a ywo way valve take it off and blow through it it air should from through i believe two of the sides but not all three i think something like that im already forgetting
 

TheGuyWho

Full Access Members
Joined
Feb 9, 2011
Posts
264
Reaction score
1
Location
OC
Im gonna go ahead and piggy back on this thread…

I worked on my AC all day today, only to have it continue to do the same thing as was posted by the OP. I even replaced the condenser! I checked all the vacuum lines, and replaced a few fittings that looked questionable, but it still didn't fix the problem. Anyone have any ideas what to do next? FYI ive already emptied and filled the entire system twice! And yes its filled properly to the right pressures. It blows cold, just does that wierd thing under load, not WOT, just under load.

Sugestions?
 

TheGuyWho

Full Access Members
Joined
Feb 9, 2011
Posts
264
Reaction score
1
Location
OC
did you check the vacuum check valve? its on passenger side rear corner against firewall under hood. the lines can look good but thats a very common problem child. just cause it looks good doesnt mean anything its a ywo way valve take it off and blow through it it air should from through i believe two of the sides but not all three i think something like that im already forgetting

Im going to have to look into that.
 
OP
OP
M

MaverikDS

Full Access Members
Joined
Jul 15, 2007
Posts
116
Reaction score
1
Location
Chico
So I actually found two pieces of the vacuum line that were questionable. I replaced the spongy one and it still did not work. There was another cut hiding behind some other cables that I was also able to add a piece of new vacuum line to and now my A/C is working normaly again. Cost of repair was next to nothing also...less than $2.00 of vacuum line and my sanity for an hour.
 

2000eb

Full Access Members
Joined
May 9, 2011
Posts
722
Reaction score
4
can you take a pic of that line. the check valve was bad on mine so i replaced it with a new one and still nothing. my buddy works at a garage and he told me about it he said 90 percent of these things with ac issues that come into the shop are that check valve, so his boss keeps plenty on hand
 
OP
OP
M

MaverikDS

Full Access Members
Joined
Jul 15, 2007
Posts
116
Reaction score
1
Location
Chico
can you take a pic of that line. the check valve was bad on mine so i replaced it with a new one and still nothing. my buddy works at a garage and he told me about it he said 90 percent of these things with ac issues that come into the shop are that check valve, so his boss keeps plenty on hand

Yeah I will take one when I get a chance. My dad just borrowed the Expedition from me for a few days but I should be able to do that on Monday or Tuesday for you. My check valve did not need to be replaced I really just did the vacuum line only. On another thread there are these pictures.

http://fordexpeditionforum.com/showthread.php?t=1119&page=2

If you look at the first picture it is the plastic piece with a blue cap on it. I believe it has 3 fittings (might have 2 as I'm going from memory) and at least on my expy if you followed it you could find a few more of the junctions. I'm not a very mechanical person and this was really as easy as using a razor to cut the line off of the plastic split very carefully to not break it and then cutting the new vacuum line (picked up at kragen, 3ft for less than $2.00) the right length to replace the piece that had the leak in it. I also then did this for the other fix but the lines were a different size. They were slightly smaller so I also then added a zip tie to the top and bottom of the patch. Not OEM but I drove 300 miles after with no problems and cold air blowing through the main vents. Once I get pictures I will try to really highlight the areas that I fixed with some circles.
 
OP
OP
M

MaverikDS

Full Access Members
Joined
Jul 15, 2007
Posts
116
Reaction score
1
Location
Chico
Sorry this took me so long but here is what I did.

The first pic is the piece that I replaced all together. You can see where I circled and that is the new piece of vacuum line.

The second picture is the blue check valve (at least I think that is the check valve) and the different lines coming off of it. The line going to the right is the piece from the first picture. If you follow the line that goes down that is the second "patch" job that I did. That line was a slightly different size. Where it looks like something is over the line is actually the replacement part I cut into it. I cut out the weird looking part and then slid the smaller existing vacuum line into the one I purchased. It fit in very well and then I added a zip tie at both ends of the "patch" to really hold it in place.

The third picture is a bit blurry but I circled where the "patch" starts and then the arrow is pointing to the zip tie. The lower circle is the end of the "patch" and the other zip tie holding it on as well. The gap that I cut out is much smaller than what is there from the new line but it was just done so there was excess and the old line had a good amount of space to be in there to minimize the possiblity of an air leak.

It has been about a month now and although I have not had my car for most of the time while I have driven it I have had normal A/C operation. My dad was the one borrowing it from me and he also told me it has worked without a problem. Hope these help and again sorry about the delay in time it took me to get them up. If you want any other pictures go ahead and let me know and I will try to take them ASAP.
 

Attachments

  • Check valve.jpg
    Check valve.jpg
    90.9 KB · Views: 333
  • Check Valve 2.jpg
    Check Valve 2.jpg
    92.1 KB · Views: 4,888
  • Check Valve 3.jpg
    Check Valve 3.jpg
    86.7 KB · Views: 311

tarafied1

Active Member
Joined
Sep 10, 2011
Posts
40
Reaction score
2
Location
Western Kentucky
I had the same issue but found that the vacuum going into the EATC was 20inHG, same as engine vacuum. I found the actuator for the vents (near the steering column) and checked the vacuum at the line going into the actuator. It was only about 4inHG. I used my vacuum pump and it took at least 10inHG to open the actuator all the way.
SO I figure the EATC was bad. I found a link on a Mercury Marauder forum talking about how to replace the O-rings in the EATC. I replaced the O-rings and my AC now works like it is supposed to.
http://www.mercurymarauder.net/forums/showthread.php?t=36922&highlight=EATC&page=12

The T20 Torx Screws on the back of the EATC unit (mine was hex head bolts).
T20Trox.jpg

The solenoid connector (red connector in pic, mine was white)
SolenoidConnector.jpg

This pic shows screws that have to be removed to access the solenoids, mine were held in with tabs that had to be bent to remove the solinoids.
Screws.jpg

Tabs that have to be straightened to remove the plunger
TabsOpen.jpg

The plunger with original O ring
OldOring.jpg

Plunger with new O ring
NewORing.jpg
 
Last edited:
Top