03 5.4L (2 valve) head gasket replacement - parts list

Disclaimer: Links on this page pointing to Amazon, eBay and other sites may include affiliate code. If you click them and make a purchase, we may earn a small commission.

Eric M

Well-Known Member
Joined
Oct 13, 2020
Posts
93
Reaction score
11
Location
WA state
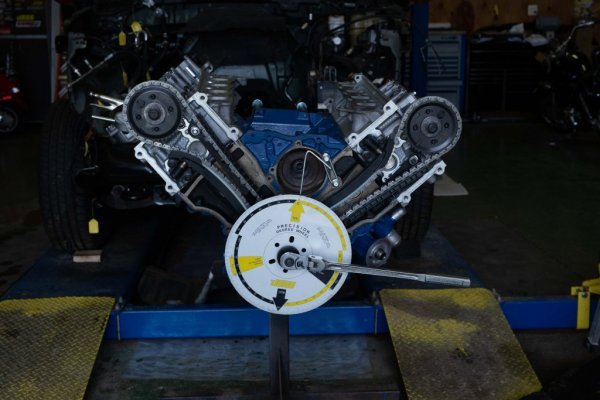
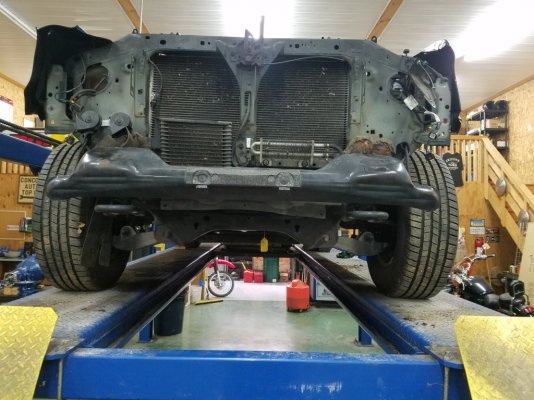
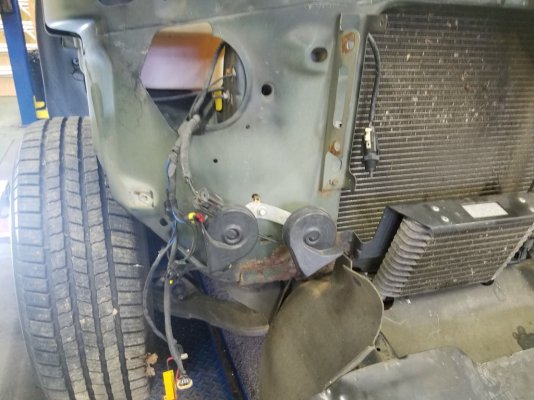
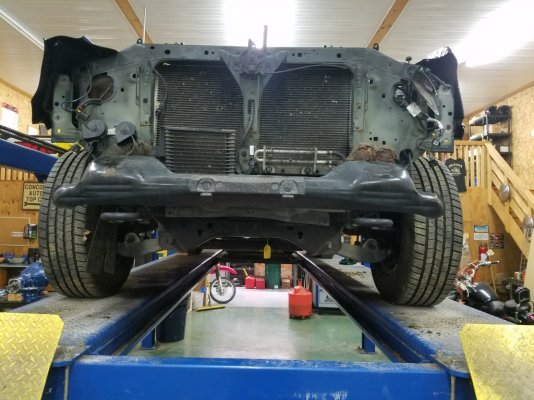
As descibed in this thread, my 03 blew a head gasket. As the motor has 185K, I figure I'll replace both gaskets at the same time. I plan on taking the long, slow route, by removing the radiator, etc. to more easily access the heads.

There are various parts that I'll replace while I have easy access to the motor and because I don't know if or when the previous owner replaced them. I'll paste the list below. If you can think of anything else I should include, please let me know. Thanks!

Parts (all gaskets excluded):

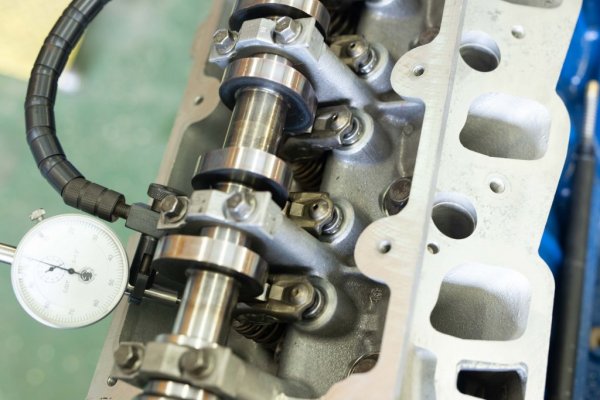
- cylinder heads ( resurface, valve job)

- cylinder head bolts

- spark plugs

- intake manifold

- exhaust manifolds (maybe)

- oil pump

- timing chain, gear, guides, tensioners

- water pump

- radiator hoses
 

Hamfisted

Full Access Members
Joined
Nov 20, 2012
Posts
2,894
Reaction score
1,796
Location
Ft Lauderdale
Crankshaft bolt, and iron ratcheting tensioners. The Fel Pro head gasket set comes with about every gasket you'll need. The two O-rings on the coolant pipe nipple under the intake manifold should be replaced as well. Exhaust studs in the heads and on the manifold flange should be changed. The cross over gaskets on the intake manifold should be changed. Just inspect the intake manifold gasket surfaces for delamination while you have it apart. If no delamination is found it is fine to re-use the intake manifold (especially if it's a OEM Motorcraft part...). For achieving proper torque to yield settings I use a black impact socket and mark it with a silver permanent marker at 90 degree points that I can easily see while tightening. The head bolts are initially torqued to 30 ft lbs, then run through two 90 degree turns to torque to yield. Oil the bolts before inserting. The heads are interchangeable, the only difference is the tensioners oil passages are not blocked off with plugs. So make sure you have them setup correctly before reinstalling. Like leave the CHT sensor in the driver's side head to mark it as the LH cylinder head. Or just make sure you check the rear of the head should have the oil passages blocked off with the threaded plugs, the fronts should be open for the tensioners.


Crankshaft TDC Locking Tool on Amazon

Heater Hose Quick Connect Fitting Removal Tool

HVAC Coolant Pipe O-rings at Rock Auto

Melling Timing Kit w/iron tensioners at Rock Auto

Fel Pro Exhaust Flange Stud & Nut Pack at Rock Auto

Exhaust Manifold Stud & Nut Kit at Rock Auto

Fel Pro Head Gasket Set at Rock Auto

Power Steering Pulley Removal/Installer Tool on Amazon

Ford 5.4 Crankshaft Pulley Bolt on Amazon

Fel Pro ES 71213 Intake Cross Over Gasket Kit at Rock Auto

Cylinder Head Temperature Sender at Rock Auto

Cylinder Head Bolt Set (One) at Amazon ( You need two sets )


.
 
Last edited:
As an Amazon Associate we earn from qualifying purchases.

Vincent Vega

Full Access Members
Joined
Jan 21, 2021
Posts
223
Reaction score
135
Location
Huntington Beach, CA
Like @Hamfisted suggested by linking the power steering pulley remover - get the tool and remove the pulley. Believe me, it will save time and frustration. Otherwise, the ps pump is a huge PIA to remove. Also, you will need fuel injector o-rings - 2 per cylinder. They are cheap. Need a front cover gasket and valve cover gaskets. Clean your throttle body while you have it removed. Consider replacing the heater hoses (a weak point on these), and other hoses while you have access. Would love to see photos and hear back from you about how it goes. Good luck.
 
OP
OP
E

Eric M

Well-Known Member
Joined
Oct 13, 2020
Posts
93
Reaction score
11
Location
WA state
Crankshaft bolt, and iron ratcheting tensioners. The Fel Pro head gasket set comes with about every gasket you'll need. The two O-rings on the coolant pipe nipple under the intake manifold should be replaced as well. Exhaust studs in the heads and on the manifold flange should be changed. The cross over gaskets on the intake manifold should be changed. Just inspect the intake manifold gasket surfaces for delamination while you have it apart. If no delamination is found it is fine to re-use the intake manifold (especially if it's a OEM Motorcraft part...). For achieving proper torque to yield settings I use a black impact socket and mark it with a silver permanent marker at 90 degree points that I can easily see while tightening. The head bolts are initially torqued to 30 ft lbs, then run through two 90 degree turns to torque to yield. Oil the bolts before inserting. The heads are interchangeable, the only difference is the tensioners oil passages are not blocked off with plugs. So make sure you have them setup correctly before reinstalling. Like leave the CHT sensor in the driver's side head to mark it as the LH cylinder head. Or just make sure you check the rear of the head should have the oil passages blocked off with the threaded plugs, the fronts should be open for the tensioners.


HVAC Coolant Pipe O-rings at Rock Auto

Melling Timing Kit w/iron tensioners at Rock Auto

Fel Pro Exhaust Flange Stud & Nut Pack at Rock Auto

Exhaust Manifold Stud & Nut Kit at Rock Auto

Fel Pro Head Gasket Set at Rock Auto

Power Steering Pulley Removal/Installer Tool on Amazon

Ford 5.4 Crankshaft Pulley Bolt on Amazon

Fel Pro ES 71213 Intake Cross Over Gasket Kit at Rock Auto

Cylinder Head Temperature Sender at Rock Auto

Cylinder Head Bolt Set (One) at Amazon ( You need two sets )


.
Awesome! This is is VERY helpful. Thanks!
 
As an Amazon Associate we earn from qualifying purchases.
OP
OP
E

Eric M

Well-Known Member
Joined
Oct 13, 2020
Posts
93
Reaction score
11
Location
WA state
Like @Hamfisted suggested by linking the power steering pulley remover - get the tool and remove the pulley. Believe me, it will save time and frustration. Otherwise, the ps pump is a huge PIA to remove. Also, you will need fuel injector o-rings - 2 per cylinder. They are cheap. Need a front cover gasket and valve cover gaskets. Clean your throttle body while you have it removed. Consider replacing the heater hoses (a weak point on these), and other hoses while you have access. Would love to see photos and hear back from you about how it goes. Good luck.
Thank you! These are good tips. I will share some photos and let you know how things go. I foresee a fairly long process here, as I work pretty slowly. I will start disassembly in the next couple of days.
 

BlackCoffee

Full Access Members
Joined
Mar 26, 2019
Posts
175
Reaction score
95
Location
SOMD
I would add the Harmonic Balancer. I did not replace mine on the last rebuild and it only lasted a year (250K miles total). The camshaft holding tools, for timing, are useful. I don't know what you have in your tool box for timing, but the timing tool is handy. If you want, you can get timing wheel from JEGS for $20 and innovative products long TDC tool to set timing. You can replace the oil pump with the front of the engine apart. Inspect your PS hoses. with the radiator and evaporator out, you have the best access you will ever have. Also, while you are there, if it hasn't been changed, the A/C clutch is pretty accessible. Finally, depending on the future you plan for this expedition, you are going to have a good look at the radiator support, it may be rusted out. It can be replaced with a little effort, I did mine, but don't be surprised if you see a lot of rust.
 
OP
OP
E

Eric M

Well-Known Member
Joined
Oct 13, 2020
Posts
93
Reaction score
11
Location
WA state
I would add the Harmonic Balancer. I did not replace mine on the last rebuild and it only lasted a year (250K miles total). The camshaft holding tools, for timing, are useful. I don't know what you have in your tool box for timing, but the timing tool is handy. If you want, you can get timing wheel from JEGS for $20 and innovative products long TDC tool to set timing. You can replace the oil pump with the front of the engine apart. Inspect your PS hoses. with the radiator and evaporator out, you have the best access you will ever have. Also, while you are there, if it hasn't been changed, the A/C clutch is pretty accessible. Finally, depending on the future you plan for this expedition, you are going to have a good look at the radiator support, it may be rusted out. It can be replaced with a little effort, I did mine, but don't be surprised if you see a lot of rust.
Many thanks for these suggestions. I think they will be worth the expense as I hope to keep the expedition for some years still.
 
OP
OP
E

Eric M

Well-Known Member
Joined
Oct 13, 2020
Posts
93
Reaction score
11
Location
WA state
I would add the Harmonic Balancer. I did not replace mine on the last rebuild and it only lasted a year (250K miles total). The camshaft holding tools, for timing, are useful. I don't know what you have in your tool box for timing, but the timing tool is handy. If you want, you can get timing wheel from JEGS for $20 and innovative products long TDC tool to set timing. You can replace the oil pump with the front of the engine apart. Inspect your PS hoses. with the radiator and evaporator out, you have the best access you will ever have. Also, while you are there, if it hasn't been changed, the A/C clutch is pretty accessible. Finally, depending on the future you plan for this expedition, you are going to have a good look at the radiator support, it may be rusted out. It can be replaced with a little effort, I did mine, but don't be surprised if you see a lot of rust.
A follow-up question, if that's alright:
Are these the two items you had in mind? Thanks.

- TDC tool

- Cam wheel
 
As an Amazon Associate we earn from qualifying purchases.

Vincent Vega

Full Access Members
Joined
Jan 21, 2021
Posts
223
Reaction score
135
Location
Huntington Beach, CA
@Eric M
I think these are the tools you were wondering about. Camshaft holding tool to keep the cams in place. Another tool for positioning the crankshaft at the right spot. Both are needed to set the timing chains properly. They cost a few bucks and you might only use them once, but I would not recommend doing the job without them. I used these exact tools and didn't waste time fighting cheap-tool problems or failed attempts at short-cuts, and my 5.4 fired up right up after I put it back together.

Camshaft holding tool
Crankshaft positioning tool
 
As an Amazon Associate we earn from qualifying purchases.
OP
OP
E

Eric M

Well-Known Member
Joined
Oct 13, 2020
Posts
93
Reaction score
11
Location
WA state
@Eric M
I think these are the tools you were wondering about. Camshaft holding tool to keep the cams in place. Another tool for positioning the crankshaft at the right spot. Both are needed to set the timing chains properly. They cost a few bucks and you might only use them once, but I would not recommend doing the job without them. I used these exact tools and didn't waste time fighting cheap-tool problems or failed attempts at short-cuts, and my 5.4 fired up right up after I put it back together.

Camshaft holding tool
Crankshaft positioning tool
Great! Thanks very much for recommending these. I will definitely get them. No sense in cutting corners on a job like this.
 
As an Amazon Associate we earn from qualifying purchases.

BlackCoffee

Full Access Members
Joined
Mar 26, 2019
Posts
175
Reaction score
95
Location
SOMD
Vicent Vega has the tools if you follow the shop manual. The crankshaft positioning tool uses a pin on the block and the crank key to position the crankshaft for TDC. The camshaft holding tool keeps the valves springs from driving camshaft rotation while you are timing. If all you plan on doing is this 5.4, get the Ford tools. If you plan on doing more engine rebuilds, the innovative TDC tool, timing wheel, and a dial micrometer are more universal and can be used on any engine. The Ford crankshaft tool will only work on the 4.6/5.4, the innovative tool and wheel can be used on many other engines, but requires a little more skill. Power Nation engine rebuilds and various YouTube videos show how to use a timing wheel.

I added the timing wheel setup
 

Attachments

  • Timing Setup-1.jpg
    Timing Setup-1.jpg
    114.5 KB · Views: 7
  • Timing Setup-1-2.jpg
    Timing Setup-1-2.jpg
    111.5 KB · Views: 7
Last edited:

BlackCoffee

Full Access Members
Joined
Mar 26, 2019
Posts
175
Reaction score
95
Location
SOMD
Just to show you see what I was referring to on my radiator support, I have included a few pictures.
 

Attachments

  • Radiator Support-1-2.jpg
    Radiator Support-1-2.jpg
    172.2 KB · Views: 15
  • Radiator Support-1.jpg
    Radiator Support-1.jpg
    143.8 KB · Views: 15
  • Oil Cooler-1.jpg
    Oil Cooler-1.jpg
    172.8 KB · Views: 13
OP
OP
E

Eric M

Well-Known Member
Joined
Oct 13, 2020
Posts
93
Reaction score
11
Location
WA state
Vicent Vega has the tools if you follow the shop manual. The crankshaft positioning tool uses a pin on the block and the crank key to position the crankshaft for TDC. The camshaft holding tool keeps the valves springs from driving camshaft rotation while you are timing. If all you plan on doing is this 5.4, get the Ford tools. If you plan on doing more engine rebuilds, the innovative TDC tool, timing wheel, and a dial micrometer are more universal and can be used on any engine. The Ford crankshaft tool will only work on the 4.6/5.4, the innovative tool and wheel can be used on many other engines, but requires a little more skill. Power Nation engine rebuilds and various YouTube videos show how to use a timing wheel.

I added the timing wheel setup
Thanks very much for explaining this. A neck injury has delayed my already slow progress. I hope to get the heads off in the next couple of days....
 
OP
OP
E

Eric M

Well-Known Member
Joined
Oct 13, 2020
Posts
93
Reaction score
11
Location
WA state
Camshaft holding tool
Amazon.com
I understand what this tool does, but I'm not sure if I will need just one or two of them. I'm guessing two as both camshafts will need to be immobilized at the same time, right? Thanks again.
 
As an Amazon Associate we earn from qualifying purchases.
OP
OP
E

Eric M

Well-Known Member
Joined
Oct 13, 2020
Posts
93
Reaction score
11
Location
WA state
I ordered this Melling timing set (Part Number: 5252-07536389) which included two new camshaft sprockets. These sprockets are clearly designed for a camshaft of much greater diameter than the ones in my vehicle, which is weird because this is definitely the right set for my 2003. Just wondering what the deal is with these sprockets....even though I can't say that I would even bother attempting to remove the current sprockets, which seem like they are on there for good.
 
OP
OP
E

Eric M

Well-Known Member
Joined
Oct 13, 2020
Posts
93
Reaction score
11
Location
WA state
I ordered this Melling timing set (Part Number: 5252-07536389) which included two new camshaft sprockets. These sprockets are clearly designed for a camshaft of much greater diameter than the ones in my vehicle, which is weird because this is definitely the right set for my 2003. Just wondering what the deal is with these sprockets....even though I can't say that I would even bother attempting to remove the current sprockets, which seem like they are on there for good.
Ok, I think I can answer my own question, after looking at some aftermarket camshafts. It appears that on aftermarket camshafts, the part of the camshaft where the sprocket is mounted is much wider than the original camshaft, which is why these sprockets that I bought look the way they do.
 

Mr_Neutron

Member
Joined
May 30, 2019
Posts
7
Reaction score
1
Location
Sunny San Diego, CA
I'm going to be the contrarian and say the power steering pump pulley remover is optional. The entire pump is held in place by only three bolts and it easily lays over to the side out of the way. Get a couple of bungee cords to hold the pump and reservoir to the side of the engine bay and bob's your uncle. Also, since the heads are coming off you won't need the camshaft holding tools if you time the motor before installing the rocker arms on reassembly. And if you are reusing the rocker arms inspect them VERY closely for roller and bearing wear.

For the timing part of it you'll find this YouTube video quite edifying: https://www.youtube.com/watch?v=4Va5CmtrMjo&t=2198s&ab_channel=FordTechMakuloco
 
Last edited:
OP
OP
E

Eric M

Well-Known Member
Joined
Oct 13, 2020
Posts
93
Reaction score
11
Location
WA state
I'm going to be the contrarian and say the power steering pump pulley remover is optional. The entire pump is held in place by only three bolts and it easily lays over to the side out of the way. Get a couple of bungee cords to hold the pump and reservoir to the side of the engine bay and bob's your uncle. Also, since the heads are coming off you won't need the camshaft holding tools if you time the motor before installing the rocker arms on reassembly. And if you are reusing the rocker arms inspect them VERY closely for roller and bearing wear.

For the timing part of it you'll find this YouTube video quite edifying: https://www.youtube.com/watch?v=4Va5CmtrMjo&t=2198s&ab_channel=FordTechMakuloco
Funny you should mention this. I went ahead and used the puller. This particular pulley was very, very stubborn. The adapter lug got stuck in the pulley during attempted removal of the pulley and the main removal shaft on the tool got bent. I ended up having to remove the pump and hose, take it to a vice and used a stud extractor to remove the seized adapter lug, lol.
 
Top